Table of Contents CONFIGURING CASH REGISTER EXPRESS 1 REGISTERING CASH REGISTER EXPRESS 1 10 STEPS TO GETTING STARTED 2 STEP 1 - PLUG IN THE EQUIPMENT STEP 2 - INSTALL AND START CASH REGISTER EXPRESS STEP 3 - ADD YOUR EMPLOYEES INTO THE SYSTEM STEP 4 - CONFIGURE A FEW SETUP OPTIONS STEP 5 - CREATE YOUR INVENTORY ITEMS STEP 6 – CONFIGURE YOUR INVENTORY AND FUNCTION BUTTONS STEP 7 - LOGIN TO THE SYSTEM STEP 8 - RING IN SOME ITEMS STEP 9 – A FEW BASIC EVERY DAY FUNCTIONS STEP 10 - CASH – OR CREDIT – OUT
INSTALLING THE TOUCH SCREEN SCANNER SCALES PINPADS WEIGHT AND DELI SCALES 23 24 25 26 CONFIGURING CASH REGISTER EXPRESS 27 CHANGING THE ADMINISTRATOR PASSWORD & ADMINISTRATOR SWIPE CARD TAX RATES CONFIGURE YOUR RECEIPT PERSONALIZE YOUR RECEIPT PERSONALIZE COLORS AND PICTURES CREDIT CARD PROCESSING ENCRYPTION KEY SETUP CHECK PROCESSING CONFIGURING MULTIPLE STATIONS PRINTING BAR CODES QUICKBOOKS SPEED TIPS FOR RETAIL STORES 27 28 29 30 31 32 33 35 37 39 40 41 COMMON RETAIL FUNCTIONS 42 SELECT A CUSTOM
CUSTOMER LOYALTY 54 YOUR INVENTORY 59 INVENTORY MAINTENANCE – ADDING AND MODIFYING ITEMS SALE AND SPECIAL PRICING CATEGORIES AND DEPARTMENTS INVENTORY TRACK EXPRESS MASS TRANSFER & RETURNED ITEMS CHOICE ITEMS COUPON ITEMS SETTING UP THE RECIPE FEATURE SETTING UP RETAIL ITEMS WITH AND WITHOUT BARCODES KIT ITEMS STYLES MATRIX 59 60 61 62 63 64 65 68 72 73 76 TRACKING YOUR EMPLOYEES 79 EMPLOYEE MAINTENANCE – ADDING & MODIFYING EMPLOYEES EMPLOYEE SECURITY AND EXCEPTIONS TRACKING TOP FIVE EMPLOYEE PERMIS
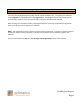
Configuring Cash Register Express Registering Cash Register Express Your copy of Cash Register Express (CRE) must be registered before use. To register your software, choose Register from the File menu at the Login Screen. Cash Register Express will prompt you for your activation number; enter the serial number located on the side of your CRE box. After entering your activation number, Cash Register Express will access the pcAmerica registration server over the internet to register your software.
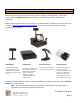
10 Steps to Getting Started Step 1 - Plug in the Equipment The first step of setting up your point of sale system is plugging in the equipment. Some of the devices require hardware drivers which is what your computer uses to talk to each piece of equipment. Step by step instructions on how to plug in your new POS hardware, peripherals and install drivers are located at: http://faq.pcAmerica.com/hardware or are contained on the installation CD that accompanied your system.
10 Steps to Getting Started Step 2 - Install and Start Cash Register Express Below are instructions on installing Cash Register Express and starting it for the first time. You must be logged onto your computer as an Administrator with full access rights in order to properly install Cash Register Express. If you have multiple stations within your store, it is very important that you install the server first! We also recommend you read the Configure Multiple Stations section later in this manual.
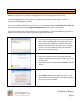
10 Steps to Getting Started Step 2 – Install and Start Cash Register Express 5. Cash Register Express will prompt you to select your industry type, select A Retail Store. Otherwise, choose A Corporate Office for a Chain of Stores or Restaurants ONLY IF this computer is an office computer in your corporate office (not an office computer in a retail store). 6. The next screen in the wizard will be the Database Selection tab. Select Configure This Computer to start a NEW database.
10 Steps to Getting Started Step 2 – Install and Start Cash Register Express 8. To setup a Store Server you will need to choose the appropriate Store ID by highlighting it. In addition, you need to select a Station. For connecting a Station to a Store Server please see the Configure Multiple Stations section later in this manual. Note: Every station must have a unique number. 9. After you have configured your system select either Begin or Exit and restart the program. 10.
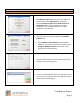
Steps to Getting Started Step 3 - Add Your Employees into the System Employees are configured within the Employee Maintenance screen of Cash Register Express. Cashiers and servers must be added into the system before they can log in and ring up sales. Other types of employees can be added and their hours tracked within CRE, even if their jobs don’t require them to use the POS.
10 Steps to Getting Started Step 4 - Configure a Few Setup Options Cash Register Express has hundreds of built-in features that can be turned on or off. The Setup Screen includes many of these options, organizing them into multiple tabs. You can access the Setup Screen from the Login Screen by selecting the File menu and Setup Screen – you must use the administrator password to enter this screen (default: admin).
10 Steps to Getting Started Step 5 - Create Your Inventory Items Your goods are separated into separate groups called Departments. A few examples of departments are Sweaters, Pants, and Fruits. Departments are used to organize your inventory items on screen as well as on reports. After your departments are created, you create items inside of each of your departments.
10 Steps to Getting Started Step 5 – Create Your Inventory Items To add a new item, select the Add Item button on the bottom of the Inventory Maintenance screen. The required information is on the top one-third of the screen: The Department this item will be inside of (ex: SWEATERS). A unique Item Number (ex: SW1001, or the barcode of the item). A Description, which will print on the receipts (ex: short sleeve v-neck). Your Cost, which is the price you pay. The Price you charge the customer.
10 Steps to Getting Started Step 6 – Configure Your Inventory and Function Buttons The invoice screen, where sales are ring up is a highly customizable screen. By default, inventory items are displayed in the order you add them. The buttons are added to the screen using a default color.
10 Steps to Getting Started Step 7 - Login to the System Cashiers must login to Cash Register Express before they can ring up customers or enter orders. The Login Screen prompts cashiers for a user name and password, or alternatively the cashier can swipe their card to gain access. 1. To log into CRE, simply enter your ID and password (the default is “01” and “admin”), enter the employees id or swipe the secure login card you previously configured in the Employee Maintenance screen from Step 3. 2.
10 Steps to Getting Started Step 8 - Ring in Some Items Ringing up an item is easy. Simply select the TS Lookup button then select the department the item is in (examples: sweaters, T-shirt, cigars, equipment, etc). While viewing the inventory for a specific department you can then select the items you would like to add to the invoice. You can also scan the barcode of the item with the barcode scanner (if one has been purchased), the item will then be added to the invoice grid automatically.
10 Steps to Getting Started Step 8 – Ring in Some Items If the item is not listed on the touchscreen and it does not have a barcode to scan, select the Search button. This option lets you search the entire inventory for the item. At the search screen find the item in your inventory using the many features of filtering inventory described below: On the right of the screen you can select the item type to filter the displayed inventory by.
10 Steps to Getting Started Step 9 – A Few Basic Every Day Functions You can access additional functions by selecting the tabs on the bottom of the invoice screen. Below is an explanation of each of these buttons. Note: These buttons can be hidden from the touchscreen by selecting Display Setup from the Setup section of the Manager/Options screen. The Toolbar option is checked it will be displayed. F1 – Help a shortcut to the Help section. F2 – Inventory a shortcut to the Inventory Maintenance screen.
10 Steps to Getting Started Step 10 - Cash – or Credit – Out the Transaction Step 10 is the most important part of the transaction – accepting payment (money) for the goods/services that your establishment offers. The three most common forms of payment in most retail stores are cash, credit/debit cards and gift cards. To pay for a transaction, select the appropriate button (PAY). This will bring open the amounttendered screen.
Computer Essentials Overview and System Security On the surface, Cash Register Express is a very simple to use point of sale system. Cashiers can ring up customers quickly and accurately. Behind the scenes, however, your Cash Register Express retail point of sale system consists of multiple components, functioning together, all running on the Microsoft Windows operating system. In most cases your computers are connected to the Internet for e-mail, credit card processing and a variety of other uses.
Computer Essentials Backing Up Your Database Your inventory, customer records and entire sales history is stored inside of your database. It is highly recommended you backup your data on a daily basis in order to avoid minimal loss of data due to unforeseen circumstances. It is uncommon to lose data, however the loss of a establishments database can be catastrophic for the business. It is YOUR RESPONSIBILITY to backup your database on a daily basis.
Hardware Setup Configuring a Receipt Printer It is necessary to add and configure the receipt printers you are using inside of Cash Register Express. CRE has a function for you to install and configure your printer easily. Step by step instructions of how to plug in your new POS hardware & peripherals and driver installation for your hardware are located at: http://faq.pcAmerica.com/hardware These instructions are also contained on the installation CD that accompanied your system.
Hardware Setup Installing a Bar Code Printer It is necessary to add and configure the Bar Code printer you are using inside of Cash Register Express. 1. Some of the supported label printers only require that a Generic / Text only driver is installed, which is a standard Windows driver. NOTE: Not all label printers are installed like this. Depending on which label printer you have purchased your installation process may differ. 2. Go to the Options Screen then, (4) Setup – (L) Friendly Printer Setup.
Hardware Setup Pole Display Pole displays face the customer and display the items you are selling as you add them to the invoice. Other information such as amount tendered, change, the current date and time as well as discounts will appear on the pole display at the proper time. 1. Select the Manager or Options button. 2. Enter the administrator password (default: admin) where applicable. 3.
Hardware Setup Credit Card Reader & Bar Code Scanner Credit card readers and bar code readers differ greatly but have two things in common. The first is they are both used to read data (either a magnetic card such as a credit card, or a bar code). The second is they enter the information into the computer like a really fast typist – meaning when the barcodes are scanned or the card is swiped the information associated with them is entered into the computer instantly! Hooking up both devices is fairly easy.
Hardware Setup Configuring a Cash Drawer 1. The majority of cash drawers plug into the back of the receipt printer. To install a Cash Drawer, first make sure the cable that comes with your cash drawer is securely plugged in to both the cash drawer and the receipt printer. A cash drawer cable looks similar to a phone cable. There is often writing on the cable that says “TO PRINTER” and “TO CASH DRAWER” to ensure it is connected correctly. 2.
Hardware Setup Installing the Touch Screen Most touch screen monitors have three plugs: The first is a standard power cable. The second cable is a USB cable which must be plugged into one of the USB ports on the back of your computer. The third cable will plug either into the VGA port or the DVI port depending on your computer. After connecting the touch screen, insert the CD that came with the Touch Screen monitor which will start the Setup Wizard, or navigate to: http://faq.pcamerica.
Hardware Setup Scanner Scales In addition to many different scale types, Cash Register Express also supports Scanner Scales. Connect the port on the scale to an open serial port on your computer. You will also need to scan the program bar code. Two options must be configured inside of the Setup Screen in order to use your scale. First select your scale model from the Primary Scale Type dropdown.
Hardware Setup PinPads PinPads can be connected to a COM (serial) port on your computer, to a USB port on your computer or via an Ethernet connection through the network. The PinPad must then be configured inside of the Setup Screen. First, select your model from the PinPad Type dropdown. Second, select the method that the pinpad is connected to the computer under PinPad Connection: If the device is connected via Serial select the COM port that it is connected to from the PinPad Port list.
Hardware Setup Weight and Deli Scales Cash Register Express supports specific scales that are directly connected to the computer (where items are weighed at the register) and can also work with deli scales, where the items are weighed at the deli or other food preparation station, and a bar code label is printed and affixed to the item. Two options must be configured inside of the Setup Screen in order to use your scale. First select your scale model from the Primary Scale Type dropdown.
Configuring Cash Register Express Changing the Administrator Password & Administrator Swipe Card There are two types of passwords inside of Cash Register Express. Employee passwords are passwords that are assigned to an individual employee. A description of the use and configuration of the employee password is discussed in the Tracking your Employees section. The administrator password is the “super password” of the system which can be used to access any function inside of the software.
Configuring Cash Register Express Tax Rates The Set Tax Rate screen is accessed from the Setup tab in the Options Screen. Cash Register Express has three tax rates. Most stores will only use the first tax rate, however some stores may charge different tax rates for different items. Change the percentage of the tax1 rate to match your local tax rate. Be sure to select Update to save your changes.
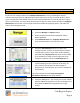
Configuring Cash Register Express Configure Your Receipt The receipt you give to your customers can be more than a simple listing of items; it can be an advertising piece that will encourage your customers to come back to your store. Receipts are configured in the Receipt and Company Info tabs of the Setup Screen. Below are some of the most commonly used receipt options.
Configuring Restaurant Pro Express Personalize Your Receipt Printing Logos on the top of your receipt can help to ensure brand recognition for your company. To enable your receipt printer to print your logo at the top, please follow these steps: 1. Select the Manager or Options button. 2. Enter the administrator password (default: admin) where applicable. 3. Select Setup then, Friendly Printer Setup. Check Print Logo on receipts at this station. 4. 5. 6.
Configuring Cash Register Express Personalize Colors and Pictures Many retail locations have a color theme that is consistent throughout your store. Cash Register Express can be configured to match your stores theme. The colors of both the login screen and invoice screen are customizable. A picture of your choice can also be placed on the login screen. The colors and pictures can be configured within the Display Setup screen that can be accessed from the Setup tab of the Setup Screen.
Configuring Cash Register Express Credit Card Processing 1. Select the Manager or Options button. Enter the administrator password (default: admin) where applicable. Go to Setup then Setup Screen. 2. Inside of the Payment Processing tab, (with Credit highlighted) select an option under the Payment processor selection. Some of the choices may require a merchant number as well as a username, password and gateway URL. 3. Select the Update button to save your changes.
Configuring Cash Register Express Encryption Key Setup Cash Register Express requires a unique encryption key to be setup for each computer. This key is used to store sensitive credit card information safely. Because of security compliance regulations, an encryption key must be unique per store. When you start the program without a key you will see the following prompt: ***Important*** - All customers not using “Express Manual” processing will be required to setup a key.
Configuring Cash Register Express Encryption Key Setup 1. When you select Yes to the above prompt, you must enter the administrator password for the store. 2. You must then enter a password. The password should be secure, unique, and stored in a safe place. 3. If the user ever wants to change the encryption key, then they can do so via the File menu on the login screen. The user may not change the encryption key when there are credit cards in the database.
Configuring Cash Register Express Check Processing Many retail locations now accept checks as a form of payment. Cash Register Express has a convenient feature that enables your store to process checks. 1. From the Login Screen, select the File Menu, then Setup Screen and type in the Administrator password. 2. Inside of the Payment Processing tab, (with Check highlighted) select an option under the Payment processor selection.
Configuring Cash Register Express Check Processing If a customer is paying with a check, select the check button from the invoice screen or the amount tendered screen. The Process Check screen will appear and ask the cashier to enter the check number as it appears on the check. Select Enter. (Depending on which verification items you chose earlier CRE will prompt you for other information.) Note: It is important to accurately record the check number for reporting purposes.
Configuring Cash Register Express Configuring Multiple Stations It is fairly easy to configure multiple stations in Cash Register Express. Before configuring CRE, ensure your Windows computer network is properly installed. If you need over-the-phone help to assess and configure a computer network, please contact your sales representative. If your network is properly configured, please follow the steps below.
Configuring Cash Register Express Configuring Multiple Stations 4. 5. Select Standalone or Corporate Office Computer under This computer is a….. Under Local Database select Change Local Database Info. 6. The information here will be copied directly from the server (i.e. the Server Name will be set as the name of the server computer holding the database). To get this information off the server at the login screen go to File – Database Maintenance and finally View Database Settings. 7. 8.
Configuring Cash Register Express Printing Bar Codes Cash Register Express has the capabilities to print bar code labels. You must be registered to use this feature, for more information please contact your pcAmerica sales representative. You must also have your inventory added and a Bar Code printer installed. From the Administrative section of the Manager/Options screen select Barcode Express Note: You can also access the Print Barcodes screen through the Inventory Maintenance screen.
Configuring Cash Register Express QuickBooks 1. 2. Select the QuickBooks Sales Pass option from the View Options screen. Make sure QuickBooks is running and minimized when setting up the interface. 3. Select the Configuration button in the General Sales tab. 4. In the Company File field select Load and search for your company file you created with QuickBooks. Under Transactions enter the information according to how you want everything to be exported into QuickBooks.
Configuring Cash Register Express Speed Tips for Retail Stores Retail Stores increase throughput, customer satisfaction and overall profits by streamlining their operations to be as efficient as possible. Reducing transaction time by a few seconds can have substantial results. Cash Register Express is designed to provide the fastest checkout possible. Below are a few tips on how to speed up the check out and payment of every customer. Swipe-and-go credit card processing.
Common Retail Functions Select a Customer Selecting a Customer for the Invoice Customer tracking is a very valuable function of Cash Register Express. The Tracking Your Customers section of this manual (and the built-in F1 Help Section) describes how to add and modify customers and loyalty plans. To select the customer for an invoice, follow these steps: Select the Find button on the invoice screen to bring up the Select Customer screen.
Common Retail Functions Delete, Discount, Quan Change and Price Change Retail stores often need to modify an order for a variety of different reasons. CRE provides delete, quantity change, price change and discount functions that are logged upon their use. In addition, the Up and Down arrow keys allow for easy access to any item on the invoice. An item delete, price change, and discount are all permission based functions that can be set to be accessible for managers only.
Common Retail Functions Purchase Orders The Purchase Order screen allows you to create and update purchase orders. To access this screen, select Purchase Orders from the Administrative menu in the Options Screen. Note: When you login to the Purchase Order screen your open Purchase Orders will be displayed The main screen, displays all open purchase orders: Feature PO # Date Ref # Vendor # Due Date Status Total Cost Order by Destination Store ID Description This is the purchase order number.
Common Retail Functions Creating a Purchase Order To create a Purchase Order go to the Options Screen and select the Purchase Order tab in the Administrative menu then select Add. 1. Select the type of request you wish to perform (Standard Purchase Order or Return to Vendor). 2. Select a vendor and a Due Date. All the other fields are optional. 3. Pick a store destination and an order by selection. 4. Select the Add Items tab at the top of the page. 5. Select the appropriate vendor.
Common Retail Functions Receiving Purchase Orders To receive a purchase order, enter the Purchase Order screen through the Administrative menu in the Options Screen. 1. Select the Purchase Order you would like to receive by double clicking to the left of the PO #. 2. The General Info screen will appear, displaying the PO # in black bold letters. 3. On the bottom of the screen are some receiving options tabs, along with a Receiving Screen button on the right hand side. 4.
Common Retail Functions Back Orders This screen displays either the items that are currently on backorder for a selected customer or the customers for whom a particular item is on backorder. The grid will display the date the backorder was placed, customer number, item number, item name, the quantity placed on backorder for the customer, the current quantity in stock, amount paid, whether or not the backorder was prepaid, and the invoice number.
Common Retail Functions Void an Invoice/Pullback an Invoice Checks can be voided before they are paid for and closed out. They can also be voided AFTER being paid for as long as it is within the same day by pulling back the check. To void a check before it has been paid simply select the Void Invoice selection in the Invoice Menu. This permission based function will save the invoice as a voided invoice with the next invoice number in sequence.
Common Retail Functions Sell and Redeem Gift Cards and Stored Value Cards Gift cards and stored value cards are tracked inside of Cash Register Express with no transaction fees. They can be sold for any value. In order to sell a gift card select the Sell Gift Card feature in the Invoice menu. Swipe the new card and enter the dollar amount you wish to sell the gift card for. A gift card does not become active until the transaction is fully paid for and completed.
Common Retail Functions Clocking Out and Closing Out a Day There are two steps to closing out a day in at a store. First, every employee should Clock Out of Cash Register Express. Employees can clock out by selecting the clock out button on the Login Screen. A Shift Report will print out for the cashier providing it is setup in the Job Code Setup screen. After each employee is clocked out, the manager of the store should run the End of Day function within Cash Register Express.
Tracking Your Customers Customer Maintenance Screen The Customer Maintenance screen is used to add and update your customers. One customer is displayed at a time. Detailed information is stored in the tabs across the top of the screen. This screen is fully touch screen compatible, meaning you can double select any field (or select the field and then the keyboard button) to bring up an on screen keyboard. Each customer within Cash Register Express must have a unique customer number.
Tracking Your Customers Adding and Modifying Customers Adding customers in Cash Register Express is easy. Use the Customer Maintenance screen to add your customers; this screen can be accessed in the Administrative tab of the Options Screen. 1. Inside of the Customer Maintenance screen, select the Add button on the bottom of the screen. This will set the screen to add mode, during which CRE is waiting for you to enter the information for the new customer. 2.
Tracking Your Customers Accounts Receivable and Customer Loyalty Accounts Receivable Cash Register Express gives you the ability to open accounts for your customer, charge on account and send statements out at a later point in time. These features, as well as the ability to make payments and credit balance are part of the built-in Accounts Receivable system.
Tracking Your Customers Customer Loyalty Customer Loyalty is great way to get repeat customers and increase sales. By offering your customer incentives to shop in your store, they will have a more enjoyable and rewarding shopping experience. This guide will focus on setting up a loyalty plan that will give a free gift card after 10 points. Customer Loyalty in CRE is used in conjunction with the Customer Maintenance screen and Bonus Points.
Tracking Your Customers Configuring Loyalty Incentives 1. Select the Manager or Options button. 2. 3. Enter the administrator password (default: admin) where applicable. Select Setup then Customer Loyalty. 4. Select Loyalty Incentive. 5. Select Add in the bottom left of the screen. 6. Enter a Description. 7. Select the type of Incentive (we will focus on Points Rewarded which means after a certain amount of points are achieved, the bonus will be rewarded). 8.
Tracking Your Customers Configuring Loyalty Plans 1. Select the Manager or Options button. 2. 3. Enter the administrator password (default: admin) where applicable. Select Setup then Customer Loyalty. 4. Select Loyalty Plans. 5. 6. 7. Select Add. Enter a Description for the plan. Check Accumulate Points (This will mean that bonus points will add up over time instead of being reset after each sale). 8. Select Add Incentive. 9. Select the inventive you want to add to this plan.
Tracking Your Customers Adding the Loyalty Plan to a Customer 1. Select the Manager or Options button. 2. Enter the administrator password (default: admin) where applicable. Select Administrative then Customer Maintenance. 3. 4. 5. 6. 7. Select the customer you want to add this plan to. Select the big blue Loyalty Plan: None Box. Select the appropriate loyalty plan from the list. Select Update in Customer Maintenance to save changes to the customer.
Tracking Your Customers Triggering the Bonus Plan 1. 2. 3. 4. 5. Ring up a sale as normal. Before paying out the sale, make sure to select the customer (or swipe their card) so they get the appropriate bonus points for their plan. The bonus points earned and bonus point balance will print on the receipt. The bonus point balance will also appear in the customer section of the invoice screen. You will see that when the customer has reached the bonus point level they will NOT get their incentive.
Your Inventory Inventory Maintenance – Adding and Modifying Items Cash Register Express allows you to create inventory items, create linked inventory, create sale pricing, track inventory and configure retail and other inventory items. Creation and modification of these inventory items, as well as coupons, is done through the Inventory Maintenance screen which can be accessed from the Administrative section of the Options Screen.
Your Inventory Sale and Special Pricing Special pricing is an extremely powerful feature of Cash Register Express. A variety of sale and promotional pricing can be configured at any time; these prices will automatically be used when the cashier rings in the items. For example, sale pricing on specific items can be pre-configured; during the allotted times the special/sale price will automatically be used without the cashiers having to apply a discount.
Your Inventory Categories and Departments Retail stores can carry anywhere from a few dozen items to hundreds of items and more. Regardless of how many inventory items your business sells, it is useful to break your items down into smaller groups of items to perform a certain task or search. In Cash Register Express, items can be grouped into Departments. Departments can be further grouped into Categories. A few examples of departments are Jeans, Fruits and Wines.
Your Inventory Inventory Track Express Every store must take physical inventory periodically, even when using a point of sale system. It is important to compare how much of each item you really have as opposed to what the computer tells you. By doing physical inventory, you will find where inventory shrinkage occurs. You may also find areas of your store that are more prone to theft. Tracking your inventory closely will actually save lots of money as a result.
Your Inventory Mass Transfer & Returned Items If you are a retailer that has multiple stores, CRE has the capabilities to transfer inventory from one store to another. The Inventory that is depleted or added will automatically be reduced or added to that store’s inventory. To access the Transfer inventory feature select the Transfer button inside the Inventory Maintenance screen. The Mass Transfer screen will allow you to scan or manually enter the item(s) you wish to transfer Select a Quantity.
Your Inventory Choice Items A Choice Item is a not a “real” item, but rather provides a way to have the user choose from a list of actual items in your inventory. For example, if have a liquor store that sells a METAL CORKSCREW and a WAITERS CORKSCREW, you can create a choice item called Corkscrew. When you sell this choice item, you will be prompted to choose which of the two corkscrews is being sold.
Your Inventory Coupon Items Coupons are commonly used in retail stores. A couple of examples are buying one greeting card getting one free on Thursday and 10% off all Magazines 3 – 5 PM daily. In order to account for the wide variety of types and restrictions of coupons in the retail business, the Cash Register Express inventory screen includes an item type just for coupons. Coupons may be configured to give either a percent or a flat dollar amount off the Grand Total.
Your Inventory Coupon Items The Days Valid tab is used to set what days and time the coupon is valid. Use the Add Time and Delete Time buttons to configure the times. You may also set the expiration date for a coupon date by checking the Does this coupon expire? check box and filling in the expiration date. 1. Select Add Item. 2. Select Coupon. 3. Fill out the appropriate information for the item. a. Select the Department. b. Input an Item Number. c.
Your Inventory Coupon Items In the Restrictions Tab there are a number of options, including a minimum dollar amount, number of days between use and other restrictions to make your coupons more customizable. Listed below are the restrictions and their most common uses; Include: Will include these category/department/items for the coupon. Exclude: Will NOT include these category/department/items for the coupon.
Your Inventory Setting up The Recipe Feature Retail Stores need to keep track of unit sales that make up a carton or case of the same item so that they will be "broken open" when necessary. Common examples include packs of cigarettes or cans of beer or soda. Cash Register Express includes a Recipe feature that simplifies this task.
Your Inventory Setting Up The Recipe Feature The first step is to add a carton of cigarettes as a separate item in your inventory. From the Inventory Maintenance Screen: 1. Select [5] Administrative. 2. Select [A] Inventory Maintenance. 3. Select Add Item. 4. Select Standard Item. 5. Choose a Department from the drop-down list (“Cigarettes” in our example). 6. Enter an Item Number. 7. Enter the Item Description (“Brand X – Carton” in our example). 8. Enter the Item Cost (optional). 9.
Your Inventory Setting Up The Recipe Feature The next step is to add an individual pack of cigarettes to your inventory. From the Manager Options window: 1. Select [5] Administrative. 2. Select [A] Inventory Maintenance. 3. Select Add Item. 4. Select Standard Item. 5. Choose a Department from the drop-down list (“Cigarettes” in our example). 6. Enter an Item Number. 7. Enter the Item Description (“Brand X – Pack” in our example). 8. Enter the Item Cost (optional). 9.
Your Inventory Setting Up The Recipe Feature The final procedure is to create a recipe for a carton of cigarettes so the program will know when a new carton should be opened or “broken into”: From the Inventory Maintenance screen, with the pack of cigarettes item still displayed: 1. Select the Recipe tab. 2. Select Add Ingredient. 3. Locate the carton item you created (“Brand X – Carton” in our example). 4. Double-click on it in the list or select the Select button. 5. Enter .
Your Inventory Setting Up Retail Items with and Without Barcodes Cash Register Express allows you to configure, ring up and track the sales of SKU based items with bar codes. You can also track retail items that do not have bar codes. To do this, add a standard item to your inventory. Scan (or type) the bar code or unique item number into the Item Number field. The main fields on the top third of the screen should be filled in for every retail item you carry in your store.
Your Inventory Kit Items Efficiency is an important part of a point of sale system with fast and easy checkout and inventory tracking. With Kits, you can speed up the process of selling multiple items as a package deal. At the same time, each item within the package gets accounted for in your inventory. A kit is similar to an inventory item, where you can assign a bar code (item number) for easy addition to the invoice. It will automatically add all items within that kit to the invoice as well.
Your Inventory Kit Maintenance 1. Select Add and then select the department which the items are located in the Department for this Item field (i.e. Combo Meals). 2. 5. Give the kit an Item Number and Description and (if applicable) an Override Price. Select a tax to be applied (if applicable) and if the kit requires the customers ID to be checked. Select Add Item and select the items that are to be a part of the kit (i.e. Diet Coke and French Fries). Select Save and then Exit. 6.
Your Inventory Kit Maintenance When the kit is scanned or selected for the invoice the items that make up the kit are automatically added to the invoice and the number in stock for each is deducted by how many are sold. To automatically have the items added to an invoice, (that are part of a kit) charge for the kit price the option Auto-Kit / Auto-Combo must be checked on Invoice Settings tab of the Setup Screen.
Your Inventory Styles Matrix A matrix is a way to classify an item that has different styles. Styles Matrix allows you to create a matrix for inventory items. For example, you may have a company shirt that comes in four colors (white, blue, black, and green) and three sizes (Small, Medium, and Large). In order to keep track of how many of each color and size you have, you need to use a style, such as Company Shirt.
Your Inventory Styles Matrix 10. Select Auto-Generate Item Numbers to have the software generate item numbers based on this format “Item Number – Size –Color” (e.g. Company Shirts Large White). 11. Go to the In Stock Matrix tab and select Add Size and enter a size for your matrix (e.g. Small, Med, Large). 12. Select Add Color and enter the colors for your matrix (white, blue, black, and green). Note: these steps must be done for each size and color in the matrix. Select Save Changes. 13.
Your Inventory Styles Matrix 16. Open Inventory Maintenance go to lookup and sort the list to only display the (Clothes) Department. You will see that the items that were created in the matrix are now present in your inventory.
Tracking Your Employees Employee Maintenance – Adding & Modifying Employees It’s important to track your employees and configure functions they have access to within your point of sale system. Employees and security, as well as job codes and other employee settings, are configured in the Employee Maintenance screen, which can be accessed from the File Menu of the Login Screen. A full tutorial of this screen is in the built-in F1 help section; below are some basic pointers to get you started.
Tracking Your Employees Employee Security and Exceptions Tracking Cash Register Express can be configured in a flexible fashion, allowing you to define which employees can access which functions inside of the system. It is important to understand and properly configure the permissions to ensure employees only have access to the appropriate functionality. Security is a priority within Cash Register Express.
Tracking Your Employees Top Five Employee Permissions and Uses Permission End Transactions Set as Yes No Prompt Override End Cash Transactions Yes No Prompt Override Invoice Discounts Yes No Prompt Override Delete Items Yes No Prompt Override Allow Exit Yes No Prompt Override Reason In order for employees to accept any type of tender and end the transaction this should be set to yes. This will not allow the employee to end any transactions.
Tracking Your Employees Job Codes, Time Clock, Hours & Wages Job codes and the employee time clock are valuable features that are easy to configure and will help you control your business. Simply put, Job Codes are the different jobs that your employees work inside of your business. A few examples are cashier, janitor, manager and crew member. Job codes can be configured inside of the Employee Maintenance screen (by selecting the Job Code Setup button).
Tracking Your Employees Job Codes, Time Clock, Hours & Wages To track the hours worked by your employees, have them clock in by selecting the clock icon on the Login Screen. Staff members use the same icon to end their shift and clock out. In the occasional situation an employee forgets to clock in or clock out, the Time Clock Management screen can be used to modify times.
Reporting How to Use the Reporting Screen Cash Register Express has dozens of built-in reports that help you view and analyze sales figures, inventory and ingredients, efficiency, employee activity, customer history and a substantial amount of additional statistics and data regarding your store operations. These reports are generated from the reporting screen, which can be accessed from the Administrative tab of the Options Screen.
Reporting Listing of the Most Useful Reports Most store operators use less than tenth of the built-in reports. It is a good idea to select each report and read the description of what information the report includes. Many users miss out on valuable information simply because they haven’t taken the time to learn the figures that each report generates and how it will benefit their business. Listed below are a few of the most useful reports.
Help and Technical Support Training Sessions and Contacting Technical Support Got a question? We’re here to help. pcAmerica offers a variety of technical services to help ease your transition, make you comfortable with your new point of sale system and help you with any problems you may have. Contact our sales department to purchase any of our service offerings. Our Hourly Training service is a great way to learn your new point of sale system.
SOFTWARE LICENSE AGREEMENT OF PC AMERICA PC AMERICA ("LICENSOR") IS WILLING TO LICENSE THE ENCLOSED SOFTWARE TO YOU ONLY IF YOU ACCEPT ALL OF THE TERMS IN THIS LICENSE AGREEMENT. PLEASE READ THE TERMS CAREFULLY BEFORE YOU OPEN THIS PACKAGE, BECAUSE BY OPENING THIS SEALED DISK PACKAGE YOU ARE AGREEING TO BE BOUND BY THE TERMS OF THIS AGREEMENT.