PCMCIA Portable CD-ROM Installation Manual CD-940E
EXP COMPUTER, INC. EXP MEMORY PRODUCTS. NON-TRANSFERABLE LIMITED WARRANTY EXP COMPUTER INC., AND EXP MEMORY PRODUCTS("EXP") warrants that the Quadruple Speed Portable CD-ROM (“products”) manufactured or distributed by EXP to be free from failures due to defects in materials or workmanship for full one year from the date of purchase of the products.
FCC COMPLIANCE STATEMENTS This equipment has been tested and found to comply with the limits for a Class B digital device, pursuant to Part 15 of the FCC Rules. These limits are designed to provide reasonable protection against harmful interference in a residential installation. This equipment generates, uses and can radiate radio frequency energy and, if not installed and used in accordance with the instructions, may cause harmful interference to radio communications.
TRADEMARKS SystemSoft is a registered trademark of SystemSoft Corporation. CardSoft is a trademark of SystemSoft Corporation. Phoenix is a registered trademark of Phoenix Technologies, Ltd. Databook is a registered trademark of Databook Inc. Cardtalk is a trademark of Databook Inc. PCMCIA is a trademark of Personal computer Memory Card International Association. MS-DOS, Windows and MSCDEX are trademarks of Microsoft Corporation. Photo CD is a trademark of Kodak.
CONTENTS INTRODUCTION ............................................................................... SYSTEM REQUIREMENTS ........................................................ 1 FEATURES ............................................................................... 1 PART NAMES AND FUNCTIONS ..................................................... 2 FRONT PANEL OF THE CD-ROM DRIVE .................................. 2 REAR PANEL OF THE CD-ROM DRIVE.....................................
INTRODUCTION The PCMCIA CD-ROM consists of a double-speed, low-power CD-ROM drive and a PCMCIA interface card. It is compatible with any computer with a PCMCIA 2.1 Type I or II slot. The fast PCMCIA interface delivers a true double-speed data transfer rate in excess of 300K bytes per second. Plus, unlike those CD-ROM drives using SCSI or parallel port interfaces, this PCMCIA CD-ROM requires no external power supply! The PCMCIA CD-ROM provides true multimedia portability. SYSTEM REQUIREMENTS 1.
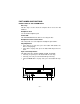
PART NAMES AND FUNCTIONS FRONT PANEL OF THE CD-ROM DRIVE • Disc Tray: This disc tray is used to insert the compact disc to access the disc database. ‚ Headphone Jack: 3.5 mm audio headphone jack. ƒ Power LED: This LED will blink when the drive is accessing the disc. „ Headphone Volume Control Knob: This rotary knob is used to adjust the headphone jack volume. … Play/Skip Button: • If the drive is in stop state, press the button will activate the drive to start playing.
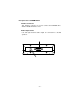
Rear panel of the CD-ROM DRIVE • Interface Connector: This interface connector is used to connect the CD-ROM drive with the PCMCIA interface card. ‚ Audio Output Jacks: Left and right channel audio output for connection to external speakers.
HARDWARE INSTALLATION Before you begin, make sure you turn OFF all power to your system before connecting the PCMCIA CD-ROM to your computer. 1. Connect the PCMCIA interface card to the CD-ROM drive. Press firmly until the CD-ROM connector is seated, and tighten the two screws on the cable connector. 2. Place the CD-ROM drive in the horizontal position, for the CDROM is designed to operate only in the flat position. Operating the CD-ROM drive in any abnormal position is prohibited. 3.
SOFTWARE INSTALLATION FOR DOS/WINDOWS 3.1 AUTOMATIC INSTALLATION The INSTALL program helps you install the device driver into the computer easily. Please follow the instructions below to proceed with automatic installation. 1. Insert the device driver diskette into a floppy disk drive on your computer. 2. Change the working directory to the floppy drive containing the device driver diskette by typing “A:” or “B:” then press ENTER. 3.
MANUAL INSTALLATION You may also manually install the PCMCIA CD-ROM device driver if the default setting conflicts with your system. Perform the following procedure to complete the manual installation. 1. Copy the files EXPCDI.EXE from the PCMCIA CD-ROM device driver disk to your hard disk. 2. Add “LASTDRIVE=Z” to the TOP of your CONFIG.SYS file. If you already have a LASTDRIVE line with a letter other than Z, change it to Z. 3. Add the following lines to the BOTTOM of your CONFIG.
/D is used to set the device name. It can be any name up to 8 characters. This name must be the same as the name you will specify in the MSCDEX.EXE option /D: name in the next step 4. Add the following line at the TOP of your AUTOEXEC.BAT: drive:\path\MSCDEX.EXE /D:MSCD001 /M:4 where drive:\path specifies the DOS directory or the directory containing the file MSCDEX.EXE. Note: If your AUTOEXEC.
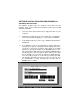
SOFTWARE INSTALLATION FOR WINDOWS 95 If your computer does not have Windows 95 installed yet, please refer to the section titled “Using PCMCIA CD-ROM to Install Windows 95”. USING PCMCIA CD-ROM UNDER WINDOWS 95 The following dialog box will appear when you are using the PCMCIA CD-ROM under Windows 95 the very first time. If the dialog box does not appear and the CD-ROM folder can not be found in My Computer, please refer to the section titled “Enabling 32-Bit Card Support”.
When the following dialog box appear, select PCMCIA CD-ROM (I) card and click on OK bottom. Follow the on-screen instruction to continue. After finishing, remember to shutdown Windows and restart your computer if you are using the PCMCIA CD-ROM to install Windows 95. Note that it is not necessary to connect the PCMCIA CD-ROM every time you reboot your computer, plug it just when you need to use it.
6. After the installation is completed, please refer to the next section titled “Enabling 32-BIT CARD SUPPORT”. ENABLING 32-BIT CARD SUPPORT OF WINDOWS 95 Your system should be ready for PCMCIA socket support prior to operating the PCMCIA CD-ROM. To check whether your computer is PCMCIA Socket supported, first, double-click on the “System” icon from “Control Panel” folder (you can select the “Control Panel” under “Settings” from the “Start” menu to open the “Control Panel” folder).
In this case, double click the PCMCIA Controller, and a dialog box will be displayed as below, please place a check mark next to the current configuration of Device usage box, then select OK. After the PCMCIA 32-Bit Card support is installed, Windows will ask you reboot your computer. Then you should refer to the first section titled “Using CD-ROM Under Windows 95” to configure the PCMCIA CDROM. If the PCMCIA Socket is not found, then you must add a PCMCIA socket to your system.
- 12 -
SOFTWARE INSTALLATION FOR OS/2 WARP Before installing PCMCIA CD-ROM device driver for OS/2 WARP, make sure your computer is PCMCIA supported. If you are not sure about this, please refer to the last part of this section for “ADDING PCMCIA SUPPORT”. AUTOMATIC INSTALLATION To perform the automatic installation of PCMCIA CD-ROM for OS/2 WARP, follow the below steps, 1. Insert the device driver diskette into a floppy disk drive on your computer. 2. Open OS/2 System. 3. Open Drives. 4.
MANUAL INSTALLATION You may also manually install the PCMCIA CD-ROM OS/2 device driver if the default setting conflicts with your system. Perform the following procedure to complete the manual installation. 1. Copy EXPCD2.FLT file from A:\OS2WARP to the BOOT subdirectory of OS/2 directory (for example: C:\OS2\BOOT.) 2. Add the following line to the BOTTOM of your CONFIG.SYS file: BASEDEV=EXPCD2.FLT /P:1 /I:15 The parameters of EXPCD2.
ADDING PCMCIA SUPPORT PCMCIA Support can be automatically installed during OS/2 installation or it can be installed through Selective Install after OS/2 installation. To check or install PCMCIA support, perform the following steps: 1. Open OS/2 System. 2. Open System Setup. 3. Open Selective Install. 4. Check the System Configuration window to see if PCMCIA Support has been installed as displayed below. If so, you may exit now, otherwise, perform the following steps to continue. 5.
6. Select the appropriate system (this should either be a direct match with your target install system or a known compatible system). 7. Select OK. 8. Select Install. 9. Follow the on-screen instructions to carry through the installation.
USE PCMCIA CD-ROM TO INSTALL OS/2 WARP Before you begin, make a backup copy of the “Diskette for CD-ROM #1” of OS/2 Warp. 1. Copy EXPCD2.FLT file from A:\OS2WARP to the Diskette for CDROM #1. (You may copy EXPCD2.FLT to harddisk, then copy it to the “Diskette for CD-ROM #1”). 2. Edit CONFIG.SYS file of the “Diskette for CD-ROM #1” by adding the following line to the BOTTOM of the file, BASEDEV=EXPCD2.FLT /P:1 /I:15 3. Insert “OS/2 WARP Installation Diskette” into drive A. 4. Restart your computer. 5.
TROUBLE SHOOTING This section explains the most common error messages that DOS/Windows users may experience. After rebooting your computer, the following messages will be displayed on your screen, which are generated by EXPCDI.EXE and MSCDEX.EXE. Configure card to: I/O Port:170-177, 376-377 IRQ number: 15 Device Name: MSCD001 PCMCIA CD-ROM card is present in socket 1 . . . Drive D: = Driver MSCD001 unit 0 If any error occurs or the PCMCIA CD-ROM does not work, you should reboot your computer again.
The above message means invalid I/O ports in the EXPCDI line of CONFIG.SYS has been selected. The legal I/O port numbers are: 1, 2, and 3. v Error: Illegal IRQ number! The above message means an invalid IRQ number in EXPCDI line of CONFIG.SYS has been selected. The legal IRQ numbers are 3, 4, 5, 7, 9, 10, 11, 12 and 15. v Error: There is no available 4K memory for mapping! The above message means EXPCDI can't find available 4K memory between C000:0 to EFFF:0.
BASIC OPERATING PROCEDURES The PCMCIA CD-ROM is designed for both multimedia applications and for entertainment purposes; it can be used with your computer for business or you can use it alone as a portable Audio CD player. Before using the PCMCIA CD-ROM, you should first load the CD properly by following the instructions below: 1. Push the Open/Close/Stop button at the CD-ROM drive front panel. The tray will automatically slide out. 2. Place the CD on the tray with the label side facing up. 3.
PCMCIA SOFTWARE INFORMATION If you have installed the PCMCIA software, such as SystemSoft’s CardSoft or Databook’s Cardtalk, then EXPCDI.EXE will call these PCMCIA software to enable the card. If you don’t have one, EXPCDI still can directly access your hardware to enable the card. In this case, your computer should have an Intel 82365SL Personal Computer Interface Controller (PCIC) or another compatible controller.
The device driver names of the major PCMCIA software are listed below: Software/Device SystemSoft Driver CardSoft Award IBM Cardware ThinkPad PCMSS.EXE SSPCIC.EXE IBMDSS02.SYS CS.EXE PCMCS.EXE PCCS.EXE IBMDOSCS.SYS CSALLOC.EXE PCMRMAN.SYS PCRM.EXE DICRMU02.SYS IDE/ATA Driver ATADRV.EXE PCMATA.SYS SRAM Card Driver MTSRAM.EXE Flash Card Support MTAA.EXE, Socket Services SS365SL.EXE, Phoenix SS365LP.EXE, SSCIRRUS.EXE, SSDBOOK.EXE, SVADEM.EXE, SSVLSI.
FILES=40 BUFFERS=20 STACKS=9,256 DEVICEHIGH=C:\CARSOFT\SS36SSL.EXE DEVICEHIGH=C:\CARDSOFT\CS.EXE DEVICEHIGH=C:\CARDSOFT\CSALLOC.EXE REM** The REM’s should be removed from thefollwing REM** lines to enable memory and hard drive card support REM** DEVICEHIGH=C:\CARDSOFT\ATADRV.EXE REM** DEVICEHIGH=C:\CARDSOFT\MTSRAM.EXE REM** DEVICEHIGH=C:\CARDSOFT\MTDDRV.EXE DEVICEHIGH=C:\CARDSOFT\CARDID.EXE DEVICE=C:\CDROM\EXPCDI.EXE /P:1 /I:15 /D:MSCD001 PHOENIX PCMCIA SOFTWARE SAMPLE CONFIG.
DOS=HIGH DEVICEHIGH=C:\THINKPAD\IBMDSS02.SYS /S0=2 DEVICEHIGH=C:\THINKPAD\IBMDOSCS.SYS DEVICEHIGH=C:THINKPAD\DICRMU02.SYS /MA=D000-DFFF DEVICEHIGH=C:\THINKPAD\$ICPMDOS.SYS DEVICE=C:\THINKPAD\AUTODRV.SYS C:\THINKPAD\AUTODRV.INI DEVICE=C:\CDROM\EXPCDI.
POWER SAVING The PCMCIA CD-ROM drive will automatically enter the sleep mode (spindle off) when it has not been accessed for about 4 minutes. Also, you can manually get into the sleep mode by removing the Compact Disc (CD) from your CD-ROM drive. The operating current will then be reduced to 120 mA. The “Hot insert/remove” feature of a PCMCIA card helps to save power.