CONTENTS PRECAUTIONS ...................................................................................... 2 CD-ROM DRIVE .................................................................................. 2 CD ...................................................................................... 2 PART NAMES AND FUNCTIONS............................................................... 3 TOP PANEL OF THE CD-ROM DRIVE.................................................
precautions Read this section carefully before starting to use the portable PCMCIA CD-ROM. CD-ROM DRIVE • Do not place heavy objects on the CD-ROM drive. • Do not shake or subject to intense vibration. • Keep disc cover closed to protect from dust. • Do not disassemble the player. • Do not spill liquid on the player. • Do not touch the lens. • Only clean the outside of the player with a soft, dry cloth. • Clean the lens with a dry cotton swab or a lens blower.
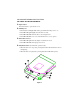
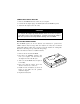
CD-ROM PART NAMES AND FUNCTIONS TOP PANEL OF THE CD-ROM DRIVE: • Open button: Press this button to open the disc cover. ‚ On/Busy led: • This indicator will light dimly with a green LED when the power is on. • This LED will light brightly when the drive is ready. • This LED will blink when the drive is accessing the disc. • This LED will blink every 2 seconds when the disc cover is opened. ƒ External Power led: • This LED will light when AC adapter or batteries are used.
… Next/Previous button: (for CD audio operation only) • When the drive is in play state, pressing the right edge of the button will skip to the next track. • When the drive is in play state, pressing the left edge of the button will skip to the previous track. † Headphone Volume Control knob: Turn this rotary knob to adjust the headphone volume. ‡ Headphone jack: This is a 3.5mm audio headphone jack. ˆ Line-out jack: Audio outputs signal to an amplifier.
BOTTOM OF THE CD-ROM DRIVE: • PCMCIA Interface Card Holder: Store the PCMCIA interface card when not used. ‚ Battery Lid: Slide and lift up the lid to install or remove the batteries.
CD-ROM POWER There are three power source options to choose to power the CD Traveler: 1. PCMCIA socket power direct 2. AC adapter 3. Battery. However, you can use only AC adapter or batteries when the CD-ROM is used as a stand-alone CD player. SELECTING THE POWER SOURCE The POWER SOURCE SWITCH (as shown in ‚ of Figure 2) is for selecting which power source to use. POWER SOURCE SWITCH is set to “PC” (Figure 4.a) The PCMCIA power direct is selected.
CONNECTING THE AC ADAPTER 1. Remove the PCMCIA interface card from your computer. 2. Connect the AC adapter plug to the DC-IN jack at the CD-ROM rear panel. 3. Attach the AC adapter to the AC outlet. CAUTION Use only the AC adapter provided with this unit or refer to the rear panel of the drive for the correct AC adapter. Using the incorrect AC adapter will cause permanent and unpredictable damage to the CD-ROM.
POWER SWITCH Stand-alone CD player Pressing the POWER button (as shown in „ of Figure 2) will switch the CD drive power ‘on’ or ‘off’. The drive also has an inactivity timer which automatically powered off if it has been idle more than 40 seconds. CD-ROM operation The POWER button will not function because the drive power is controlled by the computer. ON/BUSY LED (as shown in ‚ of Figure 1) The LED indicate four status of the CD-Drive: 1. Power On: The LED will light dimly 2.
NOTICE • Use only the AC adapter provided with this unit or refer to the rear panel of the drive for the correct AC adapter specification. • If you are not using the unit with the AC adapter for a long period of time, disconnect it from the AC power outlet. • Do not mix old and new batteries, or different type of batteries (Ni-Cad and alkaline, etc.) • Always remove old, weak or worn-out batteries promptly and dispose of them properly.
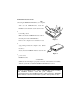
HARDWARE INSTALLATION OFF connecting the PCMCIA CD-ROM to your computer. Turn over the CD-ROM drive, locate the ROM drive. Lift and take out the card from the 2. horizontal position. Make sure that the PCMCIA interface cable is the back panel of the CD-ROM drive. Refer to the computer user’s manual to locate Figure 6 5. sign pointing towards the computer’s slot. (Please insertion.) Slowly insert the PCMCIA interface card into the Figure 7 7. power source.
SOFTWARE INSTALLATION SOFTWARE INSTALLATION FOR DOS/WINDOWS Automatic Installation The INSTALL program helps you install the device driver into your computer easily. Please follow the instructions below to proceed with automatic installation. 1. Insert the device driver diskette into a floppy disk drive on your computer. 2. Change the working directory to the floppy drive containing the device driver diskette by typing “A:” or “B:” then press ENTER. 3.
6. The rest of the installation should proceed automatically, and the CONFIG.SYS and AUTOEXEC.BAT files on your computer will be updated. 7. Reboot your computer and the CD-ROM drive will be defined as the next available drive letter. For example, if the last hard drive of the computer is drive C, the CD-ROM drive will be assigned to be drive D automatically. Manual Installation You may also manually install the PCMCIA CD-ROM device driver if the default setting conflicts with your system.
where drive:\path specifies the DOS directory or the directory containing the file MSCDEX.EXE. Note: If your AUTOEXEC.BAT file loads a menu program such as DOSSHELL or Windows, you have to add the above line to start your menu program. Otherwise, MSCDEX will not have a chance to load before your menu program begins. The example above shows the default setting. The /D: switch indicates the device name. It MUST be the same name as you specified by the /D: switch of EXPCDI.EXE in your CONFIG.SYS file.
SOFTWARE INSTALLATION FOR WINDOWS 95 If your computer does not have Windows 95 installed yet, please refer to the section titled “Using PCMCIA CD-ROM to Install Windows 95”. Use the PCMCIA CD-ROM under Windows 95 Due to the Plug-N-Play feature in Windows 95. The following dialog box will appear when the PCMCIA CD-ROM is inserted into the PCMCIA slot for the very first time.
When the following dialog box appear, select PCMCIA CD-ROM (I) card and click on the OK button. Figure 10 Follow the on-screen instruction to continue. After finishing, if you are prompt to shutdown and restart Windows 95 please do so. Otherwise there should be a CD icon in ‘My Computer’ icon. Note: In Windows 95 it is not necessary to connect the PCMCIA CD-ROM every time you reboot your computer; inserted the CD’s Card when you need to use it.
Enable 32-bit Card Support of Windows 95 To verify first, double-click on the “System” icon from “Control Panel” folder (you can select the “Control Panel” under “Settings” from the “Start” menu to open the “Control Panel” folder). Click on the Device Manager Tab. If “PCMCIA Socket” is found with a cross (x) sign next to the PCMCIA Controller as the following figure shows, it means the PCMCIA device driver is not using 32-Bit Card Support.
In this case, double click on the PCMCIA Controller, and a dialog box will be displayed as below. Please place a check mark next to the current configuration of Device usage box, then select OK. Figure 12 After the PCMCIA 32-Bit Card support is installed, Windows will ask you to reboot your computer. Then you should refer to the first section titled “Using CD-ROM Under Windows 95” to configure the PCMCIA CD-ROM. If the PCMCIA Socket is not found, then you must add a PCMCIA socket to your system.
SOFTWARE INSTALLATION FOR OS/2 WARP Before installing the PCMCIA CD-ROM device driver for OS/2 WARP, make sure the PCMCIA support is enable. If you are not sure about this, please refer to the last part of this section “Adding PCMCIA Support”. Automatic Installation For automatic installation of the PCMCIA CD-ROM for OS/2 WARP, follow the below steps, 1. 2. 3. 4. Insert the device driver disk into a floppy disk drive on your computer. Open OS/2 System. Open Drives.
Manual Installation You may also install the PCMCIA CD-ROM OS/2 device driver manually, if the default setting conflicts with your system. Perform the following procedure to complete the manual installation. 1. Copy EXPCD2.FLT file from A:\OS2WARP to the BOOT sub-directory of OS/2 directory (for example: C:\OS2\BOOT.) 2. Add the following line to the BOTTOM of your CONFIG.SYS file: BASEDEV=EXPCD2.FLT /P:1 /I:15 The parameters of EXPCD2.
Figure 14 5. Select the check box to the left of the PCMCIA Support to display the Select PCMCIA system window. 6. Select the appropriate system (this should either be a direct match with your target install system or a known compatible system). Select OK. 7. Select Install. 8. Follow the on-screen instructions to complete the installation.
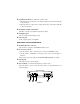
BASIC OPERATING PROCEDURES Follow the instructions listed below to open the disc cover and insert/remove a CD. 1. Press the OPEN button. The disc cover will open slightly, and the ON/BUSY LED will blink as a warning signal. 2. If there is no disc inside, go to next step. Otherwise, wait until the drive stops spinning. You may check if the disc stop by looking through the disc cover window. 3. Lift the disc cover by the edges as shown in Figure 24. Figure 24 4.
USING THE PCMCIA CD-ROM AS A STAND-ALONE CD PLAYER In a stand-alone audio CD player operation, the CD need either the AC adapter or batteries for its power source, remember to set the POWER SOURCE SWITCH to “DC/BATT”. Refer to the section titled “CD-ROM POWER SOURCE” for details. It is not necessary to remove the PCMCIA interface card from the CD-ROM drive when the CD-ROM is in stand-alone mode. You may store the card in the card holder at the back panel of the drive.
Headphone Jack • Connect your headphone to his jack for listening to audio CD. Line-Out Jack • Connect this jack to the LINE-IN jack of the sound card in your computer or an amplifier with a 3.5 mm audio cable for better sound quality from the audio CD. USING THE PCMCIA CD-ROM WITH A COMPUTER Check the power source switch set it according to the power source.
2) Choose the Drivers icon from Control Panel, and choose the Add button to set up the driver [MCI] CD Audio. 3) Start the Media Player. 4) Select Device CD Audio from the menu bar. 5) Click the play button on the screen to start it. 6) Connect headphones set to the Headphone Jack 7) If your computer is equipped with a sound card, you can also connect the LINEOUT jack of your CD-ROM to the LINE-IN jack of the sound card with a 3.5 mm audio cable.
INSTALL A CD TITLE DOS/Windows 3.x Most of the CD-ROM titles for Windows 3.1/3.11 contain the SETUP.EXE or INSTALL.EXE program in the CD disc. You need to start either one of the programs to add a Program Group and its icons into your computer, and perform the following, 1) In Program Manager click File => Run 2) Type in D: (or the drive letter assigned for CD-ROM) SETUP.EXE or INSTALL.EXE. 3) Follow the on-screen instructions. 4) After complete setting up, click the icon for the program.
Windows 95 The hot-swapping is allowed with more limitation. To avoid system failure, always follow the below steps to hot remove the PCMCIA CD-ROM in Windows 95, 1) Click the PC card indicator on the task bar at the right bottom of screen. 2) Click the command to stop the card you want to remove. 3) Read the screen prompts instruction carefully. If the system prompts you not to remove the card, DO NOT remove the card. You should exit the present application and return to step 1.
PCMCIA SOFTWARE INFORMATION (DOS/WIN 3.1) If you have installed the PCMCIA software, such as SystemSoft’s CardSoft or Databook’s Cardtalk, then the PCMCIA CD-ROM device driver will call this PCMCIA software to enable the card. If you don’t have one, the PCMCIA CDROM device driver still can directly access your hardware to enable the card. In this case, your computer should have an Intel 82365SL Personal Computer Interface Controller (PCIC) or another compatible controller.
The device driver names of the major PCMCIA software are listed below: Software/Device SystemSoft Driver CardSoft Award IBM Cardware ThinkPad PCMSS.EXE SSPCIC.EXE IBMDSS02.SYS CS.EXE PCMCS.EXE PCCS.EXE IBMDOSCS.SYS CSALLOC.EXE PCMRMAN.SYS PCRM.EXE DICRMU02.SYS IDE/ATA Driver ATADRV.EXE PCMATA.SYS SRAM Card Driver MTSRAM.EXE Flash Card Support MTAA.EXE, Socket Services SS365SL.EXE, Phoenix SS365LP.EXE, SSCIRRUS.EXE, SSDBOOK.EXE, SVADEM.EXE, SSVLSI.
DEVICE=C:\DOS\HIMEM.SYS DEVICE=C:\DOS\EMM386.EXE NOEMS X=D000-D3FF FILES=40 BUFFERS=20 STACKS=9,256 DEVICEHIGH=C:\CARDSOFT\SS36SSL.EXE DEVICEHIGH=C:\CARDSOFT\CS.EXE DEVICEHIGH=C:\CARDSOFT\CSALLOC.EXE REM** The REM’s should be removed from the following REM** lines to enable memory and hard drive card support REM** DEVICEHIGH=C:\CARDSOFT\ATADRV.EXE REM** DEVICEHIGH=C:\CARDSOFT\MTSRAM.EXE REM** DEVICEHIGH=C:\CARDSOFT\MTDDRV.EXE DEVICEHIGH=C:\CARDSOFT\CARDID.EXE DEVICE=C:\CDROM\EXPCDI.
DEVICE=C:\CARDWARE\PCENABLE.EXE DEVICE=C:\CDROM\EXPCDI.EXE /P:1 /I:15 /D:MSCD001 IBM PCMCIA SOFTWARE SAMPLE CONFIG.SYS FILE LASTDRIVE=Z DEVICEHIGH=C:\DOS\HIMEM.SYS/TESTMEM:OFF /MACHINE:2 DEVICEHIGH=C:\DOS\EMM386.EXE NOEMS X=D000-DFFF BUFFERS=40 FILES=40 STACKS=9,256 DOS=HIGH DEVICEHIGH=C:\THINKPAD\IBMDSS02.SYS /S0=2 DEVICEHIGH=C:\THINKPAD\IBMDOSCS.SYS DEVICEHIGH=C:THINKPAD\DICRMU02.SYS /MA=D000-DFFF DEVICEHIGH=C:\THINKPAD\$ICPMDOS.SYS DEVICE=C:\THINKPAD\AUTODRV.SYS C:\THINKPAD\AUTODRV.
POWER SAVING The PCMCIA CD-ROM is designed to save power: − Built-in inactivity timer for about 40 seconds in stand-alone mode, the power will be turned off automatically. − when used with the computer, the drive will automatically enter the sleep mode (spindle off) when it has not been accessed for about 1 minute. − if you remove the Compact Disc (CD) from your CD-ROM drive, the drive will manually go into the sleep mode.
TROUBLE SHOOTING This section explains the most common error messages users may encounter. DOS/Windows After rebooting your computer, the following messages will be displayed on your screen, which are generated by EXPCDI.EXE and MSCDEX.EXE. Configure card to: I/O Port:170-177, 376-377 IRQ number: 15 Device Name: MSCD001 PCMCIA CD-ROM card is present in socket 1 . . . Drive D: = Driver MSCD001 unit 0 If any error occurs or the PCMCIA CD-ROM does not work, you should reboot your computer again.
The above message means you have not specified the I/O port and IRQ number argument in the EXPCDI line of CONFIG.SYS. v Error: Illegal I/O port! The above message means invalid I/O ports in the EXPCDI line of CONFIG.SYS have been selected. The legal I/O port numbers are: 1, 2, and 3. v Error: Illegal IRQ number! The above message means an invalid IRQ number in EXPCDI line of CONFIG.SYS has been selected. The legal IRQ numbers are 3, 4, 5, 7, 9, 10, 11, 12 and 15.
EXP COMPUTER, INC. EXP MEMORY PRODUCTS, INC. NON-TRANSFERABLE LIMITED WARRANTY EXP COMPUTER INC., AND EXP MEMORY PRODUCTS("EXP") warrants that the Game Traveler (“products”) manufactured or distributed by EXP to be free from failures due to defects in materials or workmanship for full one year from the date of purchase of the products.