Audio Applications USER GUIDE Version 3.0 August, 1994 ESS Technology, Inc.
Copyright 1994 by ESS Technology, Inc. All rights reserved. The contents of this manual and the associated Audio Applications software are the property of ESS Technology, Inc. For additional copies of the software, please contact ESS Technology, Inc. AudioDrive is a trademark of ESS Technology, Inc. Microsoft, MS-DOS, Windows, and the Windows Sound System are registered trademarks of Microsoft Corporation.
Audio Applications 3.0 User Guide _________________________________________________________________________ Contents Chapter 1: Introduction .......................................................................... 1 Features of the Audio Applications........................................................ 1 Audio Applications Overview................................................................ 2 Chapter 2: Installation.............................................................................
Audio Applications 3.0 User Guide _________________________________________________________________________ Chapter 4: The Recording Control ......................................................... 31 Introduction .......................................................................................... 31 Starting the Recording Control.............................................................. 31 Recording Control Menu Commands.....................................................
Audio Applications 3.0 User Guide _________________________________________________________________________ Chapter 8: The Audio Clip Library ........................................................ 47 Introduction .......................................................................................... 47 Starting the Audio Clip Library ............................................................. 47 Audio Clip Library Menu Commands ....................................................
Audio Applications 3.0 User Guide _________________________________________________________________________ Setting the Chime.................................................................................. 67 The Help Menu ..................................................................................... 67 Chapter 12: The Audio Reminder........................................................... 68 Introduction ..........................................................................................
Audio Applications 3.0 User Guide _________________________________________________________________________ 1: Introduction The Audio Applications enable you to record, store, and play back voice, music, and other sound on your PC. These applications are designed to enhance communication and improve productivity by incorporating audio into your daily use of the computer. The Audio Applications take full advantage of the capabilities of the AudioDrive family of audio chips (ES488, ES1488, and ES688).
Audio Applications 3.0 User Guide _________________________________________________________________________ Audio Applications Overview • The Audio Recorder records, compresses, stores and plays voice, music, and other sound in .WAV and .AUD formats. • The Recording Control regulates the recording level and stereo balance of multiple sources during recording. • The Volume Control regulates the volume and stereo balance of sound during playback.
Audio Applications 3.0 User Guide _________________________________________________________________________ 2: Installation Introduction The Setup program provides an easy way for you to install the AudioDrive driver and applications. Starting the Setup Program First-time installation: 1. Start Windows 3.1 or higher. 2. In Program Manager, choose Run from the File menu. 3. Place Disk 1 in a floppy drive.
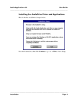
Audio Applications 3.0 User Guide _________________________________________________________________________ Installing the AudioDrive Driver and Applications Here is the first AudioDrive Setup window: Note the instructions, then click Continue to go on, or Exit to leave Setup.
Audio Applications 3.0 User Guide _________________________________________________________________________ In the second Setup window, click the first button to install the hardware driver (if an AudioDrive driver has been previously installed, first choose Driver Uninstallation, restart windows, then install the new driver), the second button to install the Audio Applications, or the third button to remove the current hardware driver. Let's examine each of these options.
Audio Applications 3.0 User Guide _________________________________________________________________________ If you choose Driver Installation, the following window appears: Unless you need to configure the board settings yourself, choose the Automatic Board Configuration button to install the hardware driver. Automatic Board Configuration will attempt to determine the I/O address, interrupt, and DMA channel settings of your board.
Audio Applications 3.0 User Guide _________________________________________________________________________ In the next window (below), choose Restart Windows if the Audio Applications are already installed. If not, choose Install Software. From the main setup window, click the Software Installation button to install the Audio Applications.
Audio Applications 3.0 User Guide _________________________________________________________________________ The default directory is PCAUDIO. To store the Audio Applications in another directory, type its name and click OK. If the directory you specify does not exist, Setup will create it for you.
Audio Applications 3.0 User Guide _________________________________________________________________________ Choose Change Directory to install the files in another directory, preserving the previous installation. If you choose Continue, this window appears: To install all the Audio Applications, click the Complete Installation button. To install only some Audio Applications, choose Custom Installation.
Audio Applications 3.0 User Guide _________________________________________________________________________ If you choose Custom Installation, this window appears: To exclude an application from the installation, click its box. To store the applications in another directory, choose Change Directory and specify the directory. Choose Install to install the selected Audio Applications.
Audio Applications 3.0 User Guide _________________________________________________________________________ Note: If you have a previous version of the software and the Setup program is unable to load the driver, follow this procedure: 1. Exit Windows and reboot your system. 2. Delete auddrive.drv, vaudrv.386, and threed.vbx from the directory windows\system, if any of these files are present. 3. Restart Windows, ignoring any Windows error messages. 4.
Audio Applications 3.0 User Guide _________________________________________________________________________ 3: The Audio Recorder Introduction The Audio Recorder enables you to record, compress, store and playback voice, music, and other sound. It provides settings for sound attributes such as mono/stereo, compression level, and sampling rate. You can use it to embed sound objects in documents created in applications that support object linking and embedding (OLE).
Audio Applications 3.0 User Guide _________________________________________________________________________ Starting the Audio Recorder To start the Audio Recorder, open the Audio Applications program group and double-click the Audio Recorder icon. OR: choose Run from the Program Manager's File menu, then type c:\pcaudio\audiorec and click the OK button.
Audio Applications 3.0 User Guide _________________________________________________________________________ The buttons at the bottom of the Audio Recorder window enable you to start and stop recording and playback. RECORD PLAY STOP Begins recording. Begins playback. Ends recording/playback Audio Recorder Menu Commands File Menu New begins a new audio file. The Audio Recorder starts with a new file. Open enables you to load an existing audio file.
Audio Applications 3.0 User Guide _________________________________________________________________________ Edit Menu Undo reverses the last change you made to the current audio file. Cut erases the selected audio portion and stores it on the Clipboard. Copy copies the selected audio portion to the Clipboard without removing it. Paste inserts the Clipboard audio at the cursor, pushing other material ahead. If audio is selected, Paste replaces the selection with the Clipboard audio.
Audio Applications 3.0 User Guide _________________________________________________________________________ Insert File displays the Insert File dialog box. From here you select an audio file to be inserted into the current file at the cursor. If audio is selected, the inserted audio file replaces the selected audio. Mix with File displays the Mix with File dialog box. From here you select an audio file to be mixed with the current file, beginning at the cursor.
Audio Applications 3.0 User Guide _________________________________________________________________________ Effects Menu The Audio Recorder's Effects commands change the waveform of the audio you have selected. If there is no selection, the entire file is affected. To change the audio back to what it was before you used an Effects command, choose Undo from the Edit menu before using any other command. Normalize amplifies the selected audio to the maximum volume possible without distortion.
Audio Applications 3.0 User Guide _________________________________________________________________________ Echo displays the Echo Rate dialog box. From here you set the echo delay and echo volume for the selected audio. Reverse flips the selected audio backwards, so the end becomes the beginning and the beginning becomes the end. Help Menu Contents displays topics you can choose for information. About Audio Recorder gives the version number and copyright information.
Audio Applications 3.0 User Guide _________________________________________________________________________ The Audio Recorder Toolbar For your convenience, eight often-used menu commands are also available as toolbar buttons at the top of the Audio Recorder window.
Audio Applications 3.0 User Guide _________________________________________________________________________ Making a Recording 1. Select New from the File menu. The Sound Attributes dialog box appears: 2. In the Sound Attributes dialog box, choose settings for Sampling Rate, Stereo (on or off), and Format, then click the OK button. • Choose one of the PCM (uncompressed) formats if you want the highest sound quality, or it you wish to edit or modify the recording with Effects commands before you save it.
Audio Applications 3.0 User Guide _________________________________________________________________________ 4. Select Save As from the File menu. The Save As dialog box appears: 5. In the Save As dialog box: • If the file is uncompressed and you wish to save it uncompressed, do not click the Options button. Just choose a directory location, enter a name for the audio file, then click the OK button to save it. The extension for an uncompressed audio file is .wav.
Audio Applications 3.0 User Guide _________________________________________________________________________ Playing an Audio File 1. Load an audio file into the Audio Recorder. It can be a recording you have just made, or use the Open command (File menu) to load a file stored on disk. 2. Click the Audio Recorder's Play button to hear the audio file. The file will play to the end unless you interrupt it by pressing the Stop button.
Audio Applications 3.0 User Guide _________________________________________________________________________ Using the Waveform Display The Audio Recorder's waveform display provides a graphic representation of the audio file currently in memory. You control the display with the vertical and horizontal scroll bars. • To zoom in on (or magnify) the waveform, move the vertical scroll button down. To zoom out, move the vertical scroll button up.
Audio Applications 3.0 User Guide _________________________________________________________________________ Editing an Audio File Use the Open command (File menu) to load an audio file from disk to the Audio Recorder. You can also edit a file you just recorded. To delete an audio section: 1. With the mouse, select the waveform of the audio to be deleted. 2. Press the Del key, or choose the Delete command. The selected audio disappears, joining the audio before and after it.
Audio Applications 3.0 User Guide _________________________________________________________________________ To move or copy an audio section: 1. Select the waveform of the audio to be moved or copied. 2. Click the Cut button to erase the selected audio and place it on the Clipboard, or click the Copy button to leave the selected audio as is while copying it to the Clipboard. 3. Place the cursor where you want the Clipboard material to appear and click the Paste button.
Audio Applications 3.0 User Guide _________________________________________________________________________ To mix Clipboard audio with the selected audio: 1. Place the cursor at the beginning of the audio to be mixed, or select a section of audio to be mixed. 2. Click the Paste Mix button. The Clipboard audio is combined with the audio after the cursor. If a section of audio was selected, the Clipboard audio is combined with the selected audio until the end of either the Clipboard or the selected audio.
Audio Applications 3.0 User Guide _________________________________________________________________________ To mix audio from a file: 1. Place the cursor at the beginning of the audio to be mixed. 2. From the Edit menu, choose Mix with File to display the Mix With File dialog box. Then choose an audio file to combine with the current file, beginning at the cursor.
Audio Applications 3.0 User Guide _________________________________________________________________________ Adding Sound to a Document: Drag and Drop The Audio Recorder's drag and drop feature enables you to embed audio files in documents. 1. Open a document in the appropriate Windows application. 2. Load an audio file from disk to the Audio Recorder, or use an audio file you just recorded. 3. Move the cursor to the icon at the top right of the Audio Recorder. The cursor changes into a hand.
Audio Applications 3.0 User Guide _________________________________________________________________________ Changing an Audio File's Properties An audio file contains more than sound. You can attach a title, description, and an icon to the current audio file. To do so, choose Properties from the File menu. The Properties dialog box appears. In this dialog box, you can place the cursor in the Label or Description area to add or change the label or description for the audio file.
Audio Applications 3.0 User Guide _________________________________________________________________________ The Audio Recorder assigns a default picture of a microphone to each audio file. To select another picture more representative of the audio file's contents, click the Set Picture button. The Set Picture dialog box appears: From here, select the picture to appear with the audio file. It can be any graphic contained in a bitmap (.BMP or .DIB), wave (.WAV), icon (.ICO), executable (.EXE) or library (.
Audio Applications 3.0 User Guide _________________________________________________________________________ 4: The Recording Control Introduction The Recording Control enables you to regulate the recording level and stereo balance at which sound is recorded from multiple sources. You use the Recording Control with the Audio Recorder or Extended Recorder during recording.
Audio Applications 3.0 User Guide _________________________________________________________________________ The Recording Control window appears. The Recording Control can receive input from a microphone, a compact disk player, a synthesizer, or any other line-in source. The Recording Control displays recording level and stereo balance controls (ES688 only) for each of your computer's hardware sources. To include a recording source, click the circle in front of its name.
Audio Applications 3.0 User Guide _________________________________________________________________________ Recording Control Menu Commands Turn on Always On Top to display the Recording Control on top of other windows. Help displays information about how to use Recording Control. About Recording Control gives the version number and copyright information.
Audio Applications 3.0 _________________________________________________________________________ The Volume Control Introduction (ES688 only) at which sound is played. You can use the Volume Control with the Audio Recorder during playback. If you are playing multiple sources, regulator. Starting the Volume Control • Open the Audio Applications program group and double-click the OR: • From the Audio Recorder Options menu or the Mixer menu, choose the Volume Control command.
Audio Applications 3.0 User Guide _________________________________________________________________________ The Volume Control window appears. The Volume Control can recieve input from a microphone, a cassette tape player, a compact disk player, or any other line-in source. • To adjust the stereo balance, drag the horizontal sliding bar left or right (for the ES688 only.) • To adjust the volume, drag the vertical sliding bar up or down. • To turn the sound off, click the Mute button.
Audio Applications 3.0 User Guide _________________________________________________________________________ The Volume Control Menu Turn on Always On Top to display the Volume Control on top of other windows. Mixer displays the Mixer window if you want to mix the playing of sounds from several sources. Help displays information on how to use Volume Control. About Volume Control gives the version number and copyright information.
Audio Applications 3.0 User Guide _________________________________________________________________________ 6: The Mixer Introduction The Mixer enables you to combine signals from several audio sources during playback, with control over the volume and stereo balance of each source. When you use the Audio Recorder to play an audio file, you can open the Mixer to combine the audio from the file with audio from other sources. The Volume Control is a natural companion to the Mixer.
Audio Applications 3.0 User Guide _________________________________________________________________________ The Mixer Window The Mixer can recieve input from a waveform audio file, a microphone, a compact disk player, a synthesizer, or other line-in source. The Mixer's appearance depends on your computer hardware; the Mixer pictures here assume the presence of the ESS Stereo Magician Plus (ES688) card. To adjust the stereo balance of a source, drag its top sliding bar left or right (for the ES688 only.
Audio Applications 3.0 User Guide _________________________________________________________________________ Mixer Menu Commands Turn on Always On Top to display the Mixer on top of other windows. Volume Control displays the Volume Control at the left side of the Mixer. Help displays information about how to use the mixer. About Mixer gives the version number and copyright information.
Audio Applications 3.0 User Guide _________________________________________________________________________ 7: The Extended Recorder Introduction The Extended Recorder is designed as a tool for recording meetings, conversations, and dictation. Like the Audio Recorder, the Extended Recorder records, compresses, stores, and plays voice, music, and other sound. Unlike the Audio Recorder, the Extended Recorder compresses and stores the audio file directly to your hard disk, using on-chip ESPCM compression.
Audio Applications 3.0 User Guide _________________________________________________________________________ Starting the Extended Recorder Open the Audio Applications program group and double-click the Extended Recorder icon. The Extended Recorder window appears.
Audio Applications 3.0 User Guide _________________________________________________________________________ These buttons enable you to start and stop recording and playback: RECORD PLAY STOP Begins recording. Begins playback. Ends recording/playback Extended Recorder Menu Commands File Menu New creates a new audio file. When you start the Extended Recorder, a new file is created automatically.
Audio Applications 3.0 User Guide _________________________________________________________________________ Save As saves the audio file with the name and in the location you specify. You can also choose to save the file as read only. Exit closes the Extended Recorder. Options Menu Temp. File Directory enables you to set the hard drive location for the .TMP files that the Extended Recorder creates while recording. When you save an audio file, its .TMP file is copied to the name and location you specify.
Audio Applications 3.0 User Guide _________________________________________________________________________ Contents displays a list of topics you can choose for information on Extended Recorder features. About Extended Recorder gives the version number and copyright information. The Extended Recorder Toolbar For your convenience, five often used menu commands are also available as toolbar buttons at the top the the Extended Recorder window.
Audio Applications 3.0 User Guide _________________________________________________________________________ Making a Recording 1. Open the File menu and select New. New opens the Sound Attributes dialog box, where you can set the sample rate, the sound format, and whether to record in mono or stereo. After you set the attributes, click OK. 2. Click the Record button. Speak into the microphone or turn on the linein source. 3. Click the Stop button to pause or end the recording. 4.
Audio Applications 3.0 User Guide _________________________________________________________________________ Playing an Audio File 1. Load an audio file into the Extended Recorder. It can be a recording you have just made, or use the Open command (File menu) to load a file stored on disk. 2. Click the Extended Recorder's Play button to hear the audio file. The file will play to the end unless you interrupt it by pressing the Stop button. You don't have to play an audio file from the beginning.
Audio Applications 3.0 User Guide _________________________________________________________________________ 8: The Audio Clip Library Introduction From the Audio Clip Library you can select and play audio files stored under three headings (or folders): music, phrases, and sounds. You can also add folders and audio files of your own to the Audio Clip Library.
Audio Applications 3.0 User Guide _________________________________________________________________________ The Audio Clip Library window appears: The Audio Clip Library displays folders titled music, phrases, and sound. The Music folder contains short musical interludes. The Phrases folder contains phrases used in business settings. The Sound folder contains a variety of mechanical and animal sound clips. To open a folder: Double-click the folder, or select one and choose Open from the File menu.
Audio Applications 3.0 User Guide _________________________________________________________________________ To open an audio file: In the music, phrases, or sounds window, double-click the name of an audio file or select the name and choose Open from the File menu. The Audio Recorder opens automatically, and the file you selected is loaded. For example, here is the QUEST1 audio file in the Audio Recorder: For information on recording, editing, and playback, see the section on the Audio Recorder.
Audio Applications 3.0 User Guide _________________________________________________________________________ 4. Click the OK button.
Audio Applications 3.0 User Guide _________________________________________________________________________ To add a new folder to the Audio Clip Library: 1. From the DOS prompt or a file manager, select the directory PCAUDIO, then select the subdirectory AUDCLIPS. 2. Create a subdirectory with the name you want on the new folder. The next time you open or refresh the Audio Clip Library window, the new folder appears.
Audio Applications 3.0 User Guide _________________________________________________________________________ To change a file name: 1. With the music, phrases, or sounds window open, select the audio file whose name you wish to change. 2. Choose Rename from the File menu. The Rename dialog box appears with the name of the file. 3. Type a new name and click the OK button. The file name is changed.
Audio Applications 3.0 User Guide _________________________________________________________________________ Audio Clip Library Menu Commands File Menu Open displays the currently selected item. From the Audio Clip Library window, Open displays the files in the selected folder. From a folder window, Open loads the selected audio file into the Audio Recorder. Rename enables you to change the name of the currently selected file. Exit closes the current window.
Audio Applications 3.0 User Guide _________________________________________________________________________ Window Menu Refresh checks the directory and updates the contents of the Audio Clip Library window or folder window. Help Menu Contents displays a list of topics you can choose for information on the Audio Clip Library. About gives the version number and copyright information.
Audio Applications 3.0 User Guide _________________________________________________________________________ 9: The Talking Calculator Introduction The Talking Calculator enables you to perform all the operations of a regular calculator. In addition, it tells you each number and operator as you enter it, then announces the result when you choose the equal operator. Starting the Talking Calculator Open the Audio Applications program group and double-click the Talking Calculator icon.
Audio Applications 3.0 User Guide _________________________________________________________________________ Performing Calculations The calculator is easiest to use with the mouse -- just point to a calculator number or function button and click it. You can also use the keyboard for basic operations such as addition (+), subtraction (-), multiplication (*), division (/), and summation (=). As you work, the Talking Calculator speaks each number and operation you enter, as well as the resulting answer.
Audio Applications 3.0 User Guide _________________________________________________________________________ Calculator Functions Button Key Function AC Esc All Clear--deletes the current calculation. CE Del Clear Entry--deletes the current number. Back Backspace Deletes the last digit of the current number.
Audio Applications 3.0 User Guide _________________________________________________________________________ Using Calculator Memory The buttons to the left of the numbers enable you to store a value and recall it at any time. When a value is stored in memory, it appears with an M in the top left of the display.
Audio Applications 3.0 User Guide _________________________________________________________________________ Regulating the Announcements • To repeat any announcement, click the REP button. • To hear each digit of the result, click the DIG button or choose Digit from the Options menu. To hear the result as a whole number, click the NUM button or choose Number from the Options menu. • To hear only the result announced, click the ANS button or choose Answer Only from the Options menu.
Audio Applications 3.0 User Guide _________________________________________________________________________ The Help Menu Contents displays a list of topics you can choose for information on the Talking Calculator. About Talking Calculator gives the version number and copyright information.
Audio Applications 3.0 User Guide _________________________________________________________________________ 10: The Talking Clock Introduction The Talking Clock displays the time in an analog or digital format. It also announces the time whenever you choose the Say command. You can set the time and whether or not the date and seconds appear. For the digital time, you can choose the font used and select the 12 or 24 hour format.
Audio Applications 3.0 User Guide _________________________________________________________________________ Positioning the Clock As with most windows, you can size and move the Talking Clock window as you like. The System menu (the button in the top left corner of the window) provides two additional settings for posititioning the clock. Always On Top displays the clock window or icon on top of other windows, even if they are selected.
Audio Applications 3.0 User Guide _________________________________________________________________________ Setting the Clock Commands on the Settings menu enable you to regulate what appears in the Talking Clock. To set the time: 1. From the Settings menu, choose Set Time. This dialog box appears: 2. Select the hour and minute and type new values, or use the up or down arrows to increase or decrease the number of hours and minutes. 4. Click the OK button.
Audio Applications 3.0 User Guide _________________________________________________________________________ To change the font used by the digital display: 1. From the Settings menu, set the display to Digital. 2. Choose Set Font from the Settings menu to display the Font dialog box. 3. Select a font from the list box. 4. Click the OK button. To turn the seconds display on and off: • From the Settings menu, choose Seconds.
Audio Applications 3.0 User Guide _________________________________________________________________________ The Help Menu Contents displays a list of topics you can choose for information on the Talking Clock. About Talking Clock gives the version number and copyright information.
Audio Applications 3.0 User Guide _________________________________________________________________________ 11: The Chime Introduction The Chime announces the time or plays other sound every hour, half hour, or quarter hour. Starting the Chime From the Audio Applications group, double-click the Chime icon. The Chime window appears. To activate or deactivate the Chime, click the ON or OFF button. To hear the chime, click the Play button. Click the Stop button to halt the playing.
Audio Applications 3.0 User Guide _________________________________________________________________________ Setting the Chime To set the Chime, click the Settings menu. The Set Chime dialog box appears: • To activate or deactivate the Chime, click the ON or OFF button. • To hear the Chime, click the Play button. • To change the Chime's sound, select the one you want from the Chime Sound Type list box. • To change the Chime interval, under Chime Time select Hour, Half Hour, or Quarter.
Audio Applications 3.0 User Guide _________________________________________________________________________ 12: The Audio Reminder Introduction The Audio Reminder has two alarms, each with a separate time, sound, and snooze settings. Once you set the alarms, they will go off on schedule every day as long as the Audio Reminder window is open or minimized to an icon. Starting the Audio Reminder In the Audio Applications group, double-click the Reminder icon.
Audio Applications 3.0 User Guide _________________________________________________________________________ Setting an Alarm The Audio Reminder provides two alarms. To set one, choose Set Alarm 1 or Set Alarm 2 from the Settings menu. The Set Alarm dialog box appears: • In the Alarm area, click ON or OFF to enable or disable the alarm. • Under Hour and Minute, set the time for the alarm to go off. • In the Sound area, select Buzzer, Gong, or Voice File.
Audio Applications 3.0 User Guide _________________________________________________________________________ Choose an audio file and click the OK button. The path and name of the audio file now appear in the Set Alarm dialog box: • To hear what the alarm sounds like, click the Play button. Snooze: If ON, the snooze feature will continue sounding the alarm after it first goes off.
Audio Applications 3.0 User Guide _________________________________________________________________________ The Audio Reminder window now shows the new settings for Alarm 1: • To enable or disable either alarm, click its ON or OFF button. • To hear either alarm, click its Play button. • To stop an alarm currently playing, click its Stop button. To hear the alarms go off on schedule, leave the Audio Reminder window either open or minimized to an icon.
Audio Applications 3.0 User Guide _________________________________________________________________________ Audio Reminder Menu Commands Settings Menu Set Alarm 1 and Set Alarm 2 enable you to specify the time, sound, and snooze interval for each alarm. Help Menu Contents displays a list of topics you can choose for information on the Audio Reminder. About Audio Reminder gives the version number and copyright information.
Audio Applications 3.0 User Guide _________________________________________________________________________ 13: The Stopwatch Introduction The Stopwatch keeps track of the time elapsed since it was started. You can set the Stopwatch to sound a tick each second it is running and announce the amount of time elapsed since it was activated. Starting the Stopwatch From the Audio Applications group, double-click the Stopwatch icon.
Audio Applications 3.0 User Guide _________________________________________________________________________ Operating the Stopwatch • To begin the Stopwatch, click the Start button. While the Stopwatch is running, the Start button is replaced with the Stop button. • Click the Stop button to stop the Stopwatch and announce the elapsed time. The Stop button is replaced with the Start button. To resume the timing, click the Start button again. • The Stopwatch ticks as it runs.
Audio Applications 3.0 User Guide _________________________________________________________________________ Here is the System menu for the Stopwatch: • To reduce the Stopwatch to an icon, choose Minimize. The icon continues to show the elapsed time. • To keep the Stopwatch window or icon on top of other windows, choose Always On Top from the System menu. The Help Menu Contents displays a list of topics you can choose for information on the Stopwatch.
Audio Applications 3.0 User Guide _________________________________________________________________________ 14: The Timer Introduction The Timer works the opposite of the Stopwatch. The Timer counts down from the time you set to 00:00. Whenever you stop the Timer, it announces the amount of time remaining. The Timer sounds a bell each second it is running. From 19 seconds on down, the Timer announces each second. You can also set the Timer to announce each minute as it passes.
Audio Applications 3.0 User Guide _________________________________________________________________________ Setting the Timer To set the timer, choose Set Time from the Settings menu. The Set Timer dialog box appears: • Under Min and Sec, set the amount of time for the Timer to count down. • In the Minute Sound area, choose ON or OFF to activate or deactivate the voice announcement of each minute as it passes.
Audio Applications 3.0 User Guide _________________________________________________________________________ Operating the Timer • To begin the Timer, click the Start button. While the Timer is running, the Start button is replaced with the Stop button. • Click the Stop button to stop the Timer and announce the time remaining. The Stop button is replaced with the Start button. To continue the countdown, click the Start button again. • The Timer sounds a bell each second as it runs.
Audio Applications 3.0 User Guide _________________________________________________________________________ Controling the Appearance of the Timer • From the Settings menu, choose Analog or Digital to change the format. • Choose Set Font to change the font of numbers in the digital display. In the Font dialog box, select the font you want and click the OK button.
Audio Applications 3.0 User Guide _________________________________________________________________________ Here is the System menu for the Timer: • To reduce the Timer to an icon, choose Minimize. The icon continues to show the time remaining. • To keep the Timer window or icon on top of other windows, choose Always On Top from the System menu. The Help Menu Contents displays a list of topics you can choose for information on the Timer. About Timer gives the version number and copyright information.