QUEST BAGGER ® For Serial Nos. 790,000 & Higher Part No. 4500-438 Rev.
Exmark reserves the right to make changes or add improvements to its products at any time without incurring any obligation to make such changes to products manufactured previously. Exmark, or its distributors and dealers, accept no responsibility for variations which may be evident in the actual specifications of its products and the statements and descriptions contained in this publication. © 2009—Exmark Mfg. Co., Inc. Industrial Park Box 808 Beatrice, NE 68310 2 Contact us at www.Exmark.com.
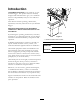
Introduction CONGRATULATIONS on the purchase of your Exmark Bagger. This product has been carefully designed and manufactured to give you a maximum amount of dependability and years of trouble-free operation. This manual contains operating, maintenance, adjustment, and safety instructions for your Exmark Bagger. BEFORE OPERATING YOUR MOWER, CAREFULLY READ THIS MANUAL IN ITS ENTIRETY.
Contents Introduction ........................................................... 3 Safety ..................................................................... 5 Safety Alert Symbol ......................................... 5 Safe Operating Practices .................................. 5 Safety and Instructional Decals ....................... 8 Specifications ......................................................... 9 Model Numbers .............................................. 9 Systems ...................
Safety Safety • Never let children or untrained people operate or service the equipment. Local regulations may restrict the age of the operator. Safety Alert Symbol • The owner/user can prevent and is responsible for accidents or injuries occurring to himself or herself, other people or property.
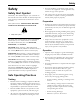
Safety • Stop the blades, slow down, and use caution when crossing surfaces other than grass and when transporting the mower to and from the area to be mowed. • Be aware of the mower discharge path and direct discharge away from others. Slope Operation Use Extreme caution when mowing and/or turning on slopes as loss of traction and/or tip-over could occur. The operator is responsible for safe operation on slopes. Figure 3 DANGER 1. Safe Zone-Use the mower here on slopes less than 15 degrees 2.
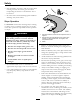
Safety Maintenance and Storage • Disengage drives, set parking brake, stop engine and remove key or disconnect spark plug wire. Wait for all movement to stop before adjusting, cleaning or repairing. • Use care when checking blades. Wrap the blade(s) or wear gloves, and use caution when servicing them. Only replace damaged blades. Never straighten or weld them. • Keep all guards, shields and all safety devices in place and in safe working condition. • Check all bolts frequently to maintain proper tightness.
Safety Safety and Instructional Decals • Keep all safety signs legible. Remove all grease, dirt and debris from safety signs and instructional labels. • Replace all worn, damaged, or missing safety signs. • When replacement components are installed, be sure that current safety signs are affixed to the replaced components. • If an attachment or accessory has been installed, make sure current safety signs are visible.
Specifications Specifications Model Numbers Serial Nos: 790,000 and Higher 116-1084 Systems Recommended High Lift Blades: Part Number Bagging System • Collection Bins: – Commercial grade, cloth mesh bags with reinforced bottoms. – Capacity: 6 bushels (2 bags and hood) • Dump Mechanism: Manual lift off • Blower Tube: Fixed, abrasion resistant molded polyethylene. Overall Width: w/Bagger 53.0 inches (135 cm) 48 inch Deck 57.0 inches (145 cm) 52 inch Deck 60.
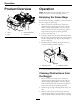
Operation Product Overview Operation Note: Determine the left and right sides of the machine from the normal operating position. Emptying the Grass Bags Be careful when lifting or handling a grass bag that is full. To empty the grass bags: 1. Move the motion control levers outward to neutral position, disengage the power take off (PTO), engage parking brake, stop the engine, remove the key, and wait for all moving parts to stop before leaving the operating position. 2. Open (raise) the hood. 3.
Operation the obstruction from the mower, discharge tube, chute, and the hood. 4. After you remove the obstruction, install the complete bagger system and resume operation. Removing the Bagger DANGER An uncovered discharge opening will allow objects to be thrown in operator’s or bystander’s direction. Also, contact with blade could occur. Thrown objects or blade contact can cause serious injury or kill you or bystanders. Figure 6 1. 2. 3. 4.
Operation Note: On the 42 and 52 inch decks, the discharge baffle does not have to be removed from the deck; you may notice better discharge with it installed. If removed, replace the original hardware in the deck holes. deflector up to test that it snaps to the full down position. Installing the Bagger 1.
Operation Cutting Height WARNING The front weight installed without the bagger may cause loss of traction and steering control or an unstable condition which could result in injury or death. Do Not set the mower cutting height too low because long grass surrounding the mower can prevent air from getting under the mower and entering the bagging system. If enough air doesn’t get under the mower, the bagging system will plug. Install the front weight only when the bagger is installed.
Operation Transporting want to slightly reduce the throttle speed and increase the ground speed of the mower. The bagging system may plug if you drive too fast and the engine speed gets too slow. On hills it may be necessary to slow the mower ground speed. This helps maintain the engine speed and bagging efficiency. Transporting a Unit Use a heavy-duty trailer or truck to transport the machine. Lock brake and block wheels.
Operation ramp angle. The trailer or truck should be as level as possible. WARNING Loading a unit on a trailer or truck increases the possibility of backward tip-over. Backward tip-over could cause serious injury or death. Important: Do Not attempt to turn the unit while on the ramp, you may lose control and drive off the side. • Use extreme caution when operating a unit on a ramp. Avoid sudden acceleration when driving up a ramp and sudden deceleration when backing down a ramp.
Maintenance Maintenance Note: Determine the left and right sides of the machine from the normal operating position. WARNING WARNING While maintenance or adjustments are being made, someone could start the engine. Accidental starting of the engine could seriously injure you or other bystanders. Debris built up in the engine compartment, if not removed, could be ignited by a hot engine. A fire in the engine compartment can burn you and others and can damage property.
Maintenance Inspecting the Mower Blades Cleaning Service Interval: As required Cleaning the Bagger Attachment Refer to your mower Operator’s Manual for complete blade maintenance. Service Interval: Before each use or daily Caring for the Grass Bags 1. After each use, remove and wash the inside and outside of the bagger top, discharge tube, chute, and the underside of the mower, using water sprayed from a garden hose. Use a mild automotive detergent to remove stubborn dirt.
Storage Storage Storing the Bagger Attachment 1. Clean the bagger attachment; refer to Cleaning the Bagger Attachment in Maintenance. 2. Inspect the bagger attachment for damage; refer to Inspecting the Bagger Attachment in Maintenance. 3. Make sure the grass bags are empty and thoroughly dry. 4. Store the bagger in a clean, dry place, out of direct sunlight. This protects the plastic parts and extends the life of the bagger. If you must store the bagger outside, cover it with a weatherproof cover.
Troubleshooting Troubleshooting Important: It is essential that all operator safety mechanisms be connected and in proper operating condition prior to mower use. When a problem occurs, do not overlook the simple causes. For example: starting problems could be caused by an empty fuel tank. The following table lists some of the common causes of trouble. Do Not attempt to service or replace major items or any items that call for special timing or adjustment procedures (such as valves, governor, etc.).
Exmark Quest Attachments and Accessories 1-Year Limited Consumer Warranty (30-Day Limited Commercial Warranty) If for any reason you are dissatisfied with the Service Dealer’s analysis or with the assistance provided, contact us at: Consumer Warranty Conditions and Products Covered Exmark Mfg. Co. Inc.
Notes: 21
Service Record Date: Description of Work Done: 22 Service Done By:
SEE EXMARK’S COMPLETE LINE OF ACCESSORIES AND OPTIONS MID-MOUNT RIDING ACCESSORIES AND OPTIONS CUSTOM RIDE SEAT SUSPENSION SYSTEM OPERATOR CONTROLLED DISCHARGE FULL SUSPENSION SEAT ROLL OVER PROTECTION SYSTEM (ROPS) DECK LIFT ASSIST KIT SUN SHADE HITCH KIT TRASH CONTAINER LIGHT KIT TURF STRIPER 12V POWER PORT ULTRA VAC COLLECTION SYSTEM MICRO-MULCH SYSTEM ULTRA VAC QUICK DISPOSAL SYSTEM OUT-FRONT RIDING ACCESSORIES AND OPTIONS CUSTOM RIDE SEAT SUSPENSION SYSTEM SNOW BLADE DUAL-TAIL WHEEL SN