
User manual


Maintenance
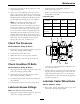
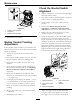
4.Toadjustthebrake,removethehairpin,washer,
andclevispinfromthelowerbrakeleverandyoke
asshowninFigure28.
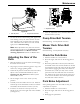
Figure28
1.Jamnut4.Lowerbrakelever
2.Yoke5.Washer
3.Clevispin
6.Hairpin
5.Loosenthejamnut.
6.Rotatetheyoke.Totightenthebrake,rotatethe
yokeup.Toloosenthebrake,rotatetheyoke
down.
Note:Thebrakerodshouldbethreadedinto
bothyokesthesamedistance.
7.Securetheyoketolowerbrakeleverwiththe
hairpin,washer,andclevispin.
8.Tightenthejamnut.
9.Checkthebrakeoperationagain.
10.Afterthebrakeisadjusted,theleverswitchneeds
tobechecked.
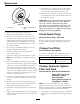
11.Checkthegapbetweenthebrakeleverandthe
switchasshowninFigure29.Thegapneedsto
bean1/8inch(3mm)withthebrakeengaged.
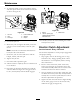
Figure29
1.Switch
3.Brakelever
2.1/8inch(3mm)gap
neededbetweenswitch
andbrakelever
12.Ifneeded,loosenthescrewsholdingtheswitch
andadjusttheswitch.
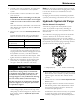
ElectricClutchAdjustment
ServiceInterval:Every100hours
Theclutchisadjustabletoensureproperengagement
andproperbraking.
1.Stopengine,waitforallmovingpartstostop,
andremovekey.Engageparkingbrake.Allow
themachinetocoolcompletelybeforestarting
theseinstructions.
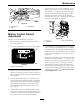
2.Inserta0.015–0.021inch(0.381–0.533mm)
feelergaugethroughoneinspectionslotinthe
sideoftheassembly.Makesureitisbetweenthe
armatureandtherotorfrictionsurfaces.
3.Thegapshouldbeatleast0.015(0.381mm)and
notmorethan0.021(0.533mm).Ifadjustmentis
needed,thensetat0.015(0.381mm)foreachof
thethreeadjustmentslotpositions.
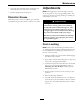
4.Tightenthelocknutsuntilthereisslightbinding
onthefeelergaugebutitcanbemovedeasily
withintheairgap(seeFigure30).
38