
User Manual

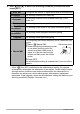


Table Of Contents
- Unpacking
- Read this first!
- Contents
- Quick Start Basics
- What is a digital camera?
- What you can do with your CASIO camera
- First, charge the battery prior to use.
- Configuring the Display Language the First Time You Turn On the Camera
- Preparing a Memory Card
- To shoot a snapshot
- Holding the Camera Correctly
- Viewing Snapshots
- Deleting Images
- Snapshot Shooting Precautions
- Turning the Camera On and Off
- Snapshot Tutorial
- Using the Control Panel
- Changing the Image Size (Size)
- Using Flash (Flash)
- Using Face Detection (Face Detection)
- Reducing the Effects of Camera and Subject Movement (Anti Shake)
- Specifying ISO Sensitivity (ISO)
- Adjusting White Balance (White Balance)
- Correcting Image Brightness (EV Shift)
- Using the easy Mode
- Changing the Control Panel Date/Time Style
- Shooting with Zoom
- Recording Movie Images and Audio
- Using BEST SHOT
- Advanced Settings
- Using On-screen Menus
- REC Mode Settings (REC)
- Selecting a Focus Mode (Focus)
- Using Continuous Shutter (Continuous)
- Using the Self-timer (Self-timer)
- Shooting with Face Detection (Face Detection)
- Reducing the Effects of Camera and Subject Movement (Anti Shake)
- Specifying the Auto Focus Area (AF Area)
- Using the easy Mode (easy Mode)
- Assigning Functions to the [<] and [>] Keys (L/R Key)
- Displaying the On-screen Grid (Grid)
- Turning Digital Zoom On or Off (Digital Zoom)
- Turning on Image Review (Review)
- Using Icon Help (Icon Help)
- Configuring Power On Default Settings (Memory)
- Image Quality Settings (Quality)
- Specifying Snapshot Size (Size)
- Specifying Snapshot Image Quality (Quality (Snapshot))
- Specifying Movie Image Quality (Quality (Movie))
- Correcting Image Brightness (EV Shift)
- Controlling White Balance (White Balance)
- Specifying ISO Sensitivity (ISO)
- Specifying the Metering Mode (Metering)
- Using Built-in Color Filters (Color Filter)
- Controlling Image Sharpness (Sharpness)
- Controlling Color Saturation (Saturation)
- Adjusting Image Contrast (Contrast)
- Specifying Flash Intensity (Flash Intensity)
- Viewing Snapshots and Movies
- Other Playback Functions (PLAY)
- Printing
- Using the Camera with a Computer
- Other Settings (Set Up)
- Selecting a REC Mode Screen Layout (_ Panel)
- Selecting a PLAY Mode Screen Layout (> Display)
- Configuring Camera Sound Settings (Sounds)
- Specifying the File Name Serial Number Generation Rule (File No.)
- Configuring World Time Settings (World Time)
- Time Stamping Snapshots (Timestamp)
- Setting the Camera’s Clock (Adjust)
- Specifying the Date Style (Date Style)
- Specifying the Display Language (Language)
- Configuring Sleep State Settings (Sleep)
- Configuring Auto Power Settings (Auto Power Off)
- Configuring [_] and [>] Settings (REC/PLAY)
- Configuring USB Protocol Settings (USB)
- Selecting the Screen Aspect Ratio and Video Output System (Video Out)
- Formatting Built-in Memory or a Memory Card (Format)
- Resetting the Camera to Factory Defaults (Reset)
- Configuring Monitor Screen Settings
- Appendix

40
Recording Movie Images and Audio
• Only digital zoom can be used for zooming during movie recording. Since optical
zoom is not possible while recording a movie, zoom as required before pressing
the shutter button to start recording.
• The effects of camera movement in an image become more pronounced when you
shoot close up or with a large zoom factor. Because of this, use of a tripod is
recommended under these conditions.
Voice Recording lets you record audio only, without a snapshot or movie. You can
record about 56 minutes and 4 seconds of Voice Recording using the camera’s built-
in memory only.
1. In the REC mode, press [BS].
2. Use [8], [2], [4], and [6] to select the
`
(Voice Recording) scene
and then press [SET].
This causes ` to appear on the monitor screen.
3. Press the shutter button to start recording.
• The back lamp flashes green while recording is in
progress.
• Pressing [SET] during recording will insert a
marker into the recording. During playback, you
will be able to jump to the markers in the
recording.
4. Press the shutter button again to stop audio
recording.
• To create another audio recording file, repeat
steps 3 and 4.
• To turn off Voice Recording, press [BS] and then select t (Auto).
Recording Audio Only (Voice Recording)
Recording time
Remaining recording time
B