
User's Manual

16
17
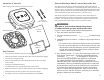
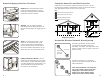
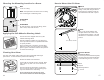
Choosing the Mounting Location in a Room
BEST
Center on ceiling.
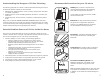
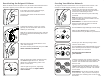
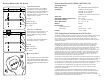
How to Mount the CO Alarm
1 Mark
Place the mounting bracket against the
ceiling or wall, and using the mount-
ing bracket as a template, mark the
top and bottom holes with a pencil.
2 Drill
Using a 1/8” (3mm) drill bit, drill
two pilot holes in the center of the
two marked hole locations. This will
determine if a wood beam or stud is
present.
3 Fasten Bracket
Situation A: Wood
If wood is present behind the drywall,
securely fasten the mounting bracket
to the wall using the two 1” screws.
1/8” (3mm) drill bit
Wood
Drywall
Mounting Bracket
1” Screws
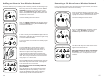
Applying the Self-Adhesive Warning Labels
Add the telephone numbers of your emergency
service provider and that of a qualified technician
in spaces provided.
This CO alarm was shipped with two (2) self-
adhesive Warning Labels.
Place one label next to the alarm, and the other
label near a source of fresh air where your family
plans to gather if the alarm indicates the presence
of carbon monoxide gas.
WARNING
WARNING
Cleaning Your Alarm
Over time, dust might collect within your alarm, potentially reducing its
performance. To clean the alarm perform the following:
Remove the alarm from its bracket.
Vacuum all the external surfaces carefully. Wipe
with a clean, dry cloth. Do not use cleaners or
solvents.
Do not submerge the CO alarm in water.
The sensitive electronics will be damaged!
Press and release the Test button on the front
face to verify the alarm is still functioning prop-
erly and reinstall on the wall/ceiling.
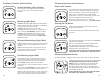
Note: Avoid placement of alarms close to ceiling
fans or heating/air conditioning vents.
ACCEPTABLE
On ceiling
ACCEPTABLE
On wall, at least 4” (10cm) from ceiling, and at
least 3 feet (0.9m) from the floor.
Minimum 3’
from floor
Exigent CO Manual 102913.indd 16-17 10/29/2013 7:44:55 PM