
User's Manual

15
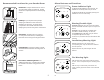
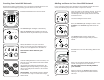
Removing an Alarm from Your interLINX Network
In the event that an alarm must be removed from your interLINX network, the
following steps must be taken.
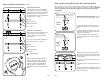
Press and hold the button on the front cover of
the alarm. The FIRE light will flash rapidly and
the alarm will sound three tones.
Continue holding the button down.
Next, the WARNING light will begin to flash.
Count 10 flashes of the WARNING light and
release the button.
The alarm will chirp twice and all four of the
lighted icons will strobe on.
The alarm has been removed from the
network.
Reset the alarm by removing the (4) AA batteries
and immediately re-installing them.
After a few seconds the alarm will chirp twice and
all four of the lighted icons will strobe on.
After five minutes, the WARNING light will stop
flashing and the alarm will function as a stand-
alone unit.
1
2
3
4
16
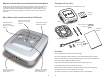
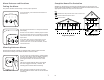
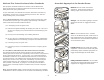
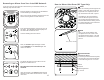
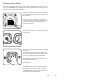
How to Mount the Alarm (DC Type Only)
1 Mark
Place the mounting bracket against the
ceiling or wall, and using the mount-
ing bracket as a template, mark the
top and bottom holes with a pencil.
2 Drill
Using a 1/8” (3mm) drill bit, drill
two pilot holes in the center of the
two marked hole locations. This will
determine if a wood beam or stud is
present.
3 Fasten Bracket
Situation A: Wood
If wood is present behind the drywall,
securely fasten the mounting bracket
to the wall using the two 1” screws.
1/8” (3mm) drill bit
Wood
Drywall
Mounting Bracket
1” Screws
If installing an AC powered alarm,
with the electrical power off to the
line, simply attach the bracket to the
electrical box with the existing screws.
See wiring diagram in this manual for
connection information.