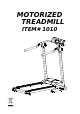
MOTORIZED TREADMILL ITEM# 1010
MANUAL OWNER’S IMPORTANT: Read all instructions carefully before using this product. Retain this owner’s manual for future reference. The specifications of this product may vary from this photo, subject to change without notice. IMPORTANT: FOR NORTH AMERICA ONLY To request product service and order replacement parts, please call our customer service department at: 18669241688 Monday through Friday, 8:00 AM5:00 PM Pacific Standard Time, or email us at: service@paradigmhw.
TABLE OF CONTENTS WARRANTY 3 WARNING LABEL PLACEMENT 4 IMPORTANT SAFETY INSTRUCTIONS 5 PARTS LIST 8 TOOL 9 OVERVIEW DRAWING
PARTS REQUEST FAX FORM 20 ONE YEAR LIMITED WARRANTY Paradigm Health & Wellness, Inc. warrants to the original purchaser that this product is free from defects in material and workmanship when used for the purpose intended, under the conditions that it has been installed and operated in according to Paradigm’s Owner’s Manual.
WARNING LABEL PLACEMENT 5
IMPORTANT SAFETY INSTRUCTIONS Basic precautions should always be followed, including the following safety instructions when using this treadmill: Read all instructions before using this treadmill. DANGER: To reduce the risk of electric shock, please read the following: Always unplug the treadmill from the electrical outlet immediately after using and before cleaning, assembling, or servicing. NOTE: Failure to follow these instructions may lead to personal injury and cause damage to the treadmill.
Only one person should be on the treadmill while in use. Wear comfortable and suitable clothing when using the treadmill. Do not use the treadmill barefoot, in only socks or in sandals, always wear athletic shoes. Never wear loose clothing because it could run the risk of getting caught in the treadmill. Always hold on to the handrails while using the treadmill. Always make sure the storage latch is in place when folding and moving the treadmill.
This unit must be plugged into a nominal 120 volt, which has a grounding. Keep hands clear of all moving parts. Never place hands, feet under the treadmill. Do not use the treadmill on a carpet that is greater than 1/2 inch in height. Before using the treadmill, check that the belt is aligned and centered on the walking deck and all visible fasteners on the treadmill are sufficiently tightened and secure. WARNING: Before beginning any exercise program consult your physician.
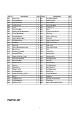
Part # 001 002 003 004 005 006 007 008 009 010 011 012 013 014 015 016 017 018 019 020 021 022 023 024 025 026 027 028 029 030 Description Main Frame Bolt (M6x60mm) Right Rear Cap Left Rear Cap Cover Nylon Nut (M6) Tapping Screw (M4x16mm) Screw (M4x50mm) Bolt (M6x40mm) Spring Washer (M6) Bolt (M4x12mm) Nut (M4) Wire Cap Spacer Ø18xØ10.
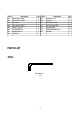
Part # 061 062 063 064 065 066 067 068 Description Spring Washer (M8) Speed Button W/Wire Short Knob Mode Button W/Wire Safety Tether Key Bolt (M10x55mm) Handlebar Knob Handlebar Qty 2 1 1 1 1 2 2 1 Part # 069 070 071 072 073 074 075 PARTS LIST TOOL Allen Wrench 1 PC 10 Description Computer Knob Computer Binding Wire Plate Nylon Bundling Strip Washer (M10) Washer Ø21xØ8.5x1.
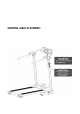
OVERVIEW DRAWING 11
ASSEMBLY INSTRUCTIONS A. Turn the Spring Knob (23) in a counterclockwise direction and then pull it to set down the Main Frame (1) on the floor. Turn the Spring Knob (23) clockwise to secure the treadmill in the folding down position. First remove four Stabilizer Knobs (32) and Ø21xØ8.5x1.8t Washers (74) from the right and left sides of Stabilizer (57). Then insert both Stabilizer Tubes (30) into the tubes of Stabilizer (57) and secure them with four Stabilizer Knobs (32) and Ø21xØ8.5x1.
D. There are five Adjustable Pads (28) on the bottom of both Stabilizer Tubes (30) and Stabilizer (57). You can adjust the Adjustable Pad (28), if the floor is not level. STORAGE A B Handlebar Knob Spring Knob C D Handlebar Short Knob FOLDING THE TREADMILL For your convenience, the treadmill can be folded up and placed in a storage area.
OPERATING THE COMPUTER Quick Start: Flip the Master Power Switch that is located at the front of the treadmill to the ON position. The treadmill will selftest for 2 seconds on startup and then the speed setting will show up after a 2 second long beep. Before beginning a workout session ensure that the Safety Tether Key is properly placed onto the Computer Console and the Safety Clip is securely attached to an article of your clothing. Always begin the treadmill standing on the side rails, not on the belt.
Press and hold the RESET button for 2 seconds, all data values will clear to zero. SPEED UP: Press the SPEED UP button to increase walking speed. SPEED DOWN: Press the SPEED DOWN button to decrease walking speed. Computer Functions: TIME: Displays your elapsed workout time in minutes and seconds. Press the START/STOP button to start exercise. The walking belt starts moving at speed of 0.4 MPH.
preset target calories, press the START/STOP button to start exercising. The walking belt starts moving with the speed at 0.4 MPH. You may press the SPEED UP or SPEED DOWN button on the computer console or right handlebar to increase or decrease the running speed during exercise. Calories start counting down from preset target calories to 0. When the preset target calories count down to 0, the computer will begin beeping to remind you. The treadmill will stop operation automatically.
CLEANING The treadmill can be cleaned with a soft cloth and mild detergent. Do not use abrasives or solvents. Be careful not get excessive moisture on the display panel as this might cause an electrical hazard or electronics to fail. Please keep the treadmill, especially, the console, out of direct sunlight to prevent screen damage. STORAGE Store the treadmill in a clean and dry environment.
treadmill and let the belt run at the speed of 11.5 MPH. Using the Allen wrench provided, turn the left rear roller adjustment bolt 1/4 turn in the clockwise direction. You should see the belt start to correct itself by moving back toward the center. Repeat the above procedure until the belt is properly centered. If the belt is shifting to the right, turn on the main power switch of treadmill and let the belt run at the speed of 11.5 MPH.
HEAD ROLLS Rotate your head to the right for one count, you should feel a stretching sensation up the left side of your neck. Then rotate your head back for one count, stretching your chin to the ceiling and letting your mouth open. Rotate your head to the left for one count, then drop your head to your chest for one count. SHOULDER LIFTS Lift your right shoulder toward your ear for one count. Then lift your left shoulder up for one count as you lower your right shoulder.
TOE TOUCHES Slowly bend forward from your waist, letting your back and shoulders relax as you stretch toward your toes. Reach as far as you can and hold for 15 counts. HAMSTRING STRETCHES Extend your right leg. Rest the sole of your left foot against your right inner thigh. Stretch toward your toe as far as possible. Hold for 15 counts. Relax and then repeat with left leg. CALF/ACHILLES STRETCH Lean against a wall with your left leg in front of the right and your arms forward.
PARADIGM PARTS REQUEST FAX FORM Please fax this form to (16268102166) OR YOU CAN EMAIL CUSTOMER SERVICE REQUESTS TO service@paradigmhw.