
User's Guide


User Guide
- 51 –
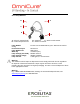
Front Panel Buttons
Position
Description
Start/Stop Button
Depressed
Shutter Activation
Center button
Momentary
Depressed
Select
UP Button
Momentary
Depressed
Navigates up. Increases intensity
value.
DOWN Button
Momentary
Depressed
Navigates down. Decreases intensity
value
Left Button
Momentary
Depressed
Navigates left. Decreases time.
Right Button
Momentary
Depressed
Navigates right. Increases time.
Table 11 Front Panel Button Descriptions
Service to be completed by qualified repair personnel only!
22.1.1 If the unit fails to POWER up or function properly, use the following checklist to
eliminate the most common causes of problems. Check that:
1. The AC POWER cord is securely plugged into a functional AC wall plug.
2. The AC POWER cord is securely plugged into the AC inlet on the rear of the
unit.
3. The mains AC POWER switch is in the ON position.
22.1.2 If the LED display lights and the fan starts, but the lamp will not turn on, check
for the following:
1. The LCD display indicates “cooling” message. This indicates the lamp is too
hot to strike. The lamp will automatically strike when it has cooled.
22.1.3 If the shutter does not open, check that:
1. The light guide is fully inserted; The lamp is warmed-up; the display is not
displaying errors. The shutter interlock input is not active (P1, pins 6 & 4).
2. The LCD displays shutter failure. POWER down the unit, wait a few minutes
and turn POWER on to the unit. If the unit displays a shutter failure again,
contact your local Excelitas Canada Service Centre to have your unit serviced.
22.1.4 If the light intensity is too low, check that:
1. The percent iris opening is set high enough.
2. There are no foreign substances on the emitting end of the light guide.