
User's Manual


USING THE SAFEPRESENCE MOTION DETECTOR
INFORMATION FOR CAREGIVERS
The SafePresence Motion Detector is only an aid for caregivers and is not designed to replace proper nursing
care including, but not limited to 1) visual monitoring 2) direct patient supervision 3) proper training for all
caregivers using the system 4) testing the system daily and before each use, and 5) immediate caregiver
response to the alerts. The Caregiver Communicator and accessories may not be suitable for all individuals.
The SafePresence Motion Detector senses movement. It sounds a local alarm (on the sensor) or transmits alerts to a
pager (remote alert) carried by caregivers. The unit is often installed to monitor a bed or doorway. Caregivers choose
the placement and application that is best for the person in their care.
Screws (included) or Velcro® (sold separately) can be used to mount the sensor which is powered by a 9V alkaline
battery. The pager is also battery powered. It has LOW or HIGH volume settings. LED lights on the sensor and pager
become dim when the battery is low.
SYSTEM SETUP
When Choosing a Mounting Location:
1. The sensor can be adjusted in the bracket as needed.
2. If used to monitor a bed, motion can only be detected on the side of the bed the sensor is mounted on.
3. Sensor beam is perpendicular to the fl oor when sensor is mounted vertically.
4. Sensor beam is parallel to the fl oor when mounted horizontally.
5. Detection beam extends up to 16 feet from sensor. Test to determine fi eld before use.
6. Keep the monitored area secure by using privacy curtains or other items to reduce false alarms.
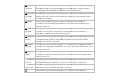
The SP sensor requires (1) one 9 Volt alkaline battery (not included). Install battery before use.
1. Select mounting location. 4. Slide battery cover off.
2. Carefully spread bracket open. 5. Insert 9V battery (not included).
3. Remove sensor. 6. Replace battery cover.
Snap battery securely into battery contacts. Test before each use.
Tools Needed to Mount:
Pencil.
3 screws (included).
Drill.
Option Mounting: Velcro (sold separately).
Screwdriver.
To Mount Bracket:
1. Position bracket on mounting location. 5. Hang bracket on the screws.
2. Mark holes with pencil. 6. Tighten the screws.
3. Drill pilot holes. 7. Replace sensor.
4. Insert screws.
For assistance call your distributor or visit www.safepresence.com
SafePresence™ is a trademark of J. Brasch Co. or its affi liates.
All Rights Reserved © 2011 DOC 16.71100.12
READ and follow these instructions. SAVE them for future use.
5
USING THE SAFEPRESENCE MOTION DETECTOR
PAGER SETUP
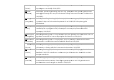
The Pager can be:
1. Mounted using the hanging socket.
2. Placed on a fl at surface using the standing buckle clamp.
Installing Batteries:
1. Remove battery cover.
2. Insert one (1) 9V alkaline battery.
3. Replace battery cover.
A fi rm click indicates the sensor has been properly placed in bracket.
Choose between different alert types:
1. Choose local alert by pressing “CHIME” on the sensor.
2. Choose remote alert by pressing “REMOTE” on the sensor.
Local Alert:
1. Turn Sensor power on by selecting “CHIME” on sensor.
2. A 10 second delay allows staff to exit monitored area.
3. When object enters monitored fi eld, local alarm sounds.
Remote Alert:
1. Turn Sensor Power on by selecting “CHIME” on sensor.
2. Turn Pager Power on by selecting “HIGH” or “LOW” on pager.
3. A 10 second delay allows staff to exit monitored area.
4. When object enters monitored fi eld, pager sounds.
Tone Selection on Pager:
1. There are 8 tones selectable by pressing button inside the battery compartment.
For assistance call your distributor or visit www.safepresence.com
SafePresence™ is a trademark of J. Brasch Co. or its affi liates.
All Rights Reserved © 2011 DOC 16.71100.12
READ and follow these instructions. SAVE them for future use.
6