EPMG8 - EPMG12 - EPMG22 - EPMG32 Electric Meat Grinder Manual Guide de hachoir à viande électrique Manual del moledor eléctrico de carne www.ExcaliburDIY.
TABLE OF CONTENTS Product Parts. . . . . . . . . . . . . . . . . . . . . . . . . . . . . . . . . . . . . . . . . . . . . . . . . . . . . . . . . . . . . . . . . . . . 2 Important Safeguards. . . . . . . . . . . . . . . . . . . . . . . . . . . . . . . . . . . . . . . . . . . . . . . . . . . . . . . . . . . . . 3 Information About The Appliance . . . . . . . . . . . . . . . . . . . . . . . . . . . . . . . . . .
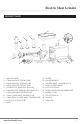
Electric Meat Grinder PRODUCT PARTS 21 4 3 1 2 20 19 14 11 5 7 6 8 9 10 12 13 1. MEAT STOMPER 2. 15MM SAUSAGE STUFFING TUBE 3. 25MM SAUSAGE STUFFING TUBE 4. 35MM SAUSAGE STUFFING TUBE 5. DOWN SPOUT (EPMG22 & EPMG32) 6. STAINLESS STEEL GRINDER HEAD RING NUT 7. 4.5MM FINE MEAT GRINDER PLATE 8. 7MM COARSE MEAT GRINDER PLATE 9. 10MM EXTRA COARSE MEAT GRINDER PLATE 10. SAUSAGE STUFFING STAR 11. KNIFE www.ExcaliburDIY.
IMPORTANT SAFEGUARDS SAVE THESE INSTRUCTIONS Warning: Failure to read these warnings may result in personal injury. When using electrical appliances, important safeguards should always be followed including the following: 1. Read and follow all instructions before using the grinder. 2. Use only approved grounded electrical outlet. 3. Do not use during an electrical storm. 4. Do not use outdoors, this product is for indoor household use only. 5. Do not expose to rain or water at anytime. 6.
Electric Meat Grinder INFORMATION ABOUT THE APPLIANCE • Carefully read this manual and understand all the safety standards described herein. • Avoid touching the moving parts with your hands and avoid touching the appliance with wet hands. • When cleaning or servicing the meat grinder take into consideration all possible hazards. • When cleaning or servicing the appliance always concentrate on what you are doing and avoid any possible distractions.
SETTING UP THE APPLIANCE FOR USE 1. With the Feed Chute facing straight up, insert the Head into the Gear Housing. Line up the slot in the Head with the Knob/Pin inside the Gear Housing. Be sure the Head is seated fully into the Gear Housing (Figure 1). Figure 1 grinder feed gear housing head chute knob/pin 2. Tighten the Head Locking Knob to lock the Head into place. 3. Insert the Auger, with the Auger Washer attached, into the Head (Figure 2). NOTE: Periodically inspect the Auger Washer for wear.
DOWNSPOUT ASSEMBLY INSTRUCTIONS 1 - DOWN SPOUT B 2 - DOWN SPOUT RING Grinder Head C A D Opening Ring Nut A: Insert the Down Spout (1) to the Down Spout Ring (2). B: Connect Down Spout (1) and the Down Spout Ring (2) to the Ring Nut on the Grinder Head. C: Turn the Down Spout Ring(2) from the “Close” direction clockwise, then fasten the Down Spout Ring (2) to the Ring Nut. D: Adjust the opening of the Down Spout, make sure the opening is facing downwards as shown in the illustration.
Electric Meat Grinder USING THE GRINDER 1. Follow the “SETTING UP THE APPLIANCE FOR USE” directions. NOTE: It is best to grind the meat using the coarse, 7 mm Grinding Plate first. If a finer grind of meat is desired, run the coarse ground meat through the Grinder a second time using the fine, 4.5 mm Grinding Plate. 2. Trim the meat of all cords, tendons, bones, etc. For best results, be sure that all meat has been chilled to between 32-34°F (0-1°C) before grinding.
SAUSAGE / STUFFING INSTRUCTIONS 1. After grinding the meat following the “Using the Grinder” section, mix the ground meat with the sausage seasonings. 2. F ollow the “Sausage Stuffing Assembly Instructions” (pg. 5) to fully assemble the Grinder as a Stuffer including the Tray. NOTE: While one person can stuff sausage with this Grinder, it is recommended that two people perform this operation.
Electric Meat Grinder CLEANING 1. Remove the Grinder Head Assembly from the Grinder Motor. Disassemble the Grinder Head Assembly. 2. Wash all parts that have come in contact with meat in hot soapy water immediately after use. DO NOT IMMERSE THE MOTOR IN WATER OR OTHER LIQUIDS! 3. Rinse the Grinder parts with clear hot water, then dry them IMMEDIATELY. Fully lubricate the Head, Plates and the Cutting Blade with a food-grade silicone spray before and after each use. 4.
Electric Meat Grinder GENERAL FOOD SAFETY INFORMATION There are basic rules to follow when handling food. They are COOK, SEPARATE, CLEAN. COOK It’s important to cook food to a safe internal temperature to destroy bacteria that is present. When meat is ground, the bacteria present on the surface are mixed throughout the ground mixture. If this ground meat is not cooked to at least 160˚F to 165˚F (71˚C to 74˚C), bacteria will not be destroyed and there’s a good chance you will get sick.
TABLE DES MATIÈRES Pièces du produit . . . . . . . . . . . . . . . . . . . . . . . . . . . . . . . . . . . . . . . . . . . . . . . . . . . . . . . . . . . . . . . Mesures de protection importantes. . . . . . . . . . . . . . . . . . . . . . . . . . . . . . . . . . . . . . . . . . . . . . . . Renseignements sur l’appareil . . . . . . . . . . . . . . . . . . . . . . . . . . .
Hachoir à viande électrique PIÈCES DU PRODUIT 21 4 3 1 2 20 19 14 11 5 7 6 8 9 10 12 13 1. POUSSOIR À VIANDE 2. TUBE DE REMPLISSAGE DE SAUCISSE DE 15 MM 3. TUBE DE REMPLISSAGE DE SAUCISSE DE 25 MM 4. TUBE DE REMPLISSAGE DE SAUCISSE DE 35 MM 5. BEC VERSEUR (EPMG22 ET EPMG32) 6. ÉCROU À ŒIL POUR TÊTE DE HACHOIR EN ACIER INOXYDABLE 7. PLAQUE DE HACHAGE FIN DE LA VIANDE, 4,5 MM 8. PLAQUE DE HACHAGE GROSSIER DE LA VIANDE, 7 MM www.ExcaliburDIY.
MESURES DE PROTECTION IMPORTANTES CONSERVEZ CES CONSIGNES Avertissement : Tout manquement à suivre ces avertissements peut entraîner des blessures. L orsque vous utilisez un appareil électroménager, il faut toujours prendre des précautions importantes, y compris les suivantes : 1. 2. 3. 4. Veuillez lire et suivre toutes les instructions avant d’utiliser le hachoir. Utilisez uniquement les prises électriques mises à la terre approuvées. N’utilisez pas pendant un orage électrique.
Hachoir à viande électrique RENSEIGNEMENTS SUR L’APPAREIL • Veuillez lire ce guide avec soin et bien comprendre toutes les normes de sécurité qu’il comprend. •. Évitez de toucher les pièces mobiles avec les mains et évitez de toucher l’appareil avec les mains mouillées. • Lorsque vous nettoyez ou réparez le hachoir à viande, tenez compte de tous les risques potentiels. • Lorsque vous nettoyez ou réparez l’appareil, faites toujours attention à ce que vous faites et évitez les distractions potentielles.
PRÉPARATION DE L’APPAREIL À L’UTILISATION 1. Avec la goulotte d’alimentation orientée tout droit vers le haut, insérez la tête dans le carter d’engrenage. Alignez la fente de la tête avec le bouton/axe à l’intérieur du carter d’engrenage. Veillez à ce que la tête repose complètement dans le carter d’engrenage (Figure 1). carter Figure 1 d’engrenage tête de hachoir goulotte d’alimentation bouton/axe 2. Serrez le bouton de verrouillage de la tête pour verrouiller la tête en place. 3.
Hachoir à viande électrique INSTRUCTIONS D’ASSEMBLAGE DU BEC VERSEUR 1 - BEC VERSEUR 2 - BAGUE DU BEC VERSEUR Tête de hachoir B A C D Ouverture Écrou à œil A : Insérez le bec verseur (1) dans la bague du bec verseur (2). B : Raccordez le bec verseur (1) et la bague du bec verseur (2) à l’écrou à œil de la tête du hachoir.
UTILISATION DU HACHOIR 1. Suivez les instructions de « PRÉPARATION DE L’APPAREIL À L’UTILISATION ». REMARQUE : Il est préférable de hacher la viande en vous servant tout d’abord de la plaque de hachage grossier de 7 mm. Si vous souhaitez un hachage de viande plus fin, faites passer la viande hachée grossièrement dans le hachoir une seconde fois en vous servant de la plaque de hachage fin de 4,5 mm. 2. Retirez tous les cordons, les tendons, les os, etc., de la viande.
Hachoir à viande électrique INSTRUCTIONS DE REMPLISSAGE DE SAUCISSE 1. Une fois que vous avez haché la viande conformément à la section « Utilisation du hachoir », mélangez la viande hachée avec les assaisonnements de saucisse. 2. Suivez les « Instructions d’assemblage du remplisseur de saucisse » (pge 5) pour assembler le hachoir complètement comme un remplisseur, y compris le plateau.
NETTOYAGE 1. R etirez la tête de hachoir du moteur du hachoir. Démontez la tête de hachoir. 2. Lavez toutes les pièces qui sont entrées en contact avec la viande à l’eau chaude savonneuse, immédiatement après l’utilisation. N’IMMERGEZ JAMAIS LE MOTEUR DANS L’EAU OU D’AUTRES LIQUIDES! 3. Rincez les pièces du hachoir dans de l’eau chaude claire, puis séchez-les immédiatement.
Hachoir à viande électrique RENSEIGNEMENTS D’ORDRE GÉNÉRAL SUR L’INNOCUITÉ DES ALIMENTS Il faut suivre des règles de base lors de la manipulation d’aliments. à savoir, FAIRE CUIRE, SÉPARER, NETTOYER. FAIRE CUIRE Il est important de faire cuire les aliments à une température interne sûre afin de détruire les bactéries présentes. Lorsque la viande est hachée, les bactéries présentes sur la surface sont mélangées dans tout le mélange haché.
TABLA DE CONTENIDO Piezas del producto . . . . . . . . . . . . . . . . . . . . . . . . . . . . . . . . . . . . . . . . . . . . . . . . . . . . . . . . . . . . . Disposiciones de seguridad importantes. . . . . . . . . . . . . . . . . . . . . . . . . . . . . . . . . . . . . . . . . . . . Información sobre el equipo. . . . . . . . . . . . . . . . . . . . . . . . . . . . . . . .
Moledor eléctrico de carne PIEZAS DEL PRODUCTO 21 4 3 1 2 20 19 14 11 5 7 6 8 1. 2. 3. 4. 5. 6. 9 10 12 13 15 NOTA: Los moledores números 8 y 12 tienen una arandela plana Cojinete de la barrena PISÓN DE CARNE TUBO PARA EMBUTIR - 15 MM TUBO PARA EMBUTIR - 25 MM TUBO PARA EMBUTIR - 35 MM PICO DE CAÍDA (EPMG22 Y EPMG32) TUERCA DE ANILLO DE ACERO INOXIDABLE PARA EL CABEZAL DEL MOLEDOR 7. PLATO PARA MOLIDO FINO DE CARNE: 4.5 MM 8. PLATO PARA MOLIDO GRUESO DE CARNE: 7 MM 9.
DISPOSICIONES DE SEGURIDAD IMPORTANTES GUARDA ESTAS INSTRUCCIONES Advertencia: No leer estas advertencias puede resultar en lesiones personales. Al usar equipos eléctricos deben tomarse siempre precauciones básicas de seguridad, incluyendo las siguientes: 1. Lee y cumple todas las instrucciones antes de usar este moledor. 2. Usa solo tomacorriente aprobado con conexión a tierra. 3. No uses este equipo durante tormentas eléctricas. 4.
Moledor eléctrico de carne INFORMACIÓN SOBRE EL EQUIPO • Lee cuidadosamente este manual y apréndete todas las normas de seguridad descritas en él. • Evita tocar con tus manos las partes móviles y tocar con aquellas húmedas el equipo mismo. • Al limpiar o dar mantenimiento al moledor de carne, ten en cuenta todos los peligros posibles. • Al limpiar o dar mantenimiento al moledor de carne, concéntrate siempre en lo que estás haciendo y evita cualquier posible distracción.
CONFIGURACIÓN DEL EQUIPO PARA USARLO 1. Con el conducto de alimentación recto hacia arriba, inserta el cabezal en la carcasa de engranajes. Alinea la ranura en el cabezal con la perilla/clavija dentro de la carcasa de engranajes. Asegura que el cabezal esté completamente asentado en la carcasa de engranajes (Figura 1). carcasa de Figura 1 engranajes cabezal del moledor conducto de alimentación perilla/clavija 2. Aprieta la perilla de bloqueo del cabezal hasta asegurarlo en su lugar. 3.
Moledor eléctrico de carne INSTRUCCIONES DE ENSAMBLAJE DE LA BOQUILLA DE DESCARGA 1 - BOQUILLA DE DESCARGA B 2 - ANILLOS DE LA BOQUILLA DE DESCARGA Cabezal del moledor C A D Abertura Tuerca de anillo A: Inserta la boquilla de descarga (1) en el anillo de la boquilla de descarga (2). B: Conecta la boquilla de descarga (1) y el anillo de la boquilla de descarga (2) a la tuerca de anillo del cabezal del moledor.
CÓMO USAR EL MOLEDOR 1. Sigue las instrucciones para la “CONFIGURACIÓN DEL EQUIPO PARA USARLO” NOTA: Lo mejor es moler primero la carne con el plato de corte grueso de 7 mm. Si deseas carne molida bien fina, pasa de nuevo por el moledor la carne picada gruesa usando el plato de corte fino de 4.5 mm. 2. Q uítale a la carne todos los nervios, tendones, huesos, etc. Para mejores resultados, asegúrate que toda la carne ha sido congelada entre 32 y 34°F (0-1°C) antes de molerla.
Moledor eléctrico de carne INSTRUCCIONES PARA RELLENAR / EMBUTIR 1. Después de moler la carne conforme a la sección “Cómo usar el moledor”, mezcla la carne picada con los condimentos para embutido. 2. Sigue las “instrucciones para rellenar / embutir” (p. 5) para ensamblar por completo el moledor para rellenar, incluyendo la bandeja. NOTA: Aunque una sola persona puede embutir con este moledor, se recomienda realizar esta operación con dos.
LIMPIEZA 1. Retira del motor del moledor el conjunto del cabezal de este último. Desarma el conjunto del cabezal del moledor. 2. Inmediatamente después de usar, lava con agua jabonosa tibia todas las piezas que hayan entrado en contacto con la carne. ¡NO SUMERJAS EL MOTOR EN AGUA U OTROS LÍQUIDOS! 3. Enjuaga las piezas del moledor con agua limpia y caliente; sécalas de INMEDIATO.
Moledor eléctrico de carne INFORMACIÓN GENERAL SOBRE SEGURIDAD DE LOS ALIMENTOS Hay reglas básicas a seguir cuando se manipulan alimentos. Son COCINAR, SEPARAR, LIMPIAR. COCINAR Es importante cocinar los alimentos a una temperatura interna segura para destruir las bacterias que estén presentes. Cuando se muele la carne, las bacterias presentes en la superficie se mezclan por toda la carne molida.
8250 Ferguson Ave., Sacramento, CA 95828 | 1.800.875.4254 www.ExcaliburDIY.