
Manual
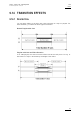
Table Of Contents
- 1. Initial Configuration
- 2. Remote Controller
- 3. Main Menu
- 4. Remote Panel Operations
- 4.1 OPERATIONS
- 4.1.1 RECORD
- 4.1.2 Mark
- 4.1.3 Last Cue
- 4.1.4 PLAY
- 4.1.5 IN
- 4.1.6 OUT
- 4.1.7 JOG KNOB
- 4.1.8 Fast Jog
- 4.1.9 Lever
- PLST
- 4.1.11 Browse
- 4.1.12 Insert
- 4.1.13 ENTER
- 4.1.14 MENU
- 4.1.15 CLEAR
- 4.1.16 Network
- 4.1.17 Goto TC
- 4.1.18 Goto IN / Goto OUT
- 4.1.19 Loop
- 4.1.20 Return
- 4.1.21 Page
- 4.1.22 Rebooting the System from the Nano Remote
- 4.2 SELECTION OF CLIP BANKS AND PLAYLISTS
- 4.3 CLIP NUMBERING HIERARCHY
- 4.1 OPERATIONS
- 5. Control Mode
- 6. Pgm + Prv Mode
- 7. Multi PGM Mode
- 8. Clip Management
- 8.1 INTRODUCTION
- 8.2 USING THE EVS REMOTE PANEL
- 8.2.1 How to Create a Clip
- 8.2.2 Storing a Clip
- 8.2.3 Recalling a Clip
- 8.2.4 Playing Back a Clip
- 8.2.5 Recall and Playback of Growing clips
- 8.2.6 Clearing Clips
- 8.2.7 Copying or Moving Clips
- 8.2.8 How to Shorten a Clip
- 8.2.9 Secondary Menu in Clip Mode
- 8.2.10 Using the Clip screen
- 8.2.11 License Code
- 8.2.12 Clip screen – Standard View
- 8.2.13 The Title Bar
- 8.2.14 The Function Bar
- 8.2.15 The Clip Information Area
- 8.2.16 The Clip Management Area
- 8.2.17 Selecting a Clip with Tablet and Stylus
- 8.2.18 Selecting a Clip with the Keyboard
- 8.2.19 How to Name a Clip
- 8.2.20 How to Change the Primary Camera of a Clip
- 8.2.21 Recalling a Clip
- 8.2.22 How to Restripe the Timecode of the Current Clip
- 8.2.23 Moving and Copying Clips
- 8.2.24 Clip Screen – Extended View
- 8.3 USING THE VDR PANEL
- 9. Playlist Management
- 9.1 GENERAL INFORMATION
- 9.2 PLAYLIST MODES ON THE REMOTE PANEL
- 9.3 PLAYLIST DISPLAY ON THE VGA
- 9.4 ACTIVATING AND LOADING PLAYLISTS
- 9.5 DELETING PLAYLISTS
- 9.6 NAMING A PLAYLIST OR AN ELEMENT IN A PLAYLIST
- 9.7 BROWSING WITHIN A PLAYLIST
- 9.8 PLAYOUT FUNCTIONS AVAILABLE FOR PLAYLISTS
- 9.9 OVERVIEW OF EDITING FUNCTIONS IN PLAYLIST EDIT MODE
- 9.10 ADDING & REPLACING CLIPS IN A PLAYLIST
- 9.10.1 Possible Methods for Adding Clips
- 9.10.2 How to Quickly Add Clips to the Current Playlist
- 9.10.3 How to Insert Clips into a Playlist
- 9.10.4 Inserting Growing Clips into Playlists
- 9.10.5 How to Delete Playlist Elements from a Playlist
- 9.10.6 How to Move an Element Within a Playlist
- 9.10.7 How to Change the Camera Angle of a Playlist Element
- 9.11 COPYING PLAYLISTS
- 9.12 OTHER EDITING FUNCTIONS FOR PLAYLISTS
- 9.13 THE AUXILIARY AUDIO CLIP
- 9.14 TRANSITION EFFECTS
- 9.15 REPLACE FUNCTION

Issue
10.04.A
XTnano
–
Version 10.04
–
Operating Manual
EVS Broadcast Equipment SA – January 2011
76
increased by the duration of the guardbands, as defined on the
destination
system.
• LONG mode: the entire original clips, including their guardbands, will be
copied on the destination system.
7. Once the various options have been decided, press ENTER to confirm the
copy, or MENU to cancel.
The F_ key of the destination playlist will flash until all clips have been copied.
This playlist can be recalled during that process for browsing, editing or playback.
If some clips have not yet been copied, the original network clip is used instead.
9.11.4 HOW TO COPY A PLAYLIST FROM THE VGA CLIP SCREEN
Copying a playlist using the CUT/COPY/PASTE functions from the Clip screen will
only copy the “EDL” (the playlist definition) and the clips themselves will remain in
their original location.
To copy a playlist from the VGA Clip Screen, proceed as follows:
1. From the VGA Clip Screen, open the playlist bank by pressing END on the
keyboard.
2. Select the playlist to copy and click CTRL + C.
3. Go to the empty playlist location on the same server where you want to copy
the playlist and click CTRL + V.
The EDL of the playlist is copied to the requested location.