
Manual
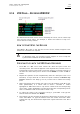
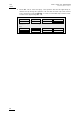
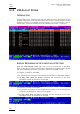
Table Of Contents
- 1. Initial Configuration
- 2. Remote Controller
- 3. Main Menu
- 4. Remote Panel Operations
- 4.1 OPERATIONS
- 4.1.1 RECORD
- 4.1.2 Mark
- 4.1.3 Last Cue
- 4.1.4 PLAY
- 4.1.5 IN
- 4.1.6 OUT
- 4.1.7 JOG KNOB
- 4.1.8 Fast Jog
- 4.1.9 Lever
- PLST
- 4.1.11 Browse
- 4.1.12 Insert
- 4.1.13 ENTER
- 4.1.14 MENU
- 4.1.15 CLEAR
- 4.1.16 Network
- 4.1.17 Goto TC
- 4.1.18 Goto IN / Goto OUT
- 4.1.19 Loop
- 4.1.20 Return
- 4.1.21 Page
- 4.1.22 Rebooting the System from the Nano Remote
- 4.2 SELECTION OF CLIP BANKS AND PLAYLISTS
- 4.3 CLIP NUMBERING HIERARCHY
- 4.1 OPERATIONS
- 5. Control Mode
- 6. Pgm + Prv Mode
- 7. Multi PGM Mode
- 8. Clip Management
- 8.1 INTRODUCTION
- 8.2 USING THE EVS REMOTE PANEL
- 8.2.1 How to Create a Clip
- 8.2.2 Storing a Clip
- 8.2.3 Recalling a Clip
- 8.2.4 Playing Back a Clip
- 8.2.5 Recall and Playback of Growing clips
- 8.2.6 Clearing Clips
- 8.2.7 Copying or Moving Clips
- 8.2.8 How to Shorten a Clip
- 8.2.9 Secondary Menu in Clip Mode
- 8.2.10 Using the Clip screen
- 8.2.11 License Code
- 8.2.12 Clip screen – Standard View
- 8.2.13 The Title Bar
- 8.2.14 The Function Bar
- 8.2.15 The Clip Information Area
- 8.2.16 The Clip Management Area
- 8.2.17 Selecting a Clip with Tablet and Stylus
- 8.2.18 Selecting a Clip with the Keyboard
- 8.2.19 How to Name a Clip
- 8.2.20 How to Change the Primary Camera of a Clip
- 8.2.21 Recalling a Clip
- 8.2.22 How to Restripe the Timecode of the Current Clip
- 8.2.23 Moving and Copying Clips
- 8.2.24 Clip Screen – Extended View
- 8.3 USING THE VDR PANEL
- 9. Playlist Management
- 9.1 GENERAL INFORMATION
- 9.2 PLAYLIST MODES ON THE REMOTE PANEL
- 9.3 PLAYLIST DISPLAY ON THE VGA
- 9.4 ACTIVATING AND LOADING PLAYLISTS
- 9.5 DELETING PLAYLISTS
- 9.6 NAMING A PLAYLIST OR AN ELEMENT IN A PLAYLIST
- 9.7 BROWSING WITHIN A PLAYLIST
- 9.8 PLAYOUT FUNCTIONS AVAILABLE FOR PLAYLISTS
- 9.9 OVERVIEW OF EDITING FUNCTIONS IN PLAYLIST EDIT MODE
- 9.10 ADDING & REPLACING CLIPS IN A PLAYLIST
- 9.10.1 Possible Methods for Adding Clips
- 9.10.2 How to Quickly Add Clips to the Current Playlist
- 9.10.3 How to Insert Clips into a Playlist
- 9.10.4 Inserting Growing Clips into Playlists
- 9.10.5 How to Delete Playlist Elements from a Playlist
- 9.10.6 How to Move an Element Within a Playlist
- 9.10.7 How to Change the Camera Angle of a Playlist Element
- 9.11 COPYING PLAYLISTS
- 9.12 OTHER EDITING FUNCTIONS FOR PLAYLISTS
- 9.13 THE AUXILIARY AUDIO CLIP
- 9.14 TRANSITION EFFECTS
- 9.15 REPLACE FUNCTION

XTnano
–
Version 10.04
–
Operating Manual
EVS Broadcast Equipment SA – January 2011
Issue
10.04.A
61
9.4 ACTIVATING AND LOADING PLAYLISTS
9.4.1 INTRODUCTION
A distinction is made between activating and loading a playlist:
• When you activate a playlist, you access the playlist location on the server but
you do not load it on a player channel. Once the playlist is active, it is called
the ‘current playlist’. You can insert clips directly in the current playlist without
having to load it onto a channel.
When Multicam is switched on, the active playlist is automatically the Playlist
11, that is the playlist 1 on bank 10 of page 1.
• When you load a playlist, you actually load it on a given player channel either to
edit it or to play it out.
9.4.2 DO ONE OF THE FOLLOWINGHOW TO ACTIVATE A PLAYLIST
You can activate a playlist via the Remote Panel or via the VGA screen.
VIA THE REMOTE PANEL
To activate a playlist via the Remote Panel, proceed as follows:
1. Go to the requested page by pressing SHIFT + PAGE + the F_ key
corresponding to the requested page.
2. Go to the playlist bank of the page by pressing SHIFT + F10.
3. Select the playlist as required (press F1 - F10)
PAGE 1 contains Playlists 10 to 19, PAGE 2 contains 20 to 29, PAGE 3
contains 30 to 39, and so on.
4. Press ENTER on the Remote Panel to confirm.
VIA THE VGA CLIP SCREEN
To activate a playlist via the VGA clip screen, proceed as follows:
1. From the clip screen, press END to access the playlist bank.
2. Press the DOWN arrows until you select the playlist to activate.
3. Pressing ENTER on the selected playlist activates it.