
Manual
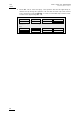
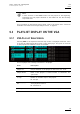
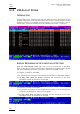
Table Of Contents
- 1. Initial Configuration
- 2. Remote Controller
- 3. Main Menu
- 4. Remote Panel Operations
- 4.1 OPERATIONS
- 4.1.1 RECORD
- 4.1.2 Mark
- 4.1.3 Last Cue
- 4.1.4 PLAY
- 4.1.5 IN
- 4.1.6 OUT
- 4.1.7 JOG KNOB
- 4.1.8 Fast Jog
- 4.1.9 Lever
- PLST
- 4.1.11 Browse
- 4.1.12 Insert
- 4.1.13 ENTER
- 4.1.14 MENU
- 4.1.15 CLEAR
- 4.1.16 Network
- 4.1.17 Goto TC
- 4.1.18 Goto IN / Goto OUT
- 4.1.19 Loop
- 4.1.20 Return
- 4.1.21 Page
- 4.1.22 Rebooting the System from the Nano Remote
- 4.2 SELECTION OF CLIP BANKS AND PLAYLISTS
- 4.3 CLIP NUMBERING HIERARCHY
- 4.1 OPERATIONS
- 5. Control Mode
- 6. Pgm + Prv Mode
- 7. Multi PGM Mode
- 8. Clip Management
- 8.1 INTRODUCTION
- 8.2 USING THE EVS REMOTE PANEL
- 8.2.1 How to Create a Clip
- 8.2.2 Storing a Clip
- 8.2.3 Recalling a Clip
- 8.2.4 Playing Back a Clip
- 8.2.5 Recall and Playback of Growing clips
- 8.2.6 Clearing Clips
- 8.2.7 Copying or Moving Clips
- 8.2.8 How to Shorten a Clip
- 8.2.9 Secondary Menu in Clip Mode
- 8.2.10 Using the Clip screen
- 8.2.11 License Code
- 8.2.12 Clip screen – Standard View
- 8.2.13 The Title Bar
- 8.2.14 The Function Bar
- 8.2.15 The Clip Information Area
- 8.2.16 The Clip Management Area
- 8.2.17 Selecting a Clip with Tablet and Stylus
- 8.2.18 Selecting a Clip with the Keyboard
- 8.2.19 How to Name a Clip
- 8.2.20 How to Change the Primary Camera of a Clip
- 8.2.21 Recalling a Clip
- 8.2.22 How to Restripe the Timecode of the Current Clip
- 8.2.23 Moving and Copying Clips
- 8.2.24 Clip Screen – Extended View
- 8.3 USING THE VDR PANEL
- 9. Playlist Management
- 9.1 GENERAL INFORMATION
- 9.2 PLAYLIST MODES ON THE REMOTE PANEL
- 9.3 PLAYLIST DISPLAY ON THE VGA
- 9.4 ACTIVATING AND LOADING PLAYLISTS
- 9.5 DELETING PLAYLISTS
- 9.6 NAMING A PLAYLIST OR AN ELEMENT IN A PLAYLIST
- 9.7 BROWSING WITHIN A PLAYLIST
- 9.8 PLAYOUT FUNCTIONS AVAILABLE FOR PLAYLISTS
- 9.9 OVERVIEW OF EDITING FUNCTIONS IN PLAYLIST EDIT MODE
- 9.10 ADDING & REPLACING CLIPS IN A PLAYLIST
- 9.10.1 Possible Methods for Adding Clips
- 9.10.2 How to Quickly Add Clips to the Current Playlist
- 9.10.3 How to Insert Clips into a Playlist
- 9.10.4 Inserting Growing Clips into Playlists
- 9.10.5 How to Delete Playlist Elements from a Playlist
- 9.10.6 How to Move an Element Within a Playlist
- 9.10.7 How to Change the Camera Angle of a Playlist Element
- 9.11 COPYING PLAYLISTS
- 9.12 OTHER EDITING FUNCTIONS FOR PLAYLISTS
- 9.13 THE AUXILIARY AUDIO CLIP
- 9.14 TRANSITION EFFECTS
- 9.15 REPLACE FUNCTION
XTnano
–
Version 10.04
–
Operating Manual
EVS Broadcast Equipment SA – January 2011
Issue
10.04.A
55
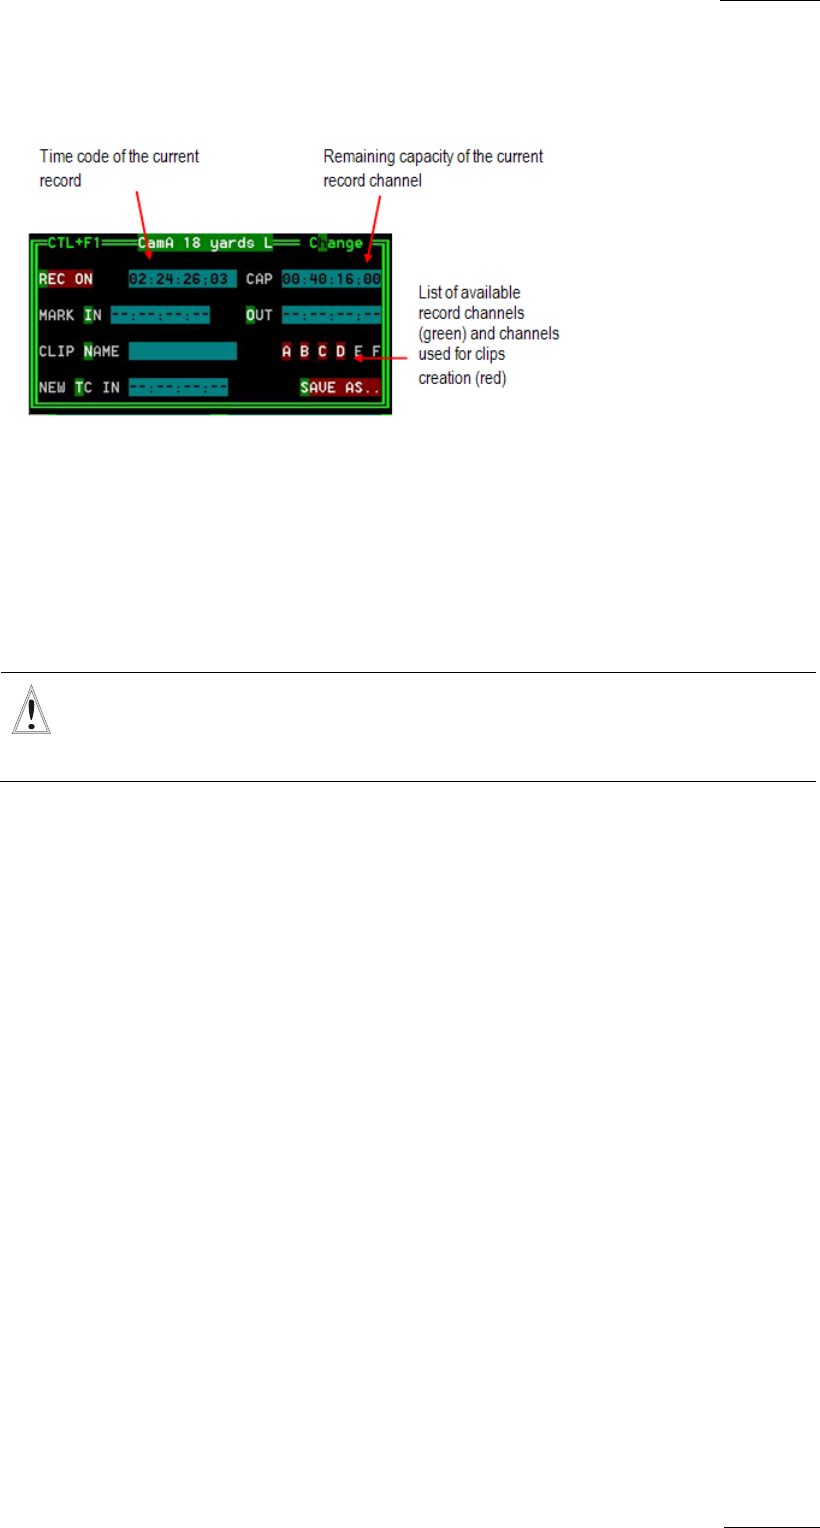
8.3.4 VDR PANEL – RECORDER WINDOW
The VDR Panel Recorder can be used to start/stop the record, and to create clips
from the local record trains. For example, it allows the creation of clips on a
server that has no Play channel.
HOW TO START/STOP THE RECORD
Press ALT + R to start or stop the record on the record channel assigned to the
window. No confirmation is required.
Important
In Sportlight mode, all recorders will be stopped at once to keep the
synchronization between all record channels.
CREATING CLIPS WITH THE VDR PANEL RECORDER
1. Press ALT + I / ALT + O to mark a Short IN / Short OUT point on the last
recorded picture. The timecode appears in the adjacent field, and the cursor is
automatically placed on that field to allow the operator to edit the timecode of
the Short IN / Short OUT point if desired. Press ENTER to confirm or ESC to
cancel.
2. Repeat this operation for the complementary Short IN / OUT point. This is not
mandatory. If only a Short IN or a Short OUT point is marked, the Default Clip
Duration defined in the Setup (p.2.2 F2) will be used to define the missing
point.
3. Select from which record train(s) the clip(s) must be created: press ALT + the
letter (A/B/C/D/E/F) of a record train to select / de-select it. Letters
highlighted in RED means that a clip will be created from the corresponding
record train ; letters highlighted in green means that the corresponding record
train is available but will not be used to create a clip.
4. To define the name of the clip before saving it, press ALT + N, type the
desired name and validate with ENTER.
5. The operator can also restripe the timecode of the IN point of the clip to a new
value. Press ALT + T, type the desired value and confirm with enter. When
creating the clip, this timecode will replace the original timecode of the Short
IN point.