Operating Manual Version 10.
XTnano – Version 10.04 – Operating Manual EVS Broadcast Equipment SA – January 2011 Issue 10.04.A C OPYRIGHT EVS Broadcast Equipment – Copyright © 2010-11. All rights reserved. D ISCLAIMER The information in this manual is furnished for inform ational use only and subject to change without notice.
Issue 10.04.A II XTnano – Version 10.
XTnano – Version 10.04 – Operating Manual EVS Broadcast Equipment SA – January 2011 Issue 10.04.A Table of Contents TABLE OF CONTENTS ................................................................................................... III OVERVIEW ........................................................................................................................ 1 1. 1.1 1.2 2. INITIAL CONFIGURATION ......................................................................................
Issue 10.04.A 5. XTnano – Version 10.04 – Operating Manual EVS Broadcast Equipment SA – January 2011 CONTROL MODE................................................................................................... 20 5.1 LIVE (E2E) MODE .....................................................................................................................20 5.2 SEARCH MODE ........................................................................................................................20 5.
XTnano – Version 10.04 – Operating Manual EVS Broadcast Equipment SA – January 2011 Issue 10.04.A 8.2.24 Clip Screen – Extended View ................................................................................................50 8.3 USING THE VDR PANEL ..........................................................................................................51 8.3.1 VDR Panel – Lower Section ..................................................................................................51 8.3.
Issue 10.04.A XTnano – Version 10.04 – Operating Manual EVS Broadcast Equipment SA – January 2011 9.11.3 How to Copy a Playlist from the Remote Panel.....................................................................74 9.11.4 How to Copy a Playlist from the VGA Clip Screen ................................................................76 9.12 OTHER EDITING FUNCTIONS FOR PLAYLISTS .....................................................................77 9.12.1 How to Trim Clips into a Playlist ..........
XTnano – Version 10.04 – Operating Manual EVS Broadcast Equipment SA – January 2011 Issue 10.04.A Overview The aim of this manual is to familiarize the operator with the Multicam software for EVS High Definition and Standard Definition servers, and its Remote Panel, so as to learn as quickly and efficiently as possible the basic operations. The CLIP and PLAYLIST MANAGEMENT functions allow the operator to keep up to 5400 clips on a server and of course to replay all or some of them.
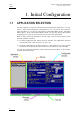
Issue 10.04.A XTnano – Version 10.04 – Operating Manual EVS Broadcast Equipment SA – January 2011 1. Initial Configuration 1.1 APPLICATION SELECTION The EVS software is used for configuration and maintenance operations. It is also used to select which application configuration to run, since EVS disk recorders have the ability to run various configurations (Sportlight 2REC 2PLAY, Sportlight 3REC 1PLAY).
XTnano – Version 10.04 – Operating Manual EVS Broadcast Equipment SA – January 2011 1.2 Issue 10.04.A CONFIGURATION ON NANO REMOTE Before you start using the Multicam application in Sportlight mode, you need to ensure that the parameters are properly defined in the Setup menu of the nano Remote Panel, and in the Setup Configuration module of the Multicam application. The new parameters are saved as soon as they are modified.
Issue 10.04.A XTnano – Version 10.04 – Operating Manual EVS Broadcast Equipment SA – January 2011 2. Remote Controller 2.1 GENERAL LAYOUT The following diagram shows the Remote Panel along with a brief description of each area.
XTnano – Version 10.04 – Operating Manual Issue 10.04.A EVS Broadcast Equipment SA – January 2011 Note The operational buttons have PRIMARY and SECONDARY functions and are divided into upper and lower sections. By pressing the SHIFT button you gain access to the secondary functions. 1. F-keys and small buttons Multi-purpose keys 2. Soft keys With LCD display, allow the operator to enter the Multicam M ENU system . 3. Lever Initiates slow motion and playlist replay. 4.
Issue 10.04.A XTnano – Version 10.04 – Operating Manual EVS Broadcast Equipment SA – January 2011 6. 7. 2.2 Operational Block 2 PLAY Initiates playback. Network Not used on XTnano. Last Cue Re-cues EVS server to previous cue point. Goto TC Allows timecode entry, with «F» keys. Fast Jog Used with jog dial for rapid, manual re-cue. This mode is automatically reset after PLAY/LIVE commands. Mark Used to enter re-usable cue point (256 cycling cues). RECORD Initiates “E2E” mode.
XTnano – Version 10.04 – Operating Manual Issue 10.04.A EVS Broadcast Equipment SA – January 2011 Enables use of the secondary key functions. Note: This key remains active even if released, until another key has been hit. SHIFT F1 F10 CLEAR ENTER 2.4 Stores or recalls information. clips, recall playlists and enter timecode Is a multi-purpose key used to clear clips or playlists, and to clear IN/OUT points.
Issue 10.04.A XTnano – Version 10.04 – Operating Manual EVS Broadcast Equipment SA – January 2011 2.5 TRANSPORT CONTROLS 2.5.1 JOG DIAL The JOG DIAL allows the operator to pass into Search mode and thus to choose exactly the Short OUT or Short IN image. Move the jog dial clockwise to search forward and move it counter-clockwise to search backwards. One revolution of the jog dial will produce a jump of approximately 35 fram es. This number can be multiplied by enabling the Fast mode.
XTnano – Version 10.04 – Operating Manual Issue 10.04.A EVS Broadcast Equipment SA – January 2011 3. Main Menu After the boot sequence of the Multicam system, the LCD screen of the Remote Control panel will display the Main menu: 2 Rec 2 Play Server F1: 1 Remote F2: 2 Remote F3: F4: F5: Char. On/Off F6: F7: F8: F9: Ver:10.03.
Issue 10.04.A XTnano – Version 10.04 – Operating Manual EVS Broadcast Equipment SA – January 2011 Function Key Use F3: 3 Remotes N/A. F4: 4 Remotes N/A. F5: Char. On/Off Enables or disables the on-screen display (Tim ecode, Clip ID…) on the output monitors. F6: Exit Exits the Multicam software and returns to the EVS Menu. F7: Clear all clips Clears all clips. All clips will be lost. A confirmation of this command is required.
XTnano – Version 10.04 – Operating Manual EVS Broadcast Equipment SA – January 2011 Issue 10.04.A 4. Remote Panel Operations 4.1 OPERATIONS 4.1.1 RECORD This key lights red when the system is recording. Pressing this key brings the system in E/E (“live”) mode, and starts the record if necessary (depending on the settings of the Setup menu). The E/E mode is actually playing pictures already recorded by the system, and has a delay of 3 frames compared to the live source, on all audio and video tracks.
Issue 10.04.A 4.1.5 XTnano – Version 10.04 – Operating Manual EVS Broadcast Equipment SA – January 2011 IN This function defines the IN point of a clip. The key will light differently depending in the following situations: 4.1.6 Green key The key lights green if an IN point exists but is not the image you see. Red key The key lights red if the on-air image is at this IN point. This point can be entered while recording.
XTnano – Version 10.04 – Operating Manual EVS Broadcast Equipment SA – January 2011 4.1.8 Issue 10.04.A FAST JOG When selected, this option enables fast picture search: the actual speed of this fast jog is adjustable in the Setup menu. Starting a play or returning to E2E mode resets the Fast Jog mode. Important The jog dial is active at all times when the system is in play and record.
Issue 10.04.A XTnano – Version 10.04 – Operating Manual EVS Broadcast Equipment SA – January 2011 4.1.11 BROWSE When a clip is loaded on the primary channel, pressing the Browse key allows the operator to browse inside all local clips of the database by turning the jog dial. When a cue point exists for the current picture on the prim ary channel (the CUE button lights red), pressing the Browse key allows the operator to browse through all existing cue points by turning the jog dial.
XTnano – Version 10.04 – Operating Manual Issue 10.04.A EVS Broadcast Equipment SA – January 2011 4.1.17 GOTO TC The Goto TC option allows the user to jump to a given timecode in the loaded train or clip. H OW TO G O TO A G IVEN T IMECODE To jump to a given timecode of the loaded train or clip, you can use the Goto TC option on the Remote Panel. To go to a given timecode, proceed as follows: 1. Press SHIFT + Goto TC keys on the Remote.
Issue 10.04.A XTnano – Version 10.04 – Operating Manual EVS Broadcast Equipment SA – January 2011 If nothing happens after confirming the TC entry with ENTER, this means that the field corresponding to the selected timecode does not exist on disk any longer. To exit the Goto TC function at any time, press the MENU key. 4.1.18 GOTO IN / GOTO OUT When you are in CLIP mode, this key combination enables the operator to go to IN / OUT points of CLIPS, instantly. 4.1.
XTnano – Version 10.04 – Operating Manual EVS Broadcast Equipment SA – January 2011 Issue 10.04.A 4.1.21 PAGE Use this key to select a new clips page. After pressing the SHIFT + Page keys, you must press a F_ key to select the corresponding page (1 to 10). 4.1.22 REBOOTING THE SYSTEM FROM THE NANO REMOTE «Hard Reboot» In the event that the system needs to be rebooted, the process can be accomplished from the Remote Panel.
Issue 10.04.A 4.2 XTnano – Version 10.04 – Operating Manual EVS Broadcast Equipment SA – January 2011 SELECTION OF CLIP BANKS AND PLAYLISTS SHIFT + F1 - F9 = CLIPS BANK This allows access to clip banks 1 through 9 within the clip page (1 to 10). SHIFT + F1 = BANK 1 SHIFT + F2 = BANK 2, etc. (up to bank 9) Once in the bank, selection of the F1 – F10 keys will call up the respective clips.
XTnano – Version 10.04 – Operating Manual EVS Broadcast Equipment SA – January 2011 4.3 Issue 10.04.A CLIP NUMBERING HIERARCHY Multicam can store up to 900 (multiplied by the number of cameras) clips and 100 playlists in its libraries. 900 clips with up to 6 camera angles per clip result in 5400 clips on a server. This number is displayed in the upper right window of the VGA Setup screen ( SHIFT + F2 from the PC keyboard).
Issue 10.04.A XTnano – Version 10.04 – Operating Manual EVS Broadcast Equipment SA – January 2011 5. Control Mode Multicam can be set in three different basic modes, depending on commands used. 5.1 LIVE (E2E) MODE This mode selected at start-up can also be selected by pushing the RECORD key. Multicam records the input signal and plays it at the same time on the program output. 5.2 SEARCH MODE This mode is selected by moving the jog dial.
XTnano – Version 10.04 – Operating Manual Issue 10.04.A EVS Broadcast Equipment SA – January 2011 5.4 SYNCHRONIZATION MODE (SWITCH TO IN) If the synchronization mode is OFF, a request for camera change will produce a jump at the same timecode on the requested camera. This mode allows synchronous change of camera angle. If the synchronization mode is ON, a request for a camera change (by pressing CAM A, CAM B, or CAM C in the Multicam menu) will lead to a jump to a predefined CUE IN point.
Issue 10.04.A 5.5 XTnano – Version 10.04 – Operating Manual EVS Broadcast Equipment SA – January 2011 DEFINITION OF CONTROLLED AND PRIMARY CHANNELS Important The notions of Prim ary Channel and Controlled Channel are very important and will be constantly referred to in this manual. 5.5.1 CONTROLLED CHANNEL A channel is “controlled” when the operator can control it with the jog dial. In this case, the words “FULL CTRL” are present on the top of the OSD of the output monitor of that channel. 5.5.
XTnano – Version 10.04 – Operating Manual Issue 10.04.A EVS Broadcast Equipment SA – January 2011 6. Pgm + Prv Mode 6.1 1PGM + PRV (PRESS A FROM MAIN MENU) *PGM1*CAM A Aud.Met. Mix. PRV CAM B PgmSpd Sw To In P.1 B.1 PL 11 < Msg: Rst Cam Cam A PostRoll Pref Sync Prv Cam B At least 2 playback channels must be available to run this configuration. This mode allows the operator to make replays with/or without transition effects between all outputs.
Issue 10.04.A XTnano – Version 10.04 – Operating Manual EVS Broadcast Equipment SA – January 2011 P GM S PD /V AR M AX Aud.Met. PgmSpd PostRoll Mix. Sw To In Pref Pressing PgmSpd once enables the Program Speed mode and highlights this function on the LCD. Pressing the key once more enables the VarMax mode and highlights this function on the LCD. The PLAY key is flashing red while either of these modes is enabled.
XTnano – Version 10.04 – Operating Manual Issue 10.04.A EVS Broadcast Equipment SA – January 2011 • When a clip is played, it will not stop on the Short OUT point, but will continue to play through the Short OUT point by the Post-R oll duration defined in the Setup Menu. • When a record train is played, the same will happen if the Record Train OUTs parameter is set to “Freeze” in the Setup menu. • When a playlist is played, the Post-Roll will apply only to the last clip of the playlist. 6.1.
Issue 10.04.A 6.2 XTnano – Version 10.04 – Operating Manual EVS Broadcast Equipment SA – January 2011 FULL CONTROL AND LEVER CONTROL Controlling both PGM and PRV is done when PRV CTL (direct access key from the remote) is not activated. Once selecting PRV CTL the operator will have control of the PRV with the jog dial and most buttons, while the lever and the Play button will control the PGM output. At this point, selecting clips will call them up on the PRV side.
XTnano – Version 10.04 – Operating Manual Issue 10.04.A EVS Broadcast Equipment SA – January 2011 7. Multi PGM Mode 7.1 1/2 PGM MODES (PRESS A OR B FROM MAIN MENU) Multicam has two modes for its basic operation, 1 PRV/PGM mode or Multi PGM mode: • The 1PGM + PRV mode, as described previously, is the more powerful of the two, allowing for interaction between all outputs. Here, synchronized replays can be rolled and chained between the cameras with either a mix, wipe, or cut between them.
Issue 10.04.A XTnano – Version 10.04 – Operating Manual EVS Broadcast Equipment SA – January 2011 R ST C AM Rst Cam Sync To PGM 1 PGM 2 This function restores the position of cameras on the active channels: CAM A on PGM 1 and C AM B on PGM 2. Note When a clip/playlist is loaded on a channel, switching back to Live mode will recall the record train, which was last used on that output. This avoids too frequent uses of the Rst Cam function.
XTnano – Version 10.04 – Operating Manual EVS Broadcast Equipment SA – January 2011 Issue 10.04.A P LAYLIST C ONDITIONAL M ODE This mode is only available in 2 PGM mode. It allows the operator to load and control several playlists simultaneously from the same Remote Panel, or to load a playlist on one channel while performing other operations on the other channel(s). To use this mode, the “Load Playlist” parameter of the setup menu must be set to “Conditional” (p.4.2 F5).
Issue 10.04.A XTnano – Version 10.04 – Operating Manual EVS Broadcast Equipment SA – January 2011 8. Clip Management 8.1 INTRODUCTION 8.1.1 CLIP STRUCTURE A clip is defined by Short IN and Short OUT points. When referring to Short IN and Short OUT points, the operators usually use the terms IN point and OUT points.
XTnano – Version 10.04 – Operating Manual Issue 10.04.A EVS Broadcast Equipment SA – January 2011 Short IN and Short OUT points are always on even fields. This is automatic. The guardband beyond the Short OUT point is created with the material available when the operator saves the clip by pressing the selected F_ key. Therefore, this guardband can sometimes be shorter than the value defined in the Setup menu. 8.1.
Issue 10.04.A 8.2.2 XTnano – Version 10.04 – Operating Manual EVS Broadcast Equipment SA – January 2011 STORING A CLIP H OW TO S TORE A C LIP To store a clip on a given location, proceed as follows: 1. Define a clip by marking the IN and/or OUT points. 2. Select the page where the clip will be stored by pressing SHIFT + PAGE + F_ key corresponding to the page. Page 1 contains clips 110 to 199. Page 2 contains clip 210 to 299, and so on. 3.
XTnano – Version 10.04 – Operating Manual EVS Broadcast Equipment SA – January 2011 8.2.3 Issue 10.04.A RECALLING A CLIP H OW TO R ECALL A C LIP To recall a clip, proceed as follows: 1. Select the Clip page 1, 2, 3… to 10 (Page key). 2. Select the bank in which the desired clip is located 3. Select the desired clip via the F1 - F10 keys.
Issue 10.04.A 8.2.4 XTnano – Version 10.04 – Operating Manual EVS Broadcast Equipment SA – January 2011 PLAYING BACK A CLIP P LAYBACK S PEED F EATURES You can play back a clip using several playback speed features explained above in this user manual.
XTnano – Version 10.04 – Operating Manual Issue 10.04.A EVS Broadcast Equipment SA – January 2011 8.2.6 CLEARING CLIPS W HICH C LIPS C AN BE D ELETED ? You can clear clips available on disks, or growing clips. The function key that corresponds to the clip location on the Remote Panel must be green for the user to be able to delete it: • Loaded clips can not be deleted. • Clips included in a playlist cannot be cleared either. In all cases, a warning message will appear.
Issue 10.04.A XTnano – Version 10.04 – Operating Manual EVS Broadcast Equipment SA – January 2011 H OW TO C LEAR A LL U NPROTECTED C LIPS The Clear All Clips command will only delete the non-protected clips. The clips stored on protected pages as defined in the Setup, as well as the clips protected by another protocol, or clips included in playlists, will not be deleted by this operation. To clear all non protected clips, proceed as follows: 1. Go to the Main menu (SHIFT + MENU) 2.
XTnano – Version 10.04 – Operating Manual EVS Broadcast Equipment SA – January 2011 Issue 10.04.A S ETTINGS ON C OPY /M OVE C LIPS When you copy/move a clip, two settings are available to specify how the clip should be copied or moved: Clip Mode/Cam Mode Pressing the D key in the Copy/Move LCD window allows the user to select a value for this setting: • CLIP mode: all camera angles of the clips will be copied/moved.
Issue 10.04.A 8.2.8 XTnano – Version 10.04 – Operating Manual EVS Broadcast Equipment SA – January 2011 HOW TO SHORTEN A CLIP To shorten a clip, proceed as follows: 1. Recall the desired clip by pressing the corresponding F_ key. 2. Move the jog dial to browse the clip and reach to the desired Short IN point. 3. Press the IN key to mark a new Short IN point. The new Short IN point is instantly saved. 4. Move the jog dial to reach the desired Short OUT point. 5.
XTnano – Version 10.04 – Operating Manual Issue 10.04.A EVS Broadcast Equipment SA – January 2011 In the secondary menu, clips can still be directly recalled using the F1-F10 keys of the Remote Panel. The ID of the current clip appears on the end of line 3 of the LCD display. P USH Push Aux Clip >Archive PostRoll Cam Introduction The Push function allows you to easily send a copy of a clip to another machine on the network.
Issue 10.04.A XTnano – Version 10.04 – Operating Manual EVS Broadcast Equipment SA – January 2011 A UX C LIP Push Aux Clip >Archive PostRoll Cam This function allows assigning a clip as auxiliary audio clip to the current playlist. Press CLEAR + Aux Clip (CLEAR + SHIFT + B) to remove the current auxiliary clip. Refer to the Chapter 9 ‘Playlist Management’, on page 57 for more details. P OST R OLL Push Aux Clip >Archive PostRoll Cam This function enables/disables the Post-Roll mode.
XTnano – Version 10.04 – Operating Manual EVS Broadcast Equipment SA – January 2011 Issue 10.04.A 8.2.12 CLIP SCREEN – STANDARD VIEW The navigation through the Clip screen, and the various functions available on this screen, can be performed using the tablet and stylus, or the keyboard shortcuts. 8.2.13 THE TITLE BAR The Title bar contains the status information: • Name of the server.
Issue 10.04.A XTnano – Version 10.04 – Operating Manual EVS Broadcast Equipment SA – January 2011 F2: CLIP/CAM This function toggles between CLIP mode and CAM mode. • In CLIP mode, actions on a clip will use all available cameras for this clip. • In CAM mode, actions on a clip will only use the selected camera for this clip. Other functions such as Name, Delete, Copy, >Archive depend on this mode selection.
XTnano – Version 10.04 – Operating Manual Issue 10.04.A EVS Broadcast Equipment SA – January 2011 For each clip and camera angle, the following inform ation is available: Field Description Clip ID Unique identifier of the clip on the server. Ex: 111A The clip ID is followed by the “Creating” message when the clip is in the process of being created, copied or moved to this location. For more information on growing clips, refer to the section 8.2.5 ‘Recall and Playback of Growing clips’, on page 34.
Issue 10.04.A XTnano – Version 10.04 – Operating Manual EVS Broadcast Equipment SA – January 2011 C LIP C ONTROL A REA It is dedicated to play-out control. Command Description ALT + P:►/■ Plays at 100% speed except for super motion clips which are played back at 33% speed; and pause playback on the current picture. ALT + R:RECUE Jumps to the Short IN point. ALT + T: SET TC Restripes the timecode of the current clip.
XTnano – Version 10.04 – Operating Manual EVS Broadcast Equipment SA – January 2011 Issue 10.04.A If a clip is present in a certain location, it will be highlighted in BLUE. Once selected, it will be highlighted in ORANGE. To cue up a clip on the primary channel controlled by the first remote, or on the VGA Call Channel defined in the setup, simply click 1 on it with the stylus.
Issue 10.04.A XTnano – Version 10.04 – Operating Manual EVS Broadcast Equipment SA – January 2011 8.2.20 HOW TO CHANGE THE PRIMARY CAMERA OF A CLIP 1. In the Clip screen, move the cursor to the desired camera. 2. Press F4 on the keyboard or click with the stylus on the corresponding area in the Function bar. → This camera becomes the new primary camera.
XTnano – Version 10.04 – Operating Manual EVS Broadcast Equipment SA – January 2011 Issue 10.04.A 3. If you want to modify the LTC timecode and date, type in the new timecode for the Short IN point and date of the clip in the Set TC field below the LTC field. 4. If you want to modify the user-defined timecode and date, type in the new timecode for the Short IN point and date of the clip in the Set TC field below the USER field. 5.
Issue 10.04.A XTnano – Version 10.04 – Operating Manual EVS Broadcast Equipment SA – January 2011 8.2.23 MOVING AND COPYING CLIPS Copying and moving clips in the VGA are performed using the CUT, COPY and PASTE functions. G ENERAL P RINCIPLES • If the clipboard was filled using the CUT function, the original clip(s) is/are deleted after being pasted to the new location. • In CAM mode, only the selected camera of the clip is Cut/Copied/Pasted. In CLIP mode, all camera angles of the clip are Cut/Copied.
XTnano – Version 10.04 – Operating Manual EVS Broadcast Equipment SA – January 2011 Issue 10.04.A CTL + V:PASTE (L ONG C OPY ) With the Long copy, the entire original clip is copied, including its guardbands, to the destination. 1. Move the cursor to the clip/playlist location where the content of the clipboard should be copied. 2. Press CTRL + V or click to the corresponding area on the screen.
Issue 10.04.A XTnano – Version 10.04 – Operating Manual EVS Broadcast Equipment SA – January 2011 8.2.24 CLIP SCREEN – EXTENDED VIEW The extended view shows cameras A to F instead of A to D. Only 1 bank can be viewed at a time. The switch between standard and extended view is done by pressing F5 on the keyboard or by clicking on the “F5:VIEW” area on the screen.
XTnano – Version 10.04 – Operating Manual EVS Broadcast Equipment SA – January 2011 8.3 Issue 10.04.A USING THE VDR PANEL The VGA VDR Panel is accessed from any VGA screen by pressing SHIFT + F9 on the keyboard. The lower section of the VDR Panel is similar to the clip screen, with the same functions. The upper section of the VDR Panel features 2 windows that can each take control of one channel of the server. Pressing SHIFT + F9 in the VDR Panel returns the VGA to the Clip screen mode. 8.3.
Issue 10.04.A XTnano – Version 10.04 – Operating Manual EVS Broadcast Equipment SA – January 2011 Important The control of a channel from the VDR Panel is concurrent to any other controller that might be assigned to that channel: EVS Remote Panel or external protocol. A command sent from the VDR Panel to a channel will overwrite whatever the channel was doing at that time. The name of the channel currently assigned to each window is displayed on the top of each of them.
XTnano – Version 10.04 – Operating Manual Issue 10.04.A EVS Broadcast Equipment SA – January 2011 H OW TO L OAD A C LIP Use the arrow keys to move the cursor inside the lower section of the VDR Panel to the desired clip and press ENTER, or click on the desired clip with the stylus, or type the desired clip ID and press F3. To select a different camera angle inside a clip, press ALT + the letter of the desired camera (A/B/C/D/E/F), or click on it.
Issue 10.04.A XTnano – Version 10.04 – Operating Manual EVS Broadcast Equipment SA – January 2011 4. Press ALT + S to save the clip. The Save as window opens, giving the operator the opportunity to name / rename the clip if needed. Pressing ENTER will save the clip to the current cursor location in the lower section of the VDR Panel.
XTnano – Version 10.04 – Operating Manual EVS Broadcast Equipment SA – January 2011 8.3.4 Issue 10.04.A VDR PANEL – RECORDER WINDOW The VDR Panel Recorder can be used to start/stop the record, and to create clips from the local record trains. For exam ple, it allows the creation of clips on a server that has no Play channel. H OW TO S TART /S TOP THE R ECORD Press ALT + R to start or stop the record on the record channel assigned to the window. No confirmation is required.
Issue 10.04.A XTnano – Version 10.04 – Operating Manual EVS Broadcast Equipment SA – January 2011 6. Press ALT + S to save the clip(s). The operator still has the opportunity to rename the clip during this operation. He can then save the clip to the current cursor location by pressing ENTER, or to the first available clip location on the current server by pressing ALT + U. PGM1 Cam A Push PgmSpd >Archive *** P.1 B.
XTnano – Version 10.04 – Operating Manual EVS Broadcast Equipment SA – January 2011 Issue 10.04.A 9. Playlist Management 9.1 GENERAL INFORMATION P LAYLIST C REATION Playlists can be created on the server via the nano Remote Panel and/or the Multicam user interface. L IMITATION ON P LAYLIST AND T IMELINE E LEMENTS A playlist can include up to 1000 elements. Up to 16000 playlist elements can be saved on a server.
Issue 10.04.A 9.2.2 XTnano – Version 10.04 – Operating Manual EVS Broadcast Equipment SA – January 2011 ACCESSING THE PLAYLIST EDIT MODE A CCESS When you load a playlist pressing the PLST key on the Remote Panel, you directly enter the Playlist Edit mode. The first frame of the element highlighted in the playlist appears on the PGM. At the start, full control will be on the PGM side; scrolling through the playlist can be done here.
XTnano – Version 10.04 – Operating Manual Issue 10.04.A EVS Broadcast Equipment SA – January 2011 Note A third selection of the PLST button cues the playlist to the beginning, displaying the first playlist elem ent on the PGM side and the following clip on the PRV. For more details on the Playlist Playout mode, refer to the section 9.8.3 ‘Functions Available on the Remote in Playlist Playout mode’, on page 67. 9.3 PLAYLIST DISPLAY ON THE VGA 9.3.
Issue 10.04.A 9.3.2 XTnano – Version 10.04 – Operating Manual EVS Broadcast Equipment SA – January 2011 VGA PLAYLIST SCREEN I NTRODUCTION Pressing F10 on the keyboard calls the VGA Playlist screen. The Playlist screen displays information on the clips included in the current or loaded playlist. Several transport functions are available from this screen. For more inform ation, refer to section 9.8.2 ‘Functions Available from the VGA Playlist Screen’, on page 66.
XTnano – Version 10.04 – Operating Manual EVS Broadcast Equipment SA – January 2011 Issue 10.04.A 9.4 ACTIVATING AND LOADING PLAYLISTS 9.4.1 INTRODUCTION A distinction is made between activating and loading a playlist: • When you activate a playlist, you access the playlist location on the server but you do not load it on a player channel. Once the playlist is active, it is called the ‘current playlist’. You can insert clips directly in the current playlist without having to load it onto a channel.
Issue 10.04.A 9.4.3 XTnano – Version 10.04 – Operating Manual EVS Broadcast Equipment SA – January 2011 HOW TO RECALL AND LOAD A PLAYLIST You can only recall and load a playlist if it is not em pty. To load a playlist on a player channel, proceed as follows: 1. Access the desired playlist bank by pressing F10 from the requested page. 2. Select the playlist to load with the F1-F10 keys. The selected playlist becomes active and is displayed on the LCD display. 3.
XTnano – Version 10.04 – Operating Manual Issue 10.04.A EVS Broadcast Equipment SA – January 2011 9.5.2 HOW TO DELETE ALL PLAYLISTS OF A BANK To clear all playlists stored on a given bank, proceed as follows: 1. Select the appropriate page on which you want to delete the playlists. 2. Press CLEAR + SHIFT, and the F10 key that corresponds to the playlist bank. The following confirmation message will be displayed: Caution: This will delete all playlists/timelines stored on bank 0 [Menu] : Cancel 3.
Issue 10.04.A 9.6.2 XTnano – Version 10.04 – Operating Manual EVS Broadcast Equipment SA – January 2011 HOW TO NAME THE CURRENT PLAYLIST ON THE VGA PLAYLIST SCREEN To name the current playlist from the VGA Playlist screen, proceed as follows: 1. Press the F10 key on the keyboard to open the VGA Playlist screen. The current playlist is displayed. 2. Type the desired name on the keyboard. It appears in the NAME field at the bottom of the screen.
XTnano – Version 10.04 – Operating Manual Issue 10.04.A EVS Broadcast Equipment SA – January 2011 9.7 BROWSING WITHIN A PLAYLIST 9.7.1 POSSIBLE BROWSING METHODS You can browse within a playlist in different ways: • Browse quickly by jumping to the first field of each clip in the playlist: For more information, see the section 9.7.3 ‘Browsing Quickly Through a Playlist’, on page 65. • Browse through the content of each clip in the playlist: For more information, see the section 9.7.
Issue 10.04.A XTnano – Version 10.04 – Operating Manual EVS Broadcast Equipment SA – January 2011 9.8 PLAYOUT FUNCTIONS AVAILABLE FOR PLAYLISTS 9.8.1 ROLLING A PLAYLIST R OLLING A CTION After recalling a playlist, you will roll the playlist using the pre-defined speed of each clip. Use the PLAY key to start rolling the playlist.
XTnano – Version 10.04 – Operating Manual Issue 10.04.A EVS Broadcast Equipment SA – January 2011 9.8.3 Criteria Description RECUE Press ALT + R to recue to the beginning of the playlist and pause. NEXT Press ALT + N while the playlist is playing to force immediately the transition to the next clip in the playlist. SKIP Press ALT + S while the playlist is playing to skip the next clip.
Issue 10.04.A XTnano – Version 10.04 – Operating Manual EVS Broadcast Equipment SA – January 2011 S KIP While the playlist is rolling, the next clip in the sequence is always displayed on the PRV screen. The Skip function allows the operator to discard clips before they go on-air. The clip that will be «skipped» is the one displayed on the PRV screen. This function does not remove the clip from the playlist, but it simply allows it to be skipped during playback.
XTnano – Version 10.04 – Operating Manual EVS Broadcast Equipment SA – January 2011 Issue 10.04.A S PEED The Speed function allows defining the speed at which one or all clips of playlist will be played. Select the playback speed of the clip with the lever, then press ENTER to validate. Values are ‘Unknown’ and from 0 to 100%. Operators have access to the secondary lever control like when clips are replayed.
Issue 10.04.A 9.9.2 XTnano – Version 10.04 – Operating Manual EVS Broadcast Equipment SA – January 2011 SECONDARY MENU IN PLAYLIST EDIT MODE I NTRODUCTION You can access the secondary menu of the Playlist Edit mode pressing MENU on the Remote Panel when you are in the main menu of the Playlist Edit mode. OtherAng Replace Redo Undo R EPLACE The Replace function makes it possible to replace a portion of a playlist by the same A/V material to which effects have been added (externally or internally).
XTnano – Version 10.04 – Operating Manual EVS Broadcast Equipment SA – January 2011 Issue 10.04.A 9.10 ADDING & REPLACING CLIPS IN A PLAYLIST 9.10.1 POSSIBLE METHODS FOR ADDING CLIPS You can add clips to a playlist in different ways: • Adding clips at the end of the current playlist without entering the Playlist Edit mode. See the section 9.10.2 ‘How to Quickly Add Clips to the Current Playlist’, on page 71. • Inserting clips before or after the clip selected in the loaded playlist. See the section 9.
Issue 10.04.A XTnano – Version 10.04 – Operating Manual EVS Broadcast Equipment SA – January 2011 1. Using the Playlist Edit mode or the Browse mode, scroll to the location where the clip must be inserted. 2. Call the selected clip. It appears on the PRV output. 3.
XTnano – Version 10.04 – Operating Manual Issue 10.04.A EVS Broadcast Equipment SA – January 2011 9.10.6 HOW TO MOVE AN ELEMENT WITHIN A PLAYLIST To move a playlist element within a playlist using the Remote Panel, proceed as follows: 1. While you are in Playlist Edit mode, scroll within the playlist to the clip that needs to be moved. 2. Select Delete from the Playlist Edit menu. The clip is sent to the clipboard and loaded on the PRV channel. 3.
Issue 10.04.A XTnano – Version 10.04 – Operating Manual EVS Broadcast Equipment SA – January 2011 9.11 COPYING PLAYLISTS 9.11.1 INTRODUCTION With the XTnano servers, you can copy and move playlists locally. From the VGA Clip screen, you can perform cut, copy and paste actions with playlists, in the same way as you do with clips. For more information on these actions, refer to the section Error! Reference source not found. ‘Error! Reference source not found.’, on page Erreur ! Signet non défini. .
XTnano – Version 10.04 – Operating Manual Issue 10.04.A EVS Broadcast Equipment SA – January 2011 A new menu appears on the LCD display of the Remote Panel, with the corresponding message on the OSD of the output monitors, asking whether you want to copy the original playlist to the new location or whether you simply want to select a new, empty playlist (default choice): Select New Playlist 13? [Menu]: Cancel [Enter]: Confirm COPY 4. NEW PLST Press COPY (A key) to select the copy option.
Issue 10.04.A XTnano – Version 10.04 – Operating Manual EVS Broadcast Equipment SA – January 2011 increased by the duration of the guardbands, as defined on the destination system . • LONG mode: the entire original clips, including their guardbands, will be copied on the destination system. 7. Once the various options have been decided, press ENTER to confirm the copy, or MENU to cancel. The F_ key of the destination playlist will flash until all clips have been copied.
XTnano – Version 10.04 – Operating Manual EVS Broadcast Equipment SA – January 2011 Issue 10.04.A 9.12 OTHER EDITING FUNCTIONS FOR PLAYLISTS 9.12.1 HOW TO TRIM CLIPS INTO A PLAYLIST Every playlist element can be trimmed independently of all other instances of the same clip number. 1. Browse to the desired element in the playlist. 2. Re-mark a new Short IN or Short OUT.
Issue 10.04.A XTnano – Version 10.04 – Operating Manual EVS Broadcast Equipment SA – January 2011 9.12.3 HOW TO MERGE PLAYLISTS From the VGA, it is possible to merge two playlists by copying a playlist and pasting it to an existing playlist. The copied playlist will be added at the end of the destination playlist. 9.12.
XTnano – Version 10.04 – Operating Manual Issue 10.04.A EVS Broadcast Equipment SA – January 2011 P ROCEDURE To regenerate the timecode in a given playlist, perform the following actions: 1. Activate the TC Regeneration and define the related settings on the Playlist page (F10), in the blue-highlighted area at the bottom of the page. This feature is defined for each playlist individually: 2. Activate the internal loop using the SHIFT + Loop keys 3. Roll the playlist.
Issue 10.04.A XTnano – Version 10.04 – Operating Manual EVS Broadcast Equipment SA – January 2011 9.13 THE AUXILIARY AUDIO CLIP 9.13.1 INTRODUCTION This option allows adding a new stereo audio track (for example. sport comments, music, jingles, ambient sound) to the original video clips. This stereo audio track is available on the PVW output and on analogue outputs 7/8 or on digital outputs 15/16. The selection of the track output is done via the Setup menu – Page 5.1 F5.
XTnano – Version 10.04 – Operating Manual EVS Broadcast Equipment SA – January 2011 Issue 10.04.A 9.14 TRANSITION EFFECTS 9.14.1 DESCRIPTION You can apply effects on the audio and video transitions of a clip in a playlist. For each transition, you define the effect type and duration. Normal Playlist with Cuts Playlist with 1:00 sec Effect Duration In an LSM playlist, the video and audio effects end at the OUT point of a clip, so the duration of clips is shortened by the length of the effect.
Issue 10.04.A XTnano – Version 10.04 – Operating Manual EVS Broadcast Equipment SA – January 2011 9.14.2 ACCESSING COMMANDS FOR TRANSITION EFFECTS The functions related to transitions effects are available from the main menu of the Playlist Edit mode, and the effects applied are also displayed on the same LCD display: 9.14.
XTnano – Version 10.04 – Operating Manual EVS Broadcast Equipment SA – January 2011 Issue 10.04.A 9.14.4 DEFAULT DURATION FOR VIDEO AND AUDIO TRANSITION This is possible to set a default value for the duration of the video and audio transitions in the Setup Menu. Once this is defined, each time a clip is entered or inserted into a playlist, transitions are applied with the default values. The Vid. Effect duration setting is on page 4.1, function key F1 (range up to 20:00 secs). The Aud.
Issue 10.04.A XTnano – Version 10.04 – Operating Manual EVS Broadcast Equipment SA – January 2011 Effect Type Description Fade to color (>) A fade in effect to a defined color is applied on the previous clip up to the transition in cut mode to the next clip (on which the effect is defined).
XTnano – Version 10.04 – Operating Manual Issue 10.04.A EVS Broadcast Equipment SA – January 2011 The following effect types are available: 4. • C: Cut • W: Wipe • <: Fade from color • M: Mix • >: Fade to color • V: Fade to/from color To modify the default duration for the transition effect, press FX Dur (C) and move the lever until the requested duration is displayed in the last field of the corresponding element: 111A/04 5.
Issue 10.04.A XTnano – Version 10.04 – Operating Manual EVS Broadcast Equipment SA – January 2011 9.15.3 REPLACE EDIT AND REPLACE PLAYBACK MODES Similar to the playlist, the Replace function has two modes: T HE R EPLACE E DIT M ODE This mode makes it possible to specify the following information for the Replace: • IN point and OUT point, for the section to replace in the playlist. The OUT point can also be defined during the Replace itself. • Loop mode parameters.
XTnano – Version 10.04 – Operating Manual Issue 10.04.A EVS Broadcast Equipment SA – January 2011 9.15.5 HOW TO PERFORM A REPLACE You first define the Replace function in the Replace Edit mode. Then, you execute the Replace function in the Replace Playback mode. To perform a Replace, proceed as follows: 1. Open the playlist in which you want to replace a section in Playlist Edit mode. 2. In Playlist Edit mode, press Menu on the Remote Panel to access the secondary menu. 3.
Issue 10.04.A XTnano – Version 10.04 – Operating Manual EVS Broadcast Equipment SA – January 2011 9. Press Enter on the Remote Panel to validate the Replace: The material between the IN and OUT points is replaced with the newly created clip. The playlist returns to Playlist Edit mode, positioned at the end of the inserted clip. You can also cancel the Replace by pressing the Menu key on the Remote Panel. 9.15.
XTnano – Version 10.04 – Operating Manual EVS Broadcast Equipment SA – January 2011 Issue 10.04.A Glossary HANC LTC Horizontal Ancillary timecode LTC as defined in the XMPTE 259M and RP188 standards. HANC VITC Horizontal Ancillary timecode VITC as defined in the XMPTE 259M and RP188 standards. LTC Longitudinal (or Linear) timecode (LTC) is a timing signal that is part of an audio tape recording. It is recorded on a track that runs lengthwise along the tape, which is why it is called longitudinal.
EVS Broadcast Equipment Liège Science Park 16, rue Bois St Jean B-4102 Ougrée Belgium Corporate Headquarters North & Latin America Headquarters Asia & Pacific Headquarters Other regional offices available on +32 4 361 7000 +1 973 575 7811 +852 2914 2501 www.evs.tv/contact To learn more about EVS go to www.evs.