
Operating Manual Owner's manual
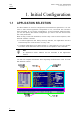


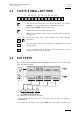


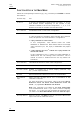

Table Of Contents
- Copyright
- Disclaimer
- Improvement Requests
- Regional Contacts
- User Manuals on EVS Website
- 1. Initial Configuration
- 2. Remote Controller
- 3. Main Menu
- 4. Remote Panel Operations
- 4.1 OPERATIONS
- 4.2 SELECTION OF CLIP BANKS AND PLAYLISTS
- 4.3 CLIP NUMBERING HIERARCHY
- 5. Control Mode
- 6. PGM-PRV Mode
- 7. Multi PGM Mode
- 8. Video Delay
- 9. Clip Management
- 9.1 INTRODUCTION
- 9.2 USING THE EVS REMOTE PANEL
- 9.3 USING THE CLIP SCREEN
- 9.3.1 Clip screen – Standard View
- 9.3.2 The Title Bar
- 9.3.3 The Function Bar
- 9.3.4 The Clip Information Area
- 9.3.5 The Clip Management Area
- 9.3.6 Selecting a Clip with Tablet and Stylus
- 9.3.7 Selecting a Clip with the Keyboard
- 9.3.8 How to Name a Clip
- 9.3.9 How to Change the Primary Camera of a Clip
- 9.3.10 Recalling a Clip
- 9.3.11 How to Cancel a Network Copy on the VGA
- 9.3.12 How to Restripe the Timecode of the Current Clip
- 9.3.13 Moving and Copying Clips
- 9.3.14 Clip Screen – Extended View
- 9.4 USING THE VDR PANEL
- 10. Keyword Management
- 10.1 CREATING AND SELECTING THE KEYWORD FILE
- 10.2 ASSIGNING KEYWORDS USING THE VGA SCREEN
- 10.2.1 Keyword Windows
- 10.2.2 How to Assign a Keyword to a Clip
- 10.2.3 How to Clear a Keyword with the Keyboard
- 10.2.4 How to Clear a Keyword with the Stylus
- 10.2.5 How to Edit the Ranking of the Current Clip With the Keyboard
- 10.2.6 How to Edit the Ranking of the Current Clip With the Stylus
- 10.2.7 How to Clear All Keywords and the Ranking of a Clip
- 10.2.8 How to Name a Clip Using the Keywords:
- 10.3 SEARCHING THE DATABASE USING THE VGA SCREEN
- 10.4 ASSIGNING KEYWORDS USING THE REMOTE PANEL
- 10.5 SEARCHING THE DATABASE USING THE REMOTE PANEL
- 11. Playlist Management
- 11.1 GENERAL INFORMATION
- 11.2 PLAYLIST MODES ON THE REMOTE PANEL
- 11.3 PLAYLIST DISPLAY ON THE VGA
- 11.4 ACTIVATING AND LOADING PLAYLISTS
- 11.5 DELETING PLAYLISTS
- 11.6 NAMING A PLAYLIST OR AN ELEMENT IN A PLAYLIST
- 11.7 BROWSING WITHIN A PLAYLIST
- 11.8 PLAYOUT FUNCTIONS WITH PLAYLISTS
- 11.9 OVERVIEW OF EDITING FUNCTIONS IN PLAYLIST EDIT MODE
- 11.10 ADDING & REPLACING CLIPS IN A PLAYLIST
- 11.10.1 Possible Methods for Adding Clips
- 11.10.2 Modifying a Distant Playlist
- 11.10.3 How to Quickly Add Clips to the Current Playlist
- 11.10.4 How to Insert Clips into a Playlist
- 11.10.5 How to Insert the Result of a Clip Search into a Playlist
- 11.10.6 Inserting Growing Clips into Playlists
- 11.10.7 How to Delete Playlist Elements from a Playlist
- 11.10.8 How to Move an Element Within a Playlist
- 11.10.9 How to Change the Camera Angle of a Playlist Element
- 11.11 COPYING PLAYLISTS
- 11.12 OTHER EDITING FUNCTIONS FOR PLAYLISTS
- 11.13 THE AUXILIARY AUDIO CLIP
- 11.14 TRANSITION EFFECTS
- 11.15 SPLIT AUDIO
- 11.15.1 Introduction
- 11.15.2 Menus in Split Audio Mode
- 11.15.3 OSD Display in Split Audio Mode
- 11.15.4 Default Duration for the Audio and Video Transitions
- 11.15.5 Associations of Audio and Video Transition Types
- 11.15.6 Default Mode for Extending a Transition
- 11.15.7 Changing the Audio or Video Effect Duration
- 11.15.8 Performing A ‘V Base’ Edit
- 11.15.9 Performing An ‘A Base’ Edit
- 11.15.10 How to Insert a Clip into a Playlist With Split Audio
- 11.16 SWAP AUDIO TRACKS
- 11.17 REPLACE FUNCTION
- 12. Timeline Management
- 13. Operating on XNet Network
- 13.1 INTRODUCTION
- 13.2 DISCONNECTING FROM XNET
- 13.3 SELECTING A SERVER ON XNET
- 13.4 OPERATIONS
- 14. Sony, XtenDD35, Odetics & VDCP Protocols

Issue
10.03.A
XSense
–
Version 10.03
–
Operating Manual
EVS Broadcast Equipment SA – July 2010
6
5. Operational
Block 2
PLAY Initiates playback
NETWORK Enters the XNet menu. (connect to other servers on the
network)
LAST CUE Re-cues EVS server to previous cue point
GOTO TC Allows timecode entry, with «F» keys
FAST JOG Used with jog dial for rapid, manual re-cue. This mode is
automatically reset after PLAY/LIVE commands.
MARK Used to enter re-usable cue point (256 cycling cues).
RECORD Initiates “E2E” mode
RETURN Inside a clip, allows the operator to return to the same
picture inside the record train, if it still exists.
PRV CTL Enables/disables the Preview Control mode.
PAGE Selects current clip page, from 1 to 10.
6. LCD Display Provides current status of system
2.2 LED COLOURS
A selected key lights red.
When a key lights green, it means a value in relation with this key exists.
For example: F1 to F0 keys
• Green light means a clip has been stored in relation with the key.
• Green flashing light means a clip is being created.
• Red light means the clip associated to the key is playing or is ready to play.
• Red flashing light means a clip is being deleted (in network mode)