
Operating Manual Owner's manual

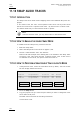
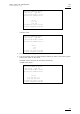

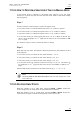


Table Of Contents
- Copyright
- Disclaimer
- Improvement Requests
- Regional Contacts
- User Manuals on EVS Website
- 1. Initial Configuration
- 2. Remote Controller
- 3. Main Menu
- 4. Remote Panel Operations
- 4.1 OPERATIONS
- 4.2 SELECTION OF CLIP BANKS AND PLAYLISTS
- 4.3 CLIP NUMBERING HIERARCHY
- 5. Control Mode
- 6. PGM-PRV Mode
- 7. Multi PGM Mode
- 8. Video Delay
- 9. Clip Management
- 9.1 INTRODUCTION
- 9.2 USING THE EVS REMOTE PANEL
- 9.3 USING THE CLIP SCREEN
- 9.3.1 Clip screen – Standard View
- 9.3.2 The Title Bar
- 9.3.3 The Function Bar
- 9.3.4 The Clip Information Area
- 9.3.5 The Clip Management Area
- 9.3.6 Selecting a Clip with Tablet and Stylus
- 9.3.7 Selecting a Clip with the Keyboard
- 9.3.8 How to Name a Clip
- 9.3.9 How to Change the Primary Camera of a Clip
- 9.3.10 Recalling a Clip
- 9.3.11 How to Cancel a Network Copy on the VGA
- 9.3.12 How to Restripe the Timecode of the Current Clip
- 9.3.13 Moving and Copying Clips
- 9.3.14 Clip Screen – Extended View
- 9.4 USING THE VDR PANEL
- 10. Keyword Management
- 10.1 CREATING AND SELECTING THE KEYWORD FILE
- 10.2 ASSIGNING KEYWORDS USING THE VGA SCREEN
- 10.2.1 Keyword Windows
- 10.2.2 How to Assign a Keyword to a Clip
- 10.2.3 How to Clear a Keyword with the Keyboard
- 10.2.4 How to Clear a Keyword with the Stylus
- 10.2.5 How to Edit the Ranking of the Current Clip With the Keyboard
- 10.2.6 How to Edit the Ranking of the Current Clip With the Stylus
- 10.2.7 How to Clear All Keywords and the Ranking of a Clip
- 10.2.8 How to Name a Clip Using the Keywords:
- 10.3 SEARCHING THE DATABASE USING THE VGA SCREEN
- 10.4 ASSIGNING KEYWORDS USING THE REMOTE PANEL
- 10.5 SEARCHING THE DATABASE USING THE REMOTE PANEL
- 11. Playlist Management
- 11.1 GENERAL INFORMATION
- 11.2 PLAYLIST MODES ON THE REMOTE PANEL
- 11.3 PLAYLIST DISPLAY ON THE VGA
- 11.4 ACTIVATING AND LOADING PLAYLISTS
- 11.5 DELETING PLAYLISTS
- 11.6 NAMING A PLAYLIST OR AN ELEMENT IN A PLAYLIST
- 11.7 BROWSING WITHIN A PLAYLIST
- 11.8 PLAYOUT FUNCTIONS WITH PLAYLISTS
- 11.9 OVERVIEW OF EDITING FUNCTIONS IN PLAYLIST EDIT MODE
- 11.10 ADDING & REPLACING CLIPS IN A PLAYLIST
- 11.10.1 Possible Methods for Adding Clips
- 11.10.2 Modifying a Distant Playlist
- 11.10.3 How to Quickly Add Clips to the Current Playlist
- 11.10.4 How to Insert Clips into a Playlist
- 11.10.5 How to Insert the Result of a Clip Search into a Playlist
- 11.10.6 Inserting Growing Clips into Playlists
- 11.10.7 How to Delete Playlist Elements from a Playlist
- 11.10.8 How to Move an Element Within a Playlist
- 11.10.9 How to Change the Camera Angle of a Playlist Element
- 11.11 COPYING PLAYLISTS
- 11.12 OTHER EDITING FUNCTIONS FOR PLAYLISTS
- 11.13 THE AUXILIARY AUDIO CLIP
- 11.14 TRANSITION EFFECTS
- 11.15 SPLIT AUDIO
- 11.15.1 Introduction
- 11.15.2 Menus in Split Audio Mode
- 11.15.3 OSD Display in Split Audio Mode
- 11.15.4 Default Duration for the Audio and Video Transitions
- 11.15.5 Associations of Audio and Video Transition Types
- 11.15.6 Default Mode for Extending a Transition
- 11.15.7 Changing the Audio or Video Effect Duration
- 11.15.8 Performing A ‘V Base’ Edit
- 11.15.9 Performing An ‘A Base’ Edit
- 11.15.10 How to Insert a Clip into a Playlist With Split Audio
- 11.16 SWAP AUDIO TRACKS
- 11.17 REPLACE FUNCTION
- 12. Timeline Management
- 13. Operating on XNet Network
- 13.1 INTRODUCTION
- 13.2 DISCONNECTING FROM XNET
- 13.3 SELECTING A SERVER ON XNET
- 13.4 OPERATIONS
- 14. Sony, XtenDD35, Odetics & VDCP Protocols

XSense
–
Version 10.03
–
Operating Manual
EVS Broadcast Equipment SA – July 2010
Issue
10.03.A
127
11.16.4 HOW TO PERFORM A SWAP AUDIO TRACK IN MANUAL MODE
If the manual mode is selected in the Setup menu (page 4.2, F3), the swap
functions in a similar way but asks the operator which track to swap when setting
the swap points.
Step 1
First the operator is being asked to select the original track:
• In 2 Tracks mode: you select between the tracks 1,2 or Menu to Cancel.
• In 4 Tracks mode: you select among the tracks 1 to 4, or Menu to Cancel.
• In 8 Tracks mode: you select among the tracks 1 to 8, or Menu to Cancel.
• In 16 Tracks mode: you select among the tracks 1 to 16, or Menu to Cancel. The
tracks 1-8 are displayed on a 1
st
page and the tracks 9-16 are available via F10
on a 2
nd
page.
The functions keys are used to select the track to change.
Step 2
When the choice is made, the operator selects by which track the selected one has
to be replaced:
• In 2 Tracks mode: you select the new track between 1, 2 or 0.
• In 4 Tracks mode: you select the new track among 1 to 4, or 0
• In 8 Tracks mode: you select the new track among 1 to 8, or 0
• In 16 Tracks mode: you select the new track among 1 to 16, or 0. The tracks 1-8
are displayed on a 1
st
page and the tracks 9-16 are available via F10 on a 2
nd
page.
Several swap points can be set on the same timecode (e.g.: 1 -> 3, 2 -> 4).
Note
Selecting track 0 will mute the output until the next swap point or the
end of the clip.
11.16.5 DELETING SWAP POINTS
When the operator is on a swap point, pressing CLEAR + IN/OUT deletes the
current swap point. All swap points for that timecode are deleted.
When the operator is not on a swap point, pressing CLEAR + IN/OUT brings up a
confirmation message to delete all swap points for the current clip.