XFLY.STREAMER – Version 1.02 – User Manual Issue 1.
XFLY.STREAMER – Version 1.02 – User Manual Issue 1.3 EVS Broadcast Equipment – April 2013 Copyright EVS Broadcast Equipment S.A. – Copyright © 2005-2013. All rights reserved. Disclaimer The information in this manual is furnished for informational use only and subject to change without notice.
XFLY.STREAMER – Version 1.02 – User Manual Issue 1.3 EVS Broadcast Equipment – April 2013 Table of Contents TABLE OF CONTENTS .................................................................................................... III WHAT’S NEW? ............................................................................................................ IV 1. PRODUCT OVERVIEW ............................................................................................. 5 1.1 1.2 1.3 Introduction ..........
XFLY.STREAMER – Version 1.02 – User Manual Issue 1.3 EVS Broadcast Equipment – April 2013 What’s New? The following table describes the sections updated to reflect the new and modified features on 1.02 (compared to 1.01). In the user manual, the icon on new and updated features. has been added on left margin to highlight information Click the section number (or the description) in the table to jump directly to the corresponding section. IV Section Description 3.1 XSquare support 6.
XFLY.STREAMER – Version 1.02 – User Manual Issue 1.3 Network Broadcast Equipment – April 2012 1. Product Overview XFly Streamer is a software dedicated to the backup of streams from one or several EVS video servers (XT2, XT2+, XT3, XS, XTnano). XFly Streamer manages the backup and transfer of all streams selected by the operator. This manual describes the configuration interface, which is easy to use and straightforward.
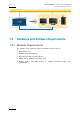
XFLY.STREAMER – Version 1.02 – User Manual Issue 1.3 EVS Broadcast Equipment – April 2013 100BT PC LAN (MTPC Network) 1.3 Hardware and Software Requirements 1.3.1 Minimal Requirements The guidelines for the minimum software and hardware requirements are: OS: Windows 7 Pro Software: Framework .NET 4.0 Motherboard: I5 660 - 3.
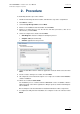
XFLY.STREAMER – Version 1.02 – User Manual Issue 1.3 EVS Broadcast Equipment – April 2013 2. Procedure To install XFly Streamer, proceed as follows: 1. Double-click the XFly Streamer installer, and follow the steps of the setup wizard. 2. Click Next to continue. 3. Select I accept the agreement and click Next. 4. Browse to an installation folder destination and click Next. 5. Browse to a folder where to save the AV files and data (for instance, drive S: for XFLY device), and click Next. 6.
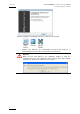
XFLY.STREAMER – Version 1.02 – User Manual Issue 1.3 EVS Broadcast Equipment – April 2013 After the installation, the following shortcuts are added to your desktop: XSquare and XTAccess are automatically associated and XTAccess is automatically launched at start-up and minimized in the task bar. Important When you first start XTAccess, the application modifies or adds the TcpAckFrequency key in the Windows registry. This key allows better backup performances. XTAccess needs then to be re-started.
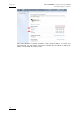
XFLY.STREAMER – Version 1.02 – User Manual Issue 1.3 EVS Broadcast Equipment – April 2013 3. Configuration 3.1 Configuration of Local XSquare/XTAccess The installer sets up automatically all software and components, therefore no additional setting is required prior to operate XFly Streamer. The following parameters of the local XSquare have been modified during the installation process: Total Max. Destinations is set to 15 in order to operate both Nano.Air and XFly.Streamer applications. Total Max.
Issue 1.3 XFLY.STREAMER – Version 1.02 – User Manual EVS Broadcast Equipment – April 2013 Click "Add a Windows credential", and fill the remote computer address, user name and password fields. For each remote system, two credentials must be added: one with the IP address, the other with the machine name.
XFLY.STREAMER – Version 1.02 – User Manual Issue 1.3 EVS Broadcast Equipment – April 2013 4. Licensing 4.1 XSecure Manager When you need to install a new license code, or extend the validity of a temporary license code, you must use the XSecure Manager application.Start the XSecure Manager application by double-clicking the XSecure Manager shortcut on your desktop.How to Get a License Key FileIn the XSecure Manager application, fill in the Customer Information area.
XFLY.STREAMER – Version 1.02 – User Manual Issue 1.3 EVS Broadcast Equipment – April 2013 5. User Interface The XFly Streamer window contains the areas highlighted on the screenshot, and described in the table below: 1 3 4 2 5 Area Description 1. Storage and Processing Devices Selection From this area, the operator can select the device to store the AV files, and the device (i.e. the XSQ/XTA) to process the different tasks for grabbing thumbnails and for recording streams. 2.
XFLY.STREAMER – Version 1.02 – User Manual Issue 1.3 EVS Broadcast Equipment – April 2013 5.1 Storage and Processing Device Selection Thanks to BONJOUR protocol, at start-up, XFLY systems are detected and listed in a drop-down list. Clicking on the arrow on the right will display all systems detected. In the dropdown list, XFly is identified as Machine_Name + EVS_SN. Note The local device is displayed on the top of the list with bold letters.
XFLY.STREAMER – Version 1.02 – User Manual Issue 1.3 EVS Broadcast Equipment – April 2013 5.2 Server List Filters This pane displays the four families of EVS video servers which can be seen by Xfly Streamer: XT series, XS, XTnano and XSnano. Select one or several server types you want to display in the servers' list. Select servers and then channels This pane displays a list of all available servers found on the network after a discovery process.
XFLY.STREAMER – Version 1.02 – User Manual Issue 1.3 EVS Broadcast Equipment – April 2013 5.3 Channels Area The channels area is filled with all selected channels (Max 6 channels)into the server list. Each channels' field displays the same information: The Channels area is divided into 6 panels. Each panel is dedicated to one channel. The screenshot below features a single panel, as all fields have the same meaning in all panels. 5.4 Commands and Status 5.4.
XFLY.STREAMER – Version 1.02 – User Manual Issue 1.3 EVS Broadcast Equipment – April 2013 Button/Field Description Duration This field displays the duration computed from the TC IN and TC OUT values, or, if TC OUT is not defined, according to the maximum duration defined in the Settings area. Record button The Record button allows to start the backup of the recoding trains on all selected channels. The backup record starts instantly. The Record button lights red when the recording is in progress.
XFLY.STREAMER – Version 1.02 – User Manual Issue 1.3 EVS Broadcast Equipment – April 2013 The maximum duration is still up to 300 minutes. When entering a TC OUT value, XFly Streamer checks if the maximum duration is not reached. At any time, the user can edit the TC OUT value. The Duration field is updated with the exact duration. Clicking the Stop button updates the TC OUT and Duration fields accordingly: The TC IN, TC OUT and Duration information remain on the screen until the jobs are all finalized.
Issue 1.3 XFLY.STREAMER – Version 1.02 – User Manual EVS Broadcast Equipment – April 2013 Click the Options button for more parameters: For generating EVS XML metadata, select the first option. This EVS metadata file can be generated with all wrappers. For generating FCP XML metadata select the second option. This FCP metadata file can be generated only when QT Movie and QT Reference wrappers are selected and is set by default.
XFLY.STREAMER – Version 1.02 – User Manual Issue 1.3 EVS Broadcast Equipment – April 2013 5.5.2 Destination Selection The Destination field specifies the path where the AV files will be saved, for all channels. Note The files can be saved to shared folders only. 5.5.3 Auto Filename Definition The filename is user-defined and can be modified as desired.
XFLY.STREAMER – Version 1.02 – User Manual Issue 1.3 EVS Broadcast Equipment – April 2013 Click the Append button to add the selected item at the end of the field. If necessary, modify the position of the items in the field with the cut/paste commands (CTRL + X, CTRL + V). Finally, click OK to validate. 5.5.4 Maximum Duration Setting In case a stream is a backup with endless command, the application will stop the backup when the maximum duration defined in this field has been reached.
XFLY.STREAMER – Version 1.02 – User Manual Issue 1.
XFLY.STREAMER – Version 1.02 – User Manual Issue 1.3 EVS Broadcast Equipment – April 2013 6. Operation 6.1 How to Record Streams To start the recording, proceed as follows: 1. Click this shortcut to launch the XFly. Streamer software. The following screen appears: 2. Select the XFly hardware (storing device) and the processing device (i.e. XTAccess) from the two drop-down lists in the upper left corner. The local system and software if present always appear in bold at the top of the list. 3.
XFLY.STREAMER – Version 1.02 – User Manual Issue 1.3 EVS Broadcast Equipment – April 2013 4. Into the server list, click the server drop-down list to display the list of available channels: The selected channel is now displayed in the channel area with thumbnails generation to preview the channel: 5. Repeat step 4 to select all channels desired. 6.
XFLY.STREAMER – Version 1.02 – User Manual Issue 1.3 EVS Broadcast Equipment – April 2013 Note As the backup files need to close properly, it can however take some time before all jobs are finalized. 6.2 How to Retry Streaming Jobs One by One When a job has failed, a retry command is available in the Channel pane. The user has the possibility to retry the job without stopping or re-starting the other jobs in progress. The Retry button is only available for the job(s) failed in the same channel pane.
XFLY.STREAMER – Version 1.02 – User Manual Issue 1.3 EVS Broadcast Equipment – April 2013 6.3 How to Preview Files? While recording files, you can control the quality of the file with the XViewer application. This application is installed with the XFLY.Streamer package.