
User Manual Owner's manual

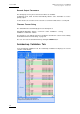


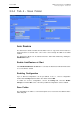
Table Of Contents
- Table of Contents
- What’s New in Version 2.19?
- 1. Introduction
- 2. Software Installation
- 3. XFile Module
- 3.1 System Configuration
- 3.2 Startup
- 3.3 Session Configuration
- 3.3.1 Tab 1 - Autobackup
- 3.3.2 Tab 2 – MXF Metadata
- 3.3.3 Tab 3 – Manual Backup
- 3.3.4 Tab 4 – Scan Folder
- 3.3.5 Tab 5 – Grab
- 3.3.6 Tab 6 – Export
- 3.3.7 Tab 7 – XML
- 3.3.8 Tab 8 – User Parameters
- Autostart
- Autobackup at Startup
- Confirm Manual Backup
- Confirm Manual Restore
- Confirm Manual Update
- Cancel Backups Scheduled when Stopping Autobackup
- Use Fixed Size Font for Clipnames and Keywords
- Publish Clips with Original UmID (Warning publish will failed if UmID already present on XNet)
- Publish Clips with Original VarID (Warning publish will failed if VarID already published on XFile)
- Import: Use Filename to fill Clipname Metadata
- Dual Path Editing
- 3.4 User Interface
- 3.4.1 Overview of the main Window
- 3.4.2 XFile List
- 3.4.3 Network status
- 3.4.4 Disk Usage and Disk Mode
- 3.4.5 Jobs Status Area
- 3.5 Autobackup Mode
- 3.6 Backup Mode
- 3.7 Restore Mode
- 3.8 Publish Mode
- 3.9 Maintenance Mode
- 3.10 Clip Maintenance
- 3.11 Disks-Folders Maintenance
- 3.12 Playlist Maintenance
- 3.13 Job Status
- 3.14 Re-Scan Disks
- 3.15 Statistics
- 4. XStream
- 4.1 Scheduler and QuickStart Modes
- 4.2 Information & Menu Area
- 4.3 Time Grid
- 4.4 Channels Area
- 4.5 Status Area
- 4.6 System Configuration
- 4.7 Record Grid Menu
- 4.8 Contextual Menu in the Scheduler
- 4.9 Creating and Editing Jobs in Scheduler Mode
- 4.10 Creating Jobs in QuickStart Mode
- 5. External modules
- Appendix 1: XF2 Hardware
- Notes

XFile Version 2.19 – User Manual
EVS Broadcast Equipment – November 2012
Issue 2.19.A
21
The Time Range filter requires a start date and time, as well as an end date and time, to
be valid:
1.
In the calendar, select the month with the left and right arrows, then the day of the
month.
2. In the Time field, select the hour using the up and down arrows to change the
value displayed or directly type the value when the field lights green.
3. Click OK to confirm your selection.
4.
Enter the second selection window to enter the values for the end limit.
The Autobackup criterion is now active and only the clips created into the time range will
be backed up.
Output Parameters
Note
A warning message is displayed in case the same path and the same file
format are selected in the three selection tabs.
Output File Format
The following setting makes it possible to choose the format in which the backup files
from the selection will be automatically generated.
The AutoBackup Output Parameters > File Format drop-down list allows the user to
select the default file format for the clips backed up with the autobackup process.
The following formats are available:
• EVS MXF
• MXF OP1a (SD IMX only)
• Quick Time Movie
• Quick Time Reference
• Avid Ingest Device
• CleanEdit Reference
• Avid MXF OPAtom
• MXF OP1a (Std SMPTE)