
User Manual Owner's manual


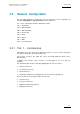


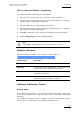
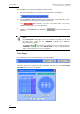
Table Of Contents
- Table of Contents
- What’s New in Version 2.19?
- 1. Introduction
- 2. Software Installation
- 3. XFile Module
- 3.1 System Configuration
- 3.2 Startup
- 3.3 Session Configuration
- 3.3.1 Tab 1 - Autobackup
- 3.3.2 Tab 2 – MXF Metadata
- 3.3.3 Tab 3 – Manual Backup
- 3.3.4 Tab 4 – Scan Folder
- 3.3.5 Tab 5 – Grab
- 3.3.6 Tab 6 – Export
- 3.3.7 Tab 7 – XML
- 3.3.8 Tab 8 – User Parameters
- Autostart
- Autobackup at Startup
- Confirm Manual Backup
- Confirm Manual Restore
- Confirm Manual Update
- Cancel Backups Scheduled when Stopping Autobackup
- Use Fixed Size Font for Clipnames and Keywords
- Publish Clips with Original UmID (Warning publish will failed if UmID already present on XNet)
- Publish Clips with Original VarID (Warning publish will failed if VarID already published on XFile)
- Import: Use Filename to fill Clipname Metadata
- Dual Path Editing
- 3.4 User Interface
- 3.4.1 Overview of the main Window
- 3.4.2 XFile List
- 3.4.3 Network status
- 3.4.4 Disk Usage and Disk Mode
- 3.4.5 Jobs Status Area
- 3.5 Autobackup Mode
- 3.6 Backup Mode
- 3.7 Restore Mode
- 3.8 Publish Mode
- 3.9 Maintenance Mode
- 3.10 Clip Maintenance
- 3.11 Disks-Folders Maintenance
- 3.12 Playlist Maintenance
- 3.13 Job Status
- 3.14 Re-Scan Disks
- 3.15 Statistics
- 4. XStream
- 4.1 Scheduler and QuickStart Modes
- 4.2 Information & Menu Area
- 4.3 Time Grid
- 4.4 Channels Area
- 4.5 Status Area
- 4.6 System Configuration
- 4.7 Record Grid Menu
- 4.8 Contextual Menu in the Scheduler
- 4.9 Creating and Editing Jobs in Scheduler Mode
- 4.10 Creating Jobs in QuickStart Mode
- 5. External modules
- Appendix 1: XF2 Hardware
- Notes
XFile Version 2.19 – User Manual
EVS Broadcast Equipment – November 2012
Issue 2.19.A
19
How to Select the Material to Autobackup
To select the material to autobackup, proceed as follows:
1.
First select the server to backup. The selected line changes to dark blue.
2.
Select the camera angles desired to be part of the autobackup process. Selected
cameras appear on a bright green background.
3.
Select the PREF cams or Archive Flag criteria if desired.
4.
Select the pages that you want to exclude from the autobackup process. Excluded
pages appear on a bright red background.
5. Click OK to confirm the selection and to close the XFile Config Session window.
6. Click the Autobackup button in the main XFile window.
Note
For the AirBox and SpotBox servers, all cameras must be selected.
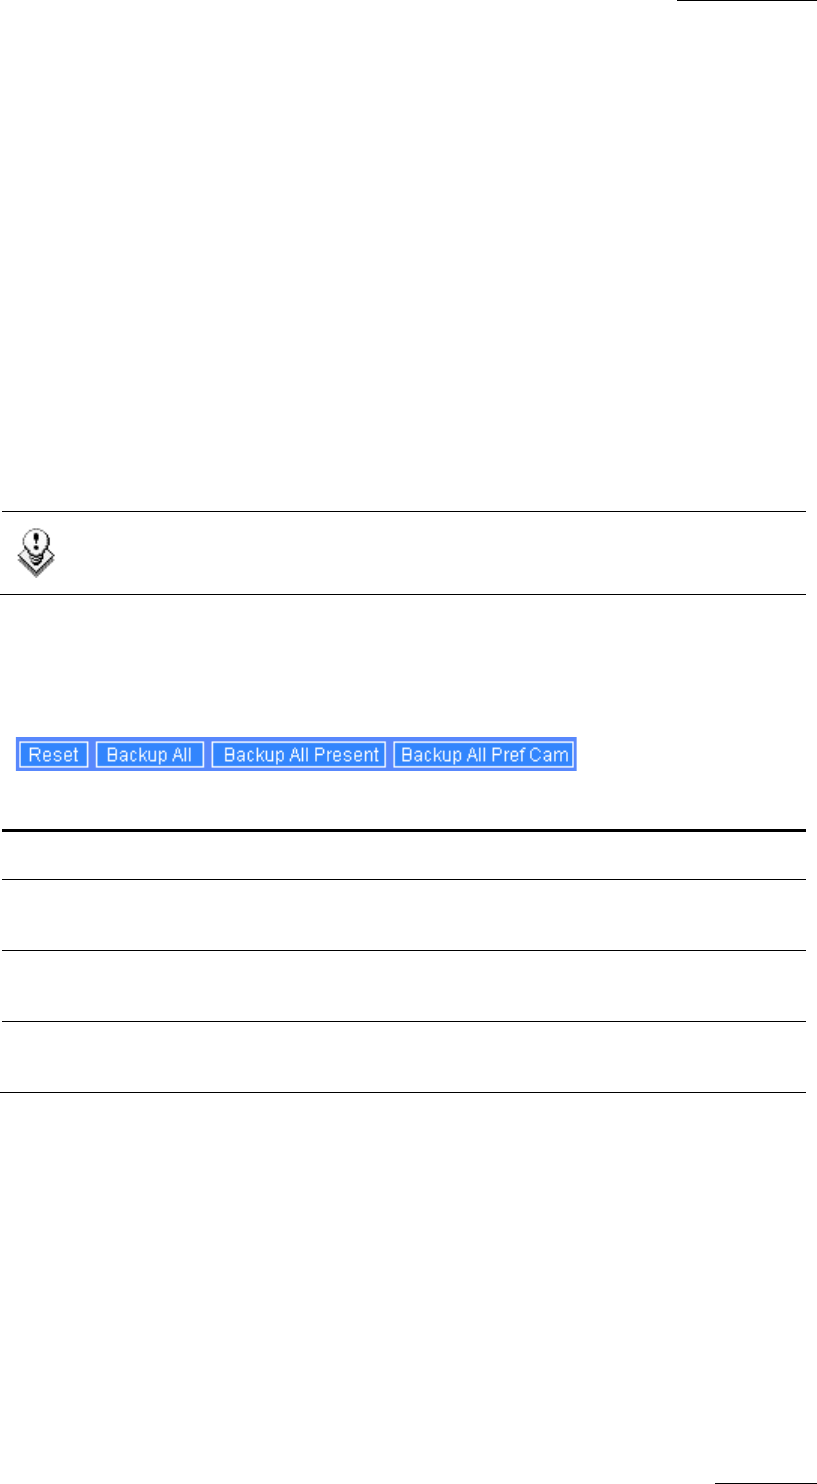
Selection Shortcuts
Different shortcuts are available to select cameras or systems with ease:
Shortcut button Description
Reset
It clears all selections
Backup all
It selects all cameras and all pages of all systems. New
systems being connected will also be backed up.
Backup all Present
It selects all cameras and all pages of all systems currently
connected to the network.
Backup all PREF cam
It selects all
preferential cameras and all pages of all
systems currently connected to the network.
Additional Autobackup Criteria
Archive status
The basic working of the XFile is to compare the content of its disks with the clips present
on the XNet. According to the result, the missing clips on disk will be automatically
backed up.
If several disks are required to back a complete session up, the Archive status must be
kept to avoid a second backup of same clips while changing the disks.