
User Manual Owner's manual

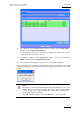
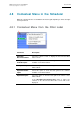

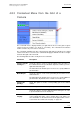

Table Of Contents
- Table of Contents
- What’s New in Version 2.19?
- 1. Introduction
- 2. Software Installation
- 3. XFile Module
- 3.1 System Configuration
- 3.2 Startup
- 3.3 Session Configuration
- 3.3.1 Tab 1 - Autobackup
- 3.3.2 Tab 2 – MXF Metadata
- 3.3.3 Tab 3 – Manual Backup
- 3.3.4 Tab 4 – Scan Folder
- 3.3.5 Tab 5 – Grab
- 3.3.6 Tab 6 – Export
- 3.3.7 Tab 7 – XML
- 3.3.8 Tab 8 – User Parameters
- Autostart
- Autobackup at Startup
- Confirm Manual Backup
- Confirm Manual Restore
- Confirm Manual Update
- Cancel Backups Scheduled when Stopping Autobackup
- Use Fixed Size Font for Clipnames and Keywords
- Publish Clips with Original UmID (Warning publish will failed if UmID already present on XNet)
- Publish Clips with Original VarID (Warning publish will failed if VarID already published on XFile)
- Import: Use Filename to fill Clipname Metadata
- Dual Path Editing
- 3.4 User Interface
- 3.4.1 Overview of the main Window
- 3.4.2 XFile List
- 3.4.3 Network status
- 3.4.4 Disk Usage and Disk Mode
- 3.4.5 Jobs Status Area
- 3.5 Autobackup Mode
- 3.6 Backup Mode
- 3.7 Restore Mode
- 3.8 Publish Mode
- 3.9 Maintenance Mode
- 3.10 Clip Maintenance
- 3.11 Disks-Folders Maintenance
- 3.12 Playlist Maintenance
- 3.13 Job Status
- 3.14 Re-Scan Disks
- 3.15 Statistics
- 4. XStream
- 4.1 Scheduler and QuickStart Modes
- 4.2 Information & Menu Area
- 4.3 Time Grid
- 4.4 Channels Area
- 4.5 Status Area
- 4.6 System Configuration
- 4.7 Record Grid Menu
- 4.8 Contextual Menu in the Scheduler
- 4.9 Creating and Editing Jobs in Scheduler Mode
- 4.10 Creating Jobs in QuickStart Mode
- 5. External modules
- Appendix 1: XF2 Hardware
- Notes

Issue 2.19.A
XFile Version 2.19 – User Manual
EVS Broadcast Equipment – November 2012
140
4.8.4 Contextual Menu from the Right of the
Server Name
This contextual menu appears when you right click the mouse on the right of the server
name and above the camera time grid (see arrow on screenshot).
The commands available from this contextual menu will apply to all cameras of the given
EVS video server. In the screenshot above, the commands will apply to Cam A to D of
the EVS server 01.
The following table describes shortly the menu commands:
Command Description
Create a new job
starting at …
Select this option to create a new job starting at the specified time
on all the cameras of the related EVS video server.
The Add a New Job window opens for the user to specify additional
job information.
Mark IN XT
Select this option to create a new job starting at the nowline on all
cameras of the related EVS video server.
The Add a New Job window opens for the user to specify additional
job information. By default, this is created as an endless job.
Mark OUT XT
Select this option to stop a record job in progress on the cameras
of the related EVS video server.