User’s Manual Version 2.
XFile Version 2.13 – User Manual EVS Broadcast Equipment – July 2010 Issue 2.13.D C OPYRIGHT EVS Broadcast Equipment – Copyright © 2003-2010. All rights reserved. D ISCLAIMER The information in this manual is furnished for informational use only and subject to change without notice.
Issue 2.13.D II XFile Version 2.
XFile Version 2.13 – User Manual EVS Broadcast Equipment – July 2010 Issue 2.13.D Table of Contents TABLE OF CONTENTS ................................................................................................... III WHAT’S NEW IN VERSION 2.13? .................................................................................. VI 1. INTRODUCTION....................................................................................................... 1 2. SOFTWARE INSTALLATION .........................
Issue 2.13.D XFile Version 2.13 – User Manual EVS Broadcast Equipment – July 2010 3.8.3 How to Un-publish a Clip.......................................................................................................82 3.9 MAINTENANCE MODE .............................................................................................................83 3.9.1 Accessing the Maintenance Mode Window ...........................................................................83 3.9.2 Maintenance Features .........
XFile Version 2.13 – User Manual EVS Broadcast Equipment – July 2010 Issue 2.13.D 4.6.3 Advanced parameters Tab ..................................................................................................130 4.7 RECORD GRID MENU ............................................................................................................132 4.8 CONTEXTUAL MENU IN THE SCHEDULER ..........................................................................137 4.8.1 Contextual Menu from the XNet Label ......
Issue 2.13.D XFile Version 2.13 – User Manual EVS Broadcast Equipment – July 2010 What’s New in Version 2.13? The changes linked to new features in version 2.13 are listed in the table below. Click the section number in the table to jump directly to the corresponding section. In the user manual, the icon has been added on left margin to highlight information on new or updated features. XFile: Possibility to select up to 4 disks for storage. Section 3.1.
XFile Version 2.13 – User Manual Issue 2.13.D EVS Broadcast Equipment – July 2010 XFile: Priority given to XML file when metadata have been updated Section 3.3.1 Generating an XML Metadata File XFile: New AutoRestore and AutoPublish modes Section 3.3.4 Tab 4 – Scan Folder: Auto Restore and AutoPublish. Section 3.4.1 New buttons available in the main window. XFile: New File Format filter available from the XFile list. Section 3.4.
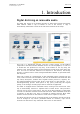
XFile Version 2.13 – User Manual Issue 2.13.D EVS Broadcast Equipment – July 2010 1. Introduction Digital Archiving on removable media The XFile has access to all footage recorded on EVS video servers through the SDTI network. When a clip is created on one of the servers, a copy is automatically transferred to XFile in the file format selected in the setup.
Issue 2.13.D XFile Version 2.13 – User Manual EVS Broadcast Equipment – July 2010 All Super-motion clips, created on any networked EVS video server, are stored by XFile amongst the normal files. The 75 fps nature of such material is maintained during archiving and is restored in a single pass without alteration.
XFile Version 2.13 – User Manual Issue 2.13.D EVS Broadcast Equipment – July 2010 2. Software Installation Important The XFILE 2.13 installers include the XFILE and XSTREAM installers, the Clip Info Exporter installer, the PCX2 drivers and the EVS Logs collector installer. Prior to install XFILE 2.13 uninstall the previous versions of XFILE and XSTREAM. 1.
Issue 2.13.D XFile Version 2.13 – User Manual EVS Broadcast Equipment – July 2010 3. Select the items to install in the Selection Components window: • Main files which include XFILE and XSTREAM installers • Clip Info Exporter • MSXML • Drivers of PCX2 board Click Next . 4. 4 In the next window, select the destination directory to install the new software and click Next .
XFile Version 2.13 – User Manual EVS Broadcast Equipment – July 2010 5. Issue 2.13.D In the Contiguration Parameters window, select the RESET EXISTING SETTINGS option, if required, and click Next to continue. This will reset all operational parameters (like SDTI speed, Video Standard, database size, net name and net number, etc.) to default parameters. 6. In the Ready to Install window, select INSTALL to start the installation of the main files. A progress bar shows the activity of files transfer. 7.
Issue 2.13.D XFile Version 2.13 – User Manual EVS Broadcast Equipment – July 2010 3. XFile Module Note XFile and XStream applications work simultaneously into 2 separate windows but share the same bandwith for all operations. To access to the XFile or XStream window select the item from the taskbar. 3.
XFile Version 2.13 – User Manual EVS Broadcast Equipment – July 2010 3.1.1 Issue 2.13.D NETWORK SETUP XF ILE I DENTIFICATION ON THE N ETWORK Standalone mode Selecting this option allows the operator to start the XFile without being connected to the XNet. In this mode only the maintenance mode is active. Important The bandwidth, the video standard and the Database Size must be identical on all machines connected to the XNet.
Issue 2.13.D XFile Version 2.13 – User Manual EVS Broadcast Equipment – July 2010 VarID Uniticy (Global / Local) This parameter is available from XFile version 2.00. It specifies at which level the VarID is unique: • Global: the VarID is unique at the XNet network level • Local: the VarID is unique at the EVS video server level. VarID Length (8 char / 32 char) This parameter is available from XFile version 2.00.
XFile Version 2.13 – User Manual EVS Broadcast Equipment – July 2010 Issue 2.13.D C OMBINED M ODE GBE + XN ET This combined mode permits the transfers through the XNet when the Gigabit network is not available, e.g. in case of disconnection of one server from the Gigabit network. 3.1.3 BACKUP CHANNEL ASSIGNMENT From XFile v.2.00, seven backup channels are available. You will assign them according to your backup needs. Two predefined configurations are available and are described below.
Issue 2.13.D XFile Version 2.13 – User Manual EVS Broadcast Equipment – July 2010 C USTOM C ONFIGURATION When you select the Custom radio button in the Network area and click the Edit Custom button, the Channels Configuration dialog box opens.
XFile Version 2.13 – User Manual EVS Broadcast Equipment – July 2010 Issue 2.13.D If you assign more channels than supported in the defined configuration, the system will automatically adapt the number of assigned channels when the configuration is saved. Available Channels Read-only display of the available channels depending on the backup functions selected in the dialog box. OK Clicking the OK button will confirm and save the defined configuration.
Issue 2.13.D 3.2 XFile Version 2.13 – User Manual EVS Broadcast Equipment – July 2010 STARTUP At first start the upper part of the window displays the System Configuration area. 3.2.1 SYSTEM CONFIGURATION AREA This field displays the current parameters of the system. Some relevant parameters are required to connect to the XNet. If an error message is displayed facing one of the parameters, click on the System Config button to enter the System configuration window.
XFile Version 2.13 – User Manual EVS Broadcast Equipment – July 2010 Issue 2.13.D If the values are coherent, press START: the System Config area is replaced by the Session Config area: 3.2.2 STATUS AREA The aim of this area is to check the hardware validity, the remaining capacity of disks and to verify the compatibility between the software, the drivers and the data recorded. The system automatically starts the test processing.
Issue 2.13.D XFile Version 2.13 – User Manual EVS Broadcast Equipment – July 2010 If all these stages are successful, the XFile is ready to operate. Press the Start button again to enter the application. 3.2.3 AUTOMATIC PROCESSES AT STARTUP After the startup, the system automatically starts two operations: the Scanning Disk process and the Scanning Network process. Those operations might last a few seconds depending on the number of clips present on disk and the number of clips present on the XNet.
XFile Version 2.13 – User Manual EVS Broadcast Equipment – July 2010 3.3 Issue 2.13.D SESSION CONFIGURATION Once the XFile application is started, the users can define the session configuration by selecting Configuration > Config Session from the main menu. The session configuration window is divided into 8 tabs: Tab 1 - Autobackup Tab 2 – MXF Metadata Tab 3 – Manual Backup Tab 4 – Scan Folder Tab 5 – Grab Tab 6 – Export Tab 7 – XML Tab 8 – User Parameters 3.3.
Issue 2.13.D XFile Version 2.13 – User Manual EVS Broadcast Equipment – July 2010 S ELECTION T ABS To allow a secondary selection and a third selection to be backed up, you need to select the Enable Selection checkbox in the respective tabs. Selection List This selection list is only active while the Autobackup mode is disabled. In the Autobackup Selection list, all systems connected to the XNet are listed by net numbers.
XFile Version 2.13 – User Manual Issue 2.13.D EVS Broadcast Equipment – July 2010 Server Selection When a server is selected, it is displayed on a bright blue background, as shown in the following screenshot. For each system selected for the autobackup, you can combine several criteria to select the video material to be included in the autobackup. Camera Selection The camera selection criterion makes it possible to select the cameras to be included in the autobackup.
Issue 2.13.D XFile Version 2.13 – User Manual EVS Broadcast Equipment – July 2010 Archive Flag The Archive Flag criterion (α) makes it possible to include in the autobackup the clips for which a backup request has been sent from a Remote panel controlling an EVS video server of the XNet network. The backup request is sent via the > Archive option available in the secondary menu of the Remote panel in clip mode.
XFile Version 2.13 – User Manual Issue 2.13.D EVS Broadcast Equipment – July 2010 How to Select the Material to Autobackup To select the material to autobackup, proceed as follows: 1. First select the server to backup. The selected line changes to dark blue. 2. Select the camera angles desired to be part of the autobackup process. Selected cameras appear on a bright green background. 3. Select the PREF cams or Archive Flag criteria if desired. 4.
Issue 2.13.D XFile Version 2.13 – User Manual EVS Broadcast Equipment – July 2010 Three conditions are required to validate the Archive status: 1. Before the Autobackup session, place a checkmark in the following box: 2. Set the ‘DEFAULT XFILE’ parameter in the Setup menu of your EVS video server. (see Multicam documentation for complete inform ation). The label appears on the line of the EVS video server if the ‘DEFAULT XFILE’ has been correctly defined. 3.
XFile Version 2.13 – User Manual EVS Broadcast Equipment – July 2010 Issue 2.13.D The Time Range filter requires a start date and time, as well as an end date and time, to be valid: 1. In the calendar, select the month with the left and right arrows, then the day of the month. 2. In the Time field, select the hour using the up and down arrows to change the value displayed or directly type the value when the field lights green. 3. Press OK to confirm your selection. 4.
Issue 2.13.D XFile Version 2.13 – User Manual EVS Broadcast Equipment – July 2010 Generating an XML Metadata File When the AutoBackup Output Parameters > Generate EVS XML Metadata checkbox is selected, an XM L file with the metadata of the clips backed up in the autobackup process is generated. This file is created at the same time as the backup file for all media file formats. The clips are saved in the same folder as the backup file. It has the same name as the backup file, followed by the <.evs.
XFile Version 2.13 – User Manual EVS Broadcast Equipment – July 2010 Issue 2.13.D Important Prior to modify the Disk Writing Mode, it is strongly recommended to check the synchronization between the paths, especially when clips have have already been backed up in the involved paths. Otherwise, this could results in data inconsistencies. Backup Folder The Backup Folder field specifies the folder destination to save the backup files.
Issue 2.13.D XFile Version 2.13 – User Manual EVS Broadcast Equipment – July 2010 Second Output Parameters This field group can only be used if at least 2 disks are available. In Mirroring mode, fields are filled automatically with the same information as for the primary output. In other modes, the selection can be saved in a second file format and to a second path.
XFile Version 2.13 – User Manual EVS Broadcast Equipment – July 2010 Issue 2.13.D A UTOBACKUP V ALIDATION T AB In the Autobackup Validation Tab, the Autobackup Validation list displays the current selection of Autobackup. The clips displayed in a red line will not be taken into account by the Autobackup criteria and the clips displayed in a green line will be backed up when starting the Autobackup mode. The selected record will be displayed on a blue background.
Issue 2.13.D 3.3.2 XFile Version 2.13 – User Manual EVS Broadcast Equipment – July 2010 TAB 2 – MXF METADATA This area displays the current parameters and values saved to the descriptive metadata of the MXF file for the open session. H OW TO M ODIFY THE V ALUES FOR MXF M ETADATA FOR THE S ESSION To modify the values assigned to a given param eter for the open session, proceed as follows: 1. Click the value to modify in the left table.
XFile Version 2.13 – User Manual EVS Broadcast Equipment – July 2010 Issue 2.13.D H OW TO D EFINE A U SER S ESSION D ATE Two session date fields are defined in the metadata of the backup file: • The PC session date comes from the PC time. This field is not editable and it is defined in the PC settings. • The user session date can be freely defined as explained in the following procedure. To assign a user session date, proceed as follows: 1. Select the User Session Date field: 2.
Issue 2.13.D 3.3.3 XFile Version 2.13 – User Manual EVS Broadcast Equipment – July 2010 TAB 3 – MANUAL BACKUP Output File Format The following setting makes it possible, in a Single Disk configuration, to choose the format in which the backup file will be manually generated. The Manual Backup Output Parameters > File Format drop-down list allows the user to select the default file format for the clips backed up with the manual backup process.
XFile Version 2.13 – User Manual EVS Broadcast Equipment – July 2010 Issue 2.13.D • Avid MXF OPAtom • MXF OP1a (Std SMPTE) Generating an XML Metadata File When the Manual Backup Output Parameters > Generate EVS XML Metadata check-box is selected, an XML file with the metadata of the clips backed up with the manual backup process is generated. This file is created at the same time as the backup file for all media file formats.
Issue 2.13.D XFile Version 2.13 – User Manual EVS Broadcast Equipment – July 2010 Backup Folder Refer to section ‘Backup Folder’ on page 23 for more details Backup Filename Format String The default filename automatically given to the backup file is EVS XFILE - - The filename is user-defined and can be modified as described in section ‘How to Modify the Default Filename Format String’, on page 30.
XFile Version 2.13 – User Manual EVS Broadcast Equipment – July 2010 Issue 2.13.D 5. Click the APPEND button to add the selected item at the end of the Filename string. 6. Reposition the available item as desired with the cut (CTRL-C) and paste (CTRL-V) commands. 7. Repeat step 4 to 6 for any new information type you want to add in the Filename string.
Issue 2.13.D 3.3.4 XFile Version 2.13 – User Manual EVS Broadcast Equipment – July 2010 TAB 4 – SCAN FOLDER A UTO R ESTORE The Auto Restore function enables the automatic restore or copy of files from a folder to a defined location on an EVS video server. This is done through the GBE or the SDTI network. The AutoRestore Mode can be activated from the main XFile window by pressing the AutoRestore button.
XFile Version 2.13 – User Manual EVS Broadcast Equipment – July 2010 Issue 2.13.D Scan Folder This field defines the folder to scan for backup files to be restored. It must differ from the XFile data path. AutoImport MXF and MOV Files When working with .mxf or .mov files, not associated with a separate XML file, select the AutoImport box. This parameter allows the extraction of metadata information and the creation of XML files.
Issue 2.13.D XFile Version 2.13 – User Manual EVS Broadcast Equipment – July 2010 The following color code is used: Background colour Meaning Bright red Unauthorized location Bright green First location which will be used when publishing Pale green Authorized location To switch one color for another, proceed as follows: Files Move If the job succeeds, the files will be moved to the ‘Done_Successful’subfolder.
XFile Version 2.13 – User Manual EVS Broadcast Equipment – July 2010 Issue 2.13.D AutoImport This parameter allows the extraction of metadata information and the creation of XML files when working with files not associated to XML files, such as .mxf and .mov. Refer to section ‘AutoImport’ on page 33 for a detailed description.
Issue 2.13.D 3.3.5 XFile Version 2.13 – User Manual EVS Broadcast Equipment – July 2010 TAB 5 – GRAB The Multicam operators, from their remote control panel, are able to select a video frame/field and to grab a picture. A Default Xfile must be defined in the Setup menu of the Multicam - See Multicam documentation for more details. Those pictures are created by the XFile and stored on the disks of this XFile. Grab Folder Select the destination folder to save the JPG/BMP files.
XFile Version 2.13 – User Manual Issue 2.13.D EVS Broadcast Equipment – July 2010 Note No compression artifact is added to this file creation process, so the original quality of the image is kept. Grab XT/XFILE Filename Format String The default filename automatically given to the JPG/BMP file is • EVSGRAB_ - <_server user number> - <_clip num ber> - <_camera name> - <_time code>. jpg/bmp, when grabbed on EVS video server • -
Issue 2.13.D 3.3.6 XFile Version 2.13 – User Manual EVS Broadcast Equipment – July 2010 TAB 6 – EXPORT All clips backed up by the XFile can be exported to other systems for different purposes: Xedio (CleanEdit) The clips backed up can be automatically inserted into theXedio Database. Place a checkmark in the ‘Update Xedio DB’ box and enter the DSN name, user and password for the defined Xedio database. Please refer to the Xedio documentation for more details.
XFile Version 2.13 – User Manual EVS Broadcast Equipment – July 2010 Issue 2.13.D Default Ingest Device Media Format The Default Ingest Device Media Format field makes it possible to specify the media format to which the Avid Ingest Device will convert the backup file received from the XFile application. This inform ation is transferred as a setting to the Avid Ingest Device that will perform the conversion.
Issue 2.13.D 3.3.7 XFile Version 2.13 – User Manual EVS Broadcast Equipment – July 2010 TAB 7 – XML A few operations made by XFile as backup, restore, delete, copy,… are remotely controlled via XML file by a source application (IPDirector, Automation system, …). Two modes are available: • XML files are put in a folder located on the same hardware than XFile and XFile scans this folder • XML files are put in a folder on the network.
XFile Version 2.13 – User Manual EVS Broadcast Equipment – July 2010 Issue 2.13.D To use this option, proceed as follows: 1. Select the Scan XML Jobs Incoming Folder option above the XM L Jobs Root Folder field. 2. Specify the local folder that will receive XM L files. The default local folder is C:\XFile_XML. XFile will handle all XML files stored in this folder. XML Load balancing Jobs Root Folder The load balancing process allows spreading the XML jobs over several XFiles.
Issue 2.13.D XFile Version 2.13 – User Manual EVS Broadcast Equipment – July 2010 Subfolders Created Four subfolders are automatically created at start up when one of the XML modes is selected: Subfolder Name Content Jobs_Incoming The source application posts XM L files to request jobs. Jobs_Scheduled The XFile stores the XML jobs scheduled. Jobs_In_Progress The XFile stores the XML jobs in progress. Jobs_Done The XFile posts the XM L files containing the final result of the jobs.
XFile Version 2.13 – User Manual EVS Broadcast Equipment – July 2010 Issue 2.13.D 9YYabjA0 11 < Job_Dest_Clip_Nb >112 < Job_Dest_Cam >A Job generated by XGateway See XFile XML jobs documentation for complete description of XML files.
Issue 2.13.D 3.3.8 XFile Version 2.13 – User Manual EVS Broadcast Equipment – July 2010 TAB 8 – USER PARAMETERS Parameters for Automatic Processes Autostart This option automatically starts the XFILE software. Autobackup at Startup This option automatically starts the autobackup mode at startup. AutoRetry when Starting Autobackup This option is disabled in version 1.09.00.
XFile Version 2.13 – User Manual EVS Broadcast Equipment – July 2010 Issue 2.13.D Parameters for Confirmation Messages Confirm Manual Backup Enables or disables the confirmation message while initiating a Backup command. Confirm Manual Restore Enables or disables the confirmation message while initiating a Restore command. Confirm Manual Update Enables or disables the confirmation message while updating a clip previously backed up. This command is only available in Manual backup mode.
Issue 2.13.D XFile Version 2.13 – User Manual EVS Broadcast Equipment – July 2010 3.4 USER INTERFACE 3.4.1 OVERVIEW OF THE MAIN WINDOW The screenshot below shows the various areas of the XFile main window. Note The AutoRestore and the AutoPublish modes can be activated from this main window. Most of the user interface elements are common to the different modes of XFile use: Network Status, XFile List, Disk Usage, Disk Mode, Job Status Bars, Job Status Display and Selection Buttons.
XFile Version 2.13 – User Manual Issue 2.13.D EVS Broadcast Equipment – July 2010 3.4.2 XFILE LIST The XFile List area includes the following elements: • At the top left of the area, the number of clips retrieved on the XFile is specified. • At the top right of the area, one or more buttons give access to commands or options specific to the XFile List. • In the upper part of the area, the filter icons make it possible to filter the list of clips displayed in the XFile List.
Issue 2.13.D XFile Version 2.13 – User Manual EVS Broadcast Equipment – July 2010 Clip Information Description Keyword 2 Displays the second keyword assigned to the clip. Keyword 3 Displays the third keyword assigned to the clip. Creation Date and Time Displays the creation date and time of the EVS video server where the clip has been created Backup Date and Time Displays the date and time of the XFile when the clip backup file has been created.
XFile Version 2.13 – User Manual Issue 2.13.D EVS Broadcast Equipment – July 2010 S ELECTING C OLUMNS IN THE XF ILE L IST Use the right-click button of the mouse (into the list) to access this selection menu. All columns available are listed here. Select or unselect the displayed or to be hidden.
Issue 2.13.D XFile Version 2.13 – User Manual EVS Broadcast Equipment – July 2010 F ILTERS The upper part of the XFile list displays a list of icons. These buttons give access to the different filters to be applied to the XFile list. The filters are available in the five modes: Autobackup, Manual Backup, Restore, Publish and Maintenance modes.
XFile Version 2.13 – User Manual EVS Broadcast Equipment – July 2010 Issue 2.13.D Creation date Note The Creation date and the backup time are different values. The creation date depends on the date and time defined on your EVS video server. Please check the date-time of your system before operating. ‘Last Hour’ and ‘Last 24h’ are both quick shortcuts to display the clips created during the last hour or during the last 24 hours.
Issue 2.13.D XFile Version 2.13 – User Manual EVS Broadcast Equipment – July 2010 1. For date selection, do one of the following: • In the calendar, select the month with the left and right arrows, then the day of the month. OR • Press the Today button. 2. For time selection, do one of the following: • In the Time field, select the hour using the up and down arrows to change the value displayed or directly type the value when the field lights green. OR • Press the Now button. 3.
XFile Version 2.13 – User Manual Issue 2.13.D EVS Broadcast Equipment – July 2010 In Autobackup mode, the Folders filter displays this selection: Option Description All Displays all the clips included in the current(s) PATH(s) defined in the system configuration at startup. PATH A/B Displays the content of the selected path only. Session Folder Displays all the clips included in the current Session Folder. Independently, a backup folder can be defined for saving the clips manually backed up.
Issue 2.13.D XFile Version 2.13 – User Manual EVS Broadcast Equipment – July 2010 • The user must double-click a folder to select it for use in the filter. This folder will appear in the Name bar at the bottom of the window if it has been correctly selected. A Backup folder is assigned temporarily for a particular operation. As all operations are successive and therefore entered in a queue, the system will keep in memory the folder defined at the time of the backup’s request.
XFile Version 2.13 – User Manual EVS Broadcast Equipment – July 2010 Issue 2.13.D The following principles are applicable in this dialog box: • Several folders are selectable at a time. • The sub-folders of the selected folder are selectable as well. • The current Session Folder always lights green in the list. You will find below explanations on how to perform the most important actions in this dialog box, i.e.
Issue 2.13.D XFile Version 2.13 – User Manual EVS Broadcast Equipment – July 2010 Clipnames Clicking on the icon on the right side opens the following dialog box: Filter Based on Prefix The Filter based on Prefix field allows defining a quick filter based on the first character(s) of a clipname. When you click the Add button to add the prefix defined to the Filter list, the system adds autom atically a "*" sign after the prefix.
XFile Version 2.13 – User Manual EVS Broadcast Equipment – July 2010 Issue 2.13.D Keywords Clicking on the icon on the right side opens the following dialog box: Filter Based on Prefix The Filter based on Prefix field allows defining a quick filter based on the first character(s) of a keyword. When you click the Add button to add the prefix defined to the Filter list, the system adds autom atically a "*" sign after the prefix.
Issue 2.13.D XFile Version 2.13 – User Manual EVS Broadcast Equipment – July 2010 OK / Cancel Press OK to confirm your selection and to quit the dialog box. The new keywords appear in the Filter field. Press Cancel to come back to the main XFile window without applying any Keyword filter. UmID Clicking on the left icon will display the UmID filter.
XFile Version 2.13 – User Manual Issue 2.13.D EVS Broadcast Equipment – July 2010 VarID Clicking on the right icon will display the VarID filter. Clicking on the icon on the right side opens the following dialog box: Filter Based on Prefix The Filter based on Prefix field allows defining a quick filter based on the first character(s) of a VarID. When you click the Add button to add the prefix defined to the Filter list, the system adds autom atically a "*" sign after the prefix.
Issue 2.13.D XFile Version 2.13 – User Manual EVS Broadcast Equipment – July 2010 Media / Clips The MXF file is the file containing all data related to a common audio/video data. The first clip created with this A/V data is called the Master Clip and has the particularity to get the same code for the ID-material and for the ID-louth. All clips ensued from this masterclip, either by copy, or by update, or by modifying the IN (i.e. short IN) or OUT (i.e.
XFile Version 2.13 – User Manual Issue 2.13.D EVS Broadcast Equipment – July 2010 The following options are available for selection: Option Description ALL Displays all the clips MasterClip Displays only the Master Clips Note This filter is helpful when restoring clips, because it will only transfer the original clips, and skip the copies.
Issue 2.13.D XFile Version 2.13 – User Manual EVS Broadcast Equipment – July 2010 Camera label Clicking on the icon on the right side opens the following dialog box: Filter Based on Prefix The Filter based on Prefix field allows defining a quick filter based on the first character(s) of a camera label. When you click the Add button to add the prefix defined to the Filter list, the system adds automatically a "*" sign after the prefix.
XFile Version 2.13 – User Manual Issue 2.13.D EVS Broadcast Equipment – July 2010 Filter Based on Prefix The Filter based on Prefix field allows defining a quick filter based on the first character(s) of the session data. When you click the Add button to add the prefix defined to the Filter list, the system adds automatically a "*" sign after the prefix. Clip Markers The clip markers allow the users to tag clips into a global selection and to keep this selection from one mode to another.
Issue 2.13.D XFile Version 2.13 – User Manual EVS Broadcast Equipment – July 2010 C OUNTERS A counter of clips is available in all modes in the upper side of the list. The first value is the number of clips displayed in the list, the second value is the total amount of clips in memory (contents of path(s) + external folder + clips scheduled). The number of items in the different lists can affect the perform ance of the system. So it is advised to reduce the num ber of clips displayed in the lists.
XFile Version 2.13 – User Manual EVS Broadcast Equipment – July 2010 Issue 2.13.D The icon displayed in the lower part of the screen notices the current disk mode in use: Single Disk Dual Disk Mirroring 3.4.5 JOBS STATUS AREA The transfer rate of the Backup and Restore processes is permanently evaluated and the progress bars show the activities in progress.
Issue 2.13.D XFile Version 2.13 – User Manual EVS Broadcast Equipment – July 2010 Refining the Selection Filters Use these filters to refine the selection: Option Description View All Displays all status since the startup of the system. View Last Day Displays the operation status related to the last 24 hours. View Last Hour Displays the operation status related to the last hour. H ide Successful Brings out clearly the various errors occurring during a complete session.
XFile Version 2.13 – User Manual EVS Broadcast Equipment – July 2010 Issue 2.13.D S CHEDULED J OBS S TATUS D ISPLAY The Scheduled Jobs status display allows the operator to cancel one or all of the jobs in queue. Cancelling Jobs Select one/several items in the list and press ‘Cancel job’, or press ‘Cancel All Scheduled Jobs’ to delete all items in the list: The selected items are deleted from the list and the related operations in progress are stopped or the scheduled operations are cancelled.
Issue 2.13.D 3.5 XFile Version 2.13 – User Manual EVS Broadcast Equipment – July 2010 AUTOBACKUP MODE P URPOSE Press to activate the Autobackup Mode. In this mode, the system acts automatically and backs up all clips according to the criteria defined in the Autobackup selection window. Besides, this mode is important to take account of the different updates made during operations.
XFile Version 2.13 – User Manual EVS Broadcast Equipment – July 2010 Issue 2.13.D Note Other modes (backup, restore and maintenance) are also available during autobackup: several modes can operate simultaneously. 3.5.1 AUTOBACKUP MAIN WINDOW The Autobackup main window is divided into several areas. The two main areas are the XNet list which monitors the XNet activity and the XFile list which displays the contents of the XFile paths. 3.5.
Issue 2.13.D XFile Version 2.13 – User Manual EVS Broadcast Equipment – July 2010 Note Working with copies of clips can affect the value of the different counters. Use the Refresh button in the XNet field for refining the current values. Note The Retry Failed button is active when errors occur. 3.6 BACKUP MODE Press 3.6.1 to enter the Backup mode. XNET LIST In Backup mode, the XNet tab shows the clips available on the XNet depending on the selected criteria, as displayed in the screenshot above.
XFile Version 2.13 – User Manual Issue 2.13.D EVS Broadcast Equipment – July 2010 3.6.2 HOW TO START MANUALLY THE BACKUP OF A FILE To start the backup of a file, proceed as follows: 1. Press the Backup button to activate the mode. 2. In the XNet area, select the server from which clips will be backed up. To display the list of servers present on the XNet, click 3. 4. Click again . to change the display of the list and find the clip to back up.
Issue 2.13.D 3.6.3 XFile Version 2.13 – User Manual EVS Broadcast Equipment – July 2010 HOW TO PERFORM A MULTI-SELECTION FOR MANUAL BACKUP To select multiple clips from an EVS video server and back them up manually, proceed as follows: 1. Define the selection criteria to retrieve a list of clips from the XNet. 2. To select the clips in the XNet list of clips, do one of the following: • To select a list of contiguous clips, press SHIFT and select the first and last clips of the list.
XFile Version 2.13 – User Manual EVS Broadcast Equipment – July 2010 Issue 2.13.D 5. If required, select the appropriate Disk Writing Mode, SuperMotion Backup Mode and Audio Mode from the Output Parameters field group. 6. In the XFile Multi-Backup window, the clips selected are listed with the current status. 7. Press OK to confirm and to initiate the transfer. If no information is specified in the Status column, the backup will be performed.
Issue 2.13.D 3.7 XFile Version 2.13 – User Manual EVS Broadcast Equipment – July 2010 RESTORE MODE Press to enter the Restore mode. The XFile can also be used as a security backup. Clips can be restored from the XFile to any other EVS video server on the network.
XFile Version 2.13 – User Manual Issue 2.13.D EVS Broadcast Equipment – July 2010 3.7.1 HOW TO RESTORE A FILE To restore a backed up file on an EVS video server, proceed as follows: 1. Click the Restore button to activate the mode. 2. Select the clip from the XFile list. 3. Select the server from the XNet area: to display the list of servers present on the XNet, click 4. . Change the display of the list to find one location where to restore the clip.
Issue 2.13.D XFile Version 2.13 – User Manual EVS Broadcast Equipment – July 2010 The clips being restored on an EVS video server are seen in Multicam as growing clips. They can be played as soon as the Restore operation has started. Note While moving/copying a clip, the ID-material is preserved. If the user COPIES a clip to a new location (making a new ID Louth) then the XFile will back up the new data. If the user MOVES a clip (ID Louth is maintained), then the XFile will update the original clip.
XFile Version 2.13 – User Manual Issue 2.13.D EVS Broadcast Equipment – July 2010 3.7.2 HOW TO PERFORM A MULTI-SELECTION FOR RESTORE To select multiple clips from an XFile to restore them to an EVS video server, proceed as follows: 1. In the XFile list on the main XFile window, do one of the following: • To select a list of contiguous clips, press SHIFT and select the first and last clips of the list. • To select non-contiguous clips, press CTRL and select the clips.
Issue 2.13.D XFile Version 2.13 – User Manual EVS Broadcast Equipment – July 2010 Restored clips are displayed in the XNet list: Restore Destination Mode The destination mode in the XFile Multi-Restore window allows the users to specify where the clip will be restored: 78 Option Description Original Place The clip returns to its previous location on the XNet. In this case, the selection performed in the XN et list is not taken into account.
XFile Version 2.13 – User Manual Issue 2.13.D EVS Broadcast Equipment – July 2010 3.8 PUBLISH MODE Press to enter the Publish mode. The Publish mode gives a direct access to the clips saved to XFile disks. A batch of clips can be organized in a ‘page/bank/cam ’ structure and can be accessible – for selection and playback – via the Remote Control panel and/or the VGA of the Multicam, or from the Clips > XFile node of the IPDirector Database Explorer.
Issue 2.13.D 3.8.2 XFile Version 2.13 – User Manual EVS Broadcast Equipment – July 2010 HOW TO PUBLISH CLIPS To publish a clip stored on the XFile disk, i.e. to give access to it from the Remote panel, from the VGA of the Multicam application, or from the Clips > XFile node of the IPDirector Database Explorer, you can choose betw een Online Publish and Fast Publish. O NLINE P UBLISH To publish one or several clips with Online Publish, proceed as follow s: 1.
XFile Version 2.13 – User Manual EVS Broadcast Equipment – July 2010 7. 8. You may switch to the Fast Publish mode by pressing the button. Issue 2.13.D (Fast Publish) Select other clips from the XFile list and repeat the operation. Clips are sent to XNet. Depending on the number of clips, this operation can take some time.
Issue 2.13.D XFile Version 2.13 – User Manual EVS Broadcast Equipment – July 2010 F AST P UBLISH To publish clips with Fast Publish, you first need to initiate the Online Publish transfer. To do so, proceed as follows: 1. 2. Repeat steps 1 to 4 from the Online Publish procedure detailed above. Press (Fast Publish) to switch to switch to the Fast Publish mode for the transfer of the selected clip. A message warns you that XFile will be disconnected from the XNet. 3. Press Yes. 4.
XFile Version 2.13 – User Manual Issue 2.13.D EVS Broadcast Equipment – July 2010 3.9 MAINTENANCE MODE 3.9.1 ACCESSING THE MAINTENANCE MODE WINDOW Press to enter the Maintenance mode.
Issue 2.13.D 3.9.2 XFile Version 2.13 – User Manual EVS Broadcast Equipment – July 2010 MAINTENANCE FEATURES Four different maintenance sub-modes are available in the Maintenance window. You select the maintenance feature you want to use by clicking the corresponding icon.
XFile Version 2.13 – User Manual Issue 2.13.D EVS Broadcast Equipment – July 2010 3.10 CLIP MAINTENANCE From XFile version 1.14, you can back up clips manually and automatically into different formats of backup files. From XFile version 2.00.30, you can view and maintain all the form ats of backup files in the Clip Maintenance mode.
Issue 2.13.D XFile Version 2.13 – User Manual EVS Broadcast Equipment – July 2010 3.10.2 MEDIA INFO AREA When you click the Clip Maintenance icon, the Media Info area opens on the left of the window. The Media Info area displays the current parameters and values saved to the descriptive metadata of the backup file.
XFile Version 2.13 – User Manual EVS Broadcast Equipment – July 2010 Issue 2.13.D T HUMBNAILS The thumbnails defined for each file are extracted from the MJPEG files. The thumbnail shows the following fram es from left to right: • the IN (i.e. SHORT IN) frame, • the REF frame (automatically defined in the middle of the clip), • the OUT (i.e. SHORT OUT) frame. The XFile versions previous to the version 1.01.05 do not include the thum bnails creation process.
Issue 2.13.D XFile Version 2.13 – User Manual EVS Broadcast Equipment – July 2010 HD clips are displayed with 16:9 aspect ratio. F ILE AND C LIP M ETADATA From XFile V.1.14, clips created on EVS video servers can be backed up in different file formats. The backup files having different formats can be maintained in XFile. The metadata of the EVS MXF files is stored in the header of the MXF file. The metadata of backup files having other formats needs to be stored in a metadata XM L file.
XFile Version 2.13 – User Manual EVS Broadcast Equipment – July 2010 Issue 2.13.D Note Depending on the time code and video systems, the time code in the column is displayed with different characters: The duration for NTSC clips is always calculated on non-drop-frame basis. Note The Nb Videos field is the only way to identify the SuperMotion Backup Mode used to backup SSLM clips: • 1 video(s) for clips backed up with 1/2 or 1/3 fram es. • 2 or 3 video(s) for clips backed up with all frames.
Issue 2.13.D XFile Version 2.13 – User Manual EVS Broadcast Equipment – July 2010 3.10.3 DELETING BACKUP CLIPS AND FILES As several clips may be linked to a backup file, the Delete command has been split in 2 buttons: Delete File and Delete Clip. Both commands are available in the upper right part of the XFile area of the Maintenance window. To mark the clips and the files out, it is advised to change the display to 'Group' in the Media / Clips filter.
XFile Version 2.13 – User Manual EVS Broadcast Equipment – July 2010 Issue 2.13.D H OW TO P ERFORM A M ULTI -S ELECTION T O D ELETE C LIPS 1. Press SHIFT or CTRL and select a batch of files from the XFile list. 2. Press to open XFile Multi-Delete Clips window. This window allows the operator to review the clips before deletion: 3. Press Delete All Clips to confirm the command or Cancel to abort the operation. 4.
Issue 2.13.D XFile Version 2.13 – User Manual EVS Broadcast Equipment – July 2010 3.10.4 CONVERTING BACKUP FILES From Multicam version 9.00, the A/V material and data are stored in 8MB blocks, no longer in 2MB blocks. In XFile, the EVS MXF backup files will still be created in 2MB block format. When the EVS MXF backup files, or any other backup file in another form at are restored, they are obviously restored in the 8M B block structure on the EVS video server.
XFile Version 2.13 – User Manual EVS Broadcast Equipment – July 2010 Issue 2.13.D 3.10.5 TRANSFERRING BACKUP FILES TO EXTERNAL SYSTEMS From the Maintenance module, it is possible to transfer the backup files to the Avid Ingest Device or to the Xedio suite. H OW TO T RANSFER B ACKUP F ILES TO A VID I NGEST D EVICE To transfer backup files to Avid Ingest Device, proceed as follows: 1. Select the file(s) to convert in the XFile list of the Maintenance module. 2. Right-click to open the contextual menu.
Issue 2.13.D XFile Version 2.13 – User Manual EVS Broadcast Equipment – July 2010 3.10.6 IMPORTING FILES FROM THIRD PARTY SYSTEMS Files from third parties do not have a corresponding EVS.xml file containing the associated metadata. As they need to be available in XFile, the im port function will result in the creation of an EVS.xml file containing the metadata that the system has been able to retrieve. The supported file extensions are: EVS MXF, Avid MXF OPAtom and QT mov.
XFile Version 2.13 – User Manual Issue 2.13.D EVS Broadcast Equipment – July 2010 3.11 DISKS-FOLDERS MAINTENANCE 3.11.1 INTRODUCTION A CCESS Click on the Disk icon to enter the Disks-Folders Maintenance mode.
Issue 2.13.D XFile Version 2.13 – User Manual EVS Broadcast Equipment – July 2010 3.11.3 HOW TO COPY/MOVE CLIPS TO OTHER XFILE FOLDERS Important Clips are linked to a backup file. In this mode, the MOVE and COPY commands affect the backup file even if only a clip is selected. The MOVE command is only accessible if the transfer of backup files operates between PATHs. The COPY command is accessible for all transfers from/to external folders.
XFile Version 2.13 – User Manual EVS Broadcast Equipment – July 2010 Issue 2.13.D The Result column mentions where each file is present. When the same file is found in both folders, the Differences column indicates the result of the comparison between the two files. The Action column gives advice on what to do. 5. If needed, click the Schedule Copies button to copy files in the folder where they are not present.
Issue 2.13.D XFile Version 2.13 – User Manual EVS Broadcast Equipment – July 2010 3.11.5 MAINTAINING FOLDERS IN THE XFILE PATHS In the folder tab, two functions make the use of the folders list easier: . H OW TO C REATE A F OLDER IN THE XF ILE P ATH To create a new folder in the XFile Path, proceed as follows: 1. Select a position in the Folders tree where to create a new folder. 2. Click on the Create Folder button to open the XFile Create Folder dialog box: 3. Type the name of the new folder 4.
XFile Version 2.13 – User Manual Issue 2.13.D EVS Broadcast Equipment – July 2010 3.12 PLAYLIST MAINTENANCE 3.12.1 INTRODUCTION A CCESS Click on the Playlist Maintenance icon to enter the Playlist Maintenance. P URPOSE The purpose of the Playlist Maintenance is to offer the possibility to compile a playlist from all the best clips captured in the OB van and export the playlist of backup files into a single media file.
Issue 2.13.D XFile Version 2.13 – User Manual EVS Broadcast Equipment – July 2010 3.12.2 OVERVIEW OF THE PLAYLIST MAINTENANCE WINDOW The Playlist Maintenance window is divided into four areas: XF ILE L IST A REA The XFile List area provides the same features as the usual XFile List area. When right-clicking on a clip, you access the following commands in the contextual menu: • M odify the displayed columns. See also the section ‘Selecting Columns in the XFile List’, on page 49. • Apply filters.
XFile Version 2.13 – User Manual EVS Broadcast Equipment – July 2010 Issue 2.13.D M EDIA I NFO A REA The Media Info area contains the same information as the Media Info area available in the Clip Maintenance. Refer to section 3.10.2 ‘Media Info Area’ on page 86. P LAYLIST A REA The Playlist area displays the backup clips included in the playlist that is being or has been created.
Issue 2.13.D XFile Version 2.13 – User Manual EVS Broadcast Equipment – July 2010 3.12.3 SETTINGS FOR PLAYLISTS A CCESSING THE P LAYLIST S ETTINGS The settings for creating and exporting backup playlists or rendering server playlists in XFile are defined in the Playlist Manager Setup window .
XFile Version 2.13 – User Manual Issue 2.13.D EVS Broadcast Equipment – July 2010 M EDIA F ILE S ETTINGS Filename Format String The following filename is assigned by default to the media file including the playlist A/V material: EVS XFILE_ name>_.
Issue 2.13.D XFile Version 2.13 – User Manual EVS Broadcast Equipment – July 2010 CSV contents file generation If you tick this check box, the playlist definition file will be generated in the .CSV format, and not the usual XML format. In this case, the setting for merging XML files cannot be taken into account if it is checked: • The clip and playlist metadata are stored in an XML file. • The playlist definition is saved in a CSV file.
XFile Version 2.13 – User Manual Issue 2.13.D EVS Broadcast Equipment – July 2010 H OW TO C REATE A B ACKUP P LAYLIST To create a backup playlist in the Playlist Maintenance, proceed as follows: 1. In the XFile list area, search for and select the clips you want to add to a playlist: • To select a list of contiguous clips, press SHIFT and select the first and last clips of the list. • To select non-contiguous clips, press CTRL and select the clips. 2. 3. In the Playlist area, click the Playlist area.
Issue 2.13.D XFile Version 2.13 – User Manual EVS Broadcast Equipment – July 2010 H OW TO L OAD A B ACKUP P LAYLIST You will load a backup playlist if you need to edit it or export it, or simply view its content. To load an existing backup playlist, proceed as follows: 1. Click the button in the PL Info area. The Open dialog box opens on the folder where you last saved a backup playlist. 2. Select the playlist definition file (i.e. the file with the .xml extension) of the playlist you want to load.
XFile Version 2.13 – User Manual Issue 2.13.D EVS Broadcast Equipment – July 2010 3.12.5 EXPORTING A BACKUP PLAYLIST I NTRODUCTION Exporting a playlist of backup clips from XFile will allow you to create a single media file. This file contains a long clip that concatenates the backup clips of the playlist with cut transitions. The two XML files including the playlist definition and the metadata inform ation will also be created in the same folder.
Issue 2.13.D XFile Version 2.13 – User Manual EVS Broadcast Equipment – July 2010 3.12.6 RENDERING A SERVER PLAYLIST I NTRODUCTION Rendering a playlist from an EVS video server to XFile will allow you to backup a playlist into a single media file. This file contains a long clip that concatenates the clips of the server playlist with cut transitions. Note From XFile version 2.13, it is possible to render a playlist containing black clips.
XFile Version 2.13 – User Manual EVS Broadcast Equipment – July 2010 Issue 2.13.D 3.13 JOB STATUS 3.13.1 PURPOSE The Job Status window gives information on the transfer status of jobs between XFile and the servers connected to it either in a XNet only or GBE only mode or in a combined mode GBE +XNet, as configured through the XFile System Config. This only relates to XFile jobs, not to XStream jobs. 3.13.2 JOB STATUS WINDOW The Job Status window is divided into four main areas.
Issue 2.13.D XFile Version 2.13 – User Manual EVS Broadcast Equipment – July 2010 XN ET A REA This area displays the number of clips already saved to XFile for each system connected to the XNet and/or to the Gigabit network.
XFile Version 2.13 – User Manual EVS Broadcast Equipment – July 2010 Issue 2.13.D Note Users cannot cancel Gigabit jobs while they are being executed. Modifying the Priority of Backup and Restore Jobs The order of the scheduled operations can be modified. This is only available for backup, restore and export clips.
Issue 2.13.D XFile Version 2.13 – User Manual EVS Broadcast Equipment – July 2010 J OBS D ONE A REA This area displays all the jobs done with their status: • Successful with process duration and transfer rate • Error with short error message. Filters The upper part of the Job Done area displays a list of icons. These buttons give access to the different filters to be applied to the area. Click on the button to display/hide the filter.
XFile Version 2.13 – User Manual EVS Broadcast Equipment – July 2010 Issue 2.13.D • A period of time: a range of date & time can be defined to sort the jobs created during that period. Click on the ‘Range’ button. A dialog box will then open where you will have to enter a start date and time, as well as an end date and time. D ISK U SAGE AND T RANSFER R ATE A REA The Disk Usage area displays the remaining capacity and the capacity of local disks.
Issue 2.13.D 114 XFile Version 2.
XFile Version 2.13 – User Manual Issue 2.13.D EVS Broadcast Equipment – July 2010 4. XStream All operations of XStream are concentrated in a single screen.
Issue 2.13.D 4.1 XFile Version 2.13 – User Manual EVS Broadcast Equipment – July 2010 SCHEDULER AND QUICKSTART MODES The users can perform backup of record trains in XStream using two different modes: the Scheduler mode or the QuickStart mode. The users activate these modes by clicking the buttons at the top of the XStream main window: Both modes cannot be active nor work at the same time, even on different EVS video servers. 4.1.
XFile Version 2.13 – User Manual Issue 2.13.D EVS Broadcast Equipment – July 2010 4.2 INFORMATION & MENU AREA The Information & Menu area displays the elements described below: 4.2.1 SCHEDULER AND QUICKSTART BUTTONS Press to activate the Scheduler Mode. In this mode, the system acts automatically and backs up all files/clips according to the jobs defined via the Edit menu and shown in the time grid. Press to activate the QuickStart mode.
Issue 2.13.D 4.2.3 XFile Version 2.13 – User Manual EVS Broadcast Equipment – July 2010 TRANSFER RATE The counter displays the current transfer rate. An average of bit-rate for all operations is done in real-time. 4.2.4 TIME The current time is displayed on the top right of the screen. As you can select which time information you will work with in the time grid, the time display depends on this selection.
XFile Version 2.13 – User Manual Issue 2.13.D EVS Broadcast Equipment – July 2010 4.3 TIME GRID 4.3.1 INFORMATION DISPLAYED IN THE TIME GRID Different color codes are used in the time grid to easily distinguish the various job types. The color codes are the same in the Scheduler mode and in the QuickStart mode.
Issue 2.13.D XFile Version 2.13 – User Manual EVS Broadcast Equipment – July 2010 The following sections provide screenshots to show which types of jobs can be found in the various modes.
XFile Version 2.13 – User Manual Issue 2.13.D EVS Broadcast Equipment – July 2010 Q UICK S TART M ODE When a job is launched in the QuickStart mode, the time grid will display it as an endless job in progress from the nowline onwards. The other possible status in QuickStart mode is ‘failed jobs’. 4.3.2 TIME DISPLAY IN THE TIME GRID T IME D ISPLAY M ODES From version 2.00, it is possible to specify which time mode has to be used in the XStream time grid.
Issue 2.13.D XFile Version 2.13 – User Manual EVS Broadcast Equipment – July 2010 Note When time code jumps occur in the recorded train, the time code jumps will be visible in the EVS server time code display, not in the PC time display. When backup jobs are scheduled with a start and stop time in EVS server time code display, they will only be visible in PC time when they start. F RAME A CCURACY D EPENDING ON THE D ISPLAY M ODE The video is frame accurate in some display modes, but not in all of them .
XFile Version 2.13 – User Manual Issue 2.13.D EVS Broadcast Equipment – July 2010 4.5 STATUS AREA The different operations are divided into different tabs. 4.5.1 JOBS DONE TAB In JOBS DONE use these filters to refine the selection: Filter Label Description View All Displays all statuses since the startup of the system. View Last Hour Displays the operation status related to the last hour. View Last Day Displays the operation status related to the last 24 hours.
Issue 2.13.D 4.5.2 XFile Version 2.13 – User Manual EVS Broadcast Equipment – July 2010 GENERAL TAB The GENERAL tab displays the information of the selected job in the grid or the selected record train. Cancel Job: delete the selected job displayed in this field. 4.5.3 OTHER TABS The JOBS SELECTED, JOBS PENDING and JOBS ENDLESS tabs give access to Mark IN, Mark OUT and Cancel Job commands which affect the items displayed in the lists.
XFile Version 2.13 – User Manual Issue 2.13.D EVS Broadcast Equipment – July 2010 4.6 SYSTEM CONFIGURATION Modify the system configuration Configuration from the top menu: by selecting Configuration > System During operations, this window will be displayed in read-only mode for information. 4.6.1 STORAGE TAB The settings specified in the Storage tab are applicable to the Scheduler and QuickStart modes. These are the default settings for the QuickStart mode.
Issue 2.13.D XFile Version 2.13 – User Manual EVS Broadcast Equipment – July 2010 N UMBER OF D ISKS Specifies the num ber of disks assigned to the channels to backup. Note In order to ensure good performances in data transfers we highly recommend to balance the load onto several disks. P ATH C HANNEL Specifies the path to save files for each channel. 4.6.
XFile Version 2.13 – User Manual Issue 2.13.D EVS Broadcast Equipment – July 2010 D EFAULT J OB D URATION (default: 1 hour) S ELECT D EFAULT O UTPUT M ODE Output File Format Seven different output formats are available to save the files. Depending on the format selected, various parameters fields will be displayed in the Option area. File Format Specific Information EVS MXF The user can add the output file to the CleanEdit database by selecting the Upd. CleanEdit check box (i.e. Update CleanEdit).
Issue 2.13.D XFile Version 2.13 – User Manual EVS Broadcast Equipment – July 2010 Options Endless Max Duration When selecting any output form at, you need to specify a maximum duration for the backup file in the Endless Max. Duration field. In case a train is backed up with endless duration, the application will stop the backup when the maximum duration defined in this field has been reached.
XFile Version 2.13 – User Manual EVS Broadcast Equipment – July 2010 Issue 2.13.D 24 bits samples can be down converted to 16 bits by selecting the 16 bits option or kept as it is by selecting the 24 bits option. F ORMAT S TRING An automatic file name can be given to each file format and can be different for each one. The default MXF file is EVS MXF XSTREAM
Issue 2.13.D 4.6.3 XFile Version 2.13 – User Manual EVS Broadcast Equipment – July 2010 ADVANCED PARAMETERS TAB R ECORD G RID S TART U P O PTIONS The settings of the record grid are pre-defined in the Advanced Parameters window but they can be modified during operations: Field / Button Description Auto Hide Disconnected XTs When this option is selected, only the EVS video servers connected to the XNet are displayed in the time grid when the application is started.
XFile Version 2.13 – User Manual EVS Broadcast Equipment – July 2010 Issue 2.13.D E DIT J OB D IALOG O PTIONS This option specifies the time after which the values entered in a text field (i.e. time code) are validated. The default value is 2.0 sec and it can be modified. XML J OBS U SER I NTERACTION A LLOWED When selected, the XML Jobs User Interaction Allowed option allows the user to perform actions (i.e. cancel job, reschedule job, etc.) on the XM L jobs sent to XStream.
Issue 2.13.D 4.7 XFile Version 2.13 – User Manual EVS Broadcast Equipment – July 2010 RECORD GRID MENU The Record Grid menu contains several options or commands related to the information displayed on the record grid, i.e. the nowline, the scheduled jobs, the EVS server display, the time display, etc. D ISPLAY M ODE The display mode specifies which time information is used in the XStream time grid.
XFile Version 2.13 – User Manual EVS Broadcast Equipment – July 2010 Issue 2.13.D C LEAN O PTIONS The Clean commands from the Record Grid menu allow the users to clean jobs from the time grid. Only jobs which have occurred in the past and are completely finished will be cleaned.
Issue 2.13.D XFile Version 2.13 – User Manual EVS Broadcast Equipment – July 2010 L OAD J OBS The Load Jobs command from the Record Grid menu makes it possible to load an XML file previously created with the information on the running, scheduled or pending jobs. When the XML file is loaded, the jobs saved in the file are loaded in XStream as scheduled jobs, even if they have already been executed in an earlier session.
XFile Version 2.13 – User Manual EVS Broadcast Equipment – July 2010 4. Issue 2.13.D If you want some of the displayed jobs not to be loaded, select them with CTRL + click and select the Ignore Selected button. The background colour for these records becomes light blue and the value ‘Ignore’ is displayed in the User Decision column. 5. If you want to retry the records highlighted in orange or in red, select them with CTRL + click and select the Retry Selected button. 6.
Issue 2.13.D XFile Version 2.13 – User Manual EVS Broadcast Equipment – July 2010 Color Codes in the Jobs List The jobs displayed as records in the Jobs List of the XStream Load Jobs window are highlighted with different colours depending on whether they will or would be loaded or not into the XStream. The following table explains the meaning of the different color codes: Color Meaning Green Selected jobs which will be loaded as scheduled job in the XStream time grid.
XFile Version 2.13 – User Manual Issue 2.13.D EVS Broadcast Equipment – July 2010 4.8 CONTEXTUAL MENU IN THE SCHEDULER Different contextual menus are available from the time grid depending on where the right-click is performed: 4.8.1 CONTEXTUAL MENU FROM THE XNET LABEL Command Description Auto-Hide Disconnected XTs Select this option to hide or display the disconnected EVS video servers.
Issue 2.13.D 4.8.2 XFile Version 2.13 – User Manual EVS Broadcast Equipment – July 2010 CONTEXTUAL MENU FROM THE CAMERA NAMES AREA This contextual menu appears when you right click the mouse in the area where the camera names are displayed (see arrow on screenshot). The following table describes shortly the menu commands: Command Description Collapse Select this option to hide the time grid for the camera on which you have right-clicked. Clicking a camera icon display the camera in the time grid.
XFile Version 2.13 – User Manual Issue 2.13.D EVS Broadcast Equipment – July 2010 4.8.3 CONTEXTUAL MENU FROM THE GRID OF A CAMERA This contextual menu is displayed when you right click the mouse in the grid of a given camera, before the nowline (see arrow on screenshot). The contextual menu after the nowline contains only some of these elements. The commands available from this contextual menu will apply specifically to the related camera.
Issue 2.13.D 4.8.4 XFile Version 2.13 – User Manual EVS Broadcast Equipment – July 2010 CONTEXTUAL MENU FROM THE RIGHT OF THE SERVER NAME This contextual menu appears when you right click the mouse on the right of the server name and above the camera time grid (see arrow on screenshot). The commands available from this contextual menu will apply to all cameras of the given EVS video server. In the screenshot above, the commands will apply to Cam A to D of the EVS server 01.
XFile Version 2.13 – User Manual Issue 2.13.D EVS Broadcast Equipment – July 2010 4.8.5 CONTEXTUAL MENU FROM A JOB This contextual menu appears when you right-click the mouse on a scheduled or running job (see arrow on screenshot). It can vary slightly depending on the job status. The following table describes shortly the menu commands: Command Description Status This option shows the job status. Out … This option gives access to the Preview and Edit functions on the job.
Issue 2.13.D 4.8.6 XFile Version 2.13 – User Manual EVS Broadcast Equipment – July 2010 CHECK TIMECODE INTEGRITY Every 5 minutes, the application automatically checks the time code integrity, i.e. it checks whether time code jumps have occurred in the record trains of EVS video servers. The user can also perform this check manually on a record train selected in the time grid. In this case, the check starts from the head of the record train back towards the beginning of the record train.
XFile Version 2.13 – User Manual EVS Broadcast Equipment – July 2010 4.9 Issue 2.13.D CREATING AND EDITING JOBS IN SCHEDULER MODE Create a new job in one of the following ways: • by selecting Edit > Add a New Job from the top menu, • by right-clicking in the time grid, • by pressing the Add button in the Channels area. The Add a Job Manually window, which is displayed below, appears to define the different parameters of the job. A very similar window is displayed each time the user edits the job.
Issue 2.13.D 4.9.1 XFile Version 2.13 – User Manual EVS Broadcast Equipment – July 2010 GENERAL INFORMATION The following fields displayed above the tabs provide general information on the job being created or edited: Field Description Job ID Identifier automatically assigned to the job when it is saved for the first tim e. XT EVS video server from which the record train will be backed up.
XFile Version 2.13 – User Manual Issue 2.13.D EVS Broadcast Equipment – July 2010 4.9.2 IN/OUT TAB IN/OUT Defines the starting time of the clip to be archived. Duration Defines the duration of the current clip if IN or OUT point is not set. Browse Allows you to locate the starting point by reviewing the video. Clicking on the button opens a second window with preview.
Issue 2.13.D XFile Version 2.13 – User Manual EVS Broadcast Equipment – July 2010 Note Prior to start recording files, check the disk capacity inform ation by clicking . A diagram displays the disk capacity required according to the different video standards and bitrates.
XFile Version 2.13 – User Manual EVS Broadcast Equipment – July 2010 4.9.3 Issue 2.13.D OUTPUTS TAB XStream Multitarget allows creating three different output files, with different format, and saving them to three different paths. This is done without reduction of bandwith.
Issue 2.13.D XFile Version 2.13 – User Manual EVS Broadcast Equipment – July 2010 If the filename is not filled in, the default filename will be used. The approximating filename is displayed below this field. It takes into account the expected values for the fields included in the filename. Output Mode It is not mandatory to use Secondary and Third outputs. When no output format is selected from the Output M ode field, Output Disabled is displayed.
XFile Version 2.13 – User Manual EVS Broadcast Equipment – July 2010 Issue 2.13.D 4.10 CREATING JOBS IN QUICKSTART MODE The QuickStart mode allows launching straight away the backup of one or several record trains of one or several EVS video servers. The users start the backup jobs in QuickStart mode from the QuickStart window.
Issue 2.13.D XFile Version 2.13 – User Manual EVS Broadcast Equipment – July 2010 5. Click the Record button to start the job. This QuickStart job will automatically start from the nowline as an endless job. Consequently, you will have to stop the QuickStart job manually. 4.10.2 QUICKSTART WINDOW This section describes the fields and buttons of the QuickStart window.
XFile Version 2.13 – User Manual Issue 2.13.D EVS Broadcast Equipment – July 2010 Field / Button Description XT Number and Name Displays the EVS server num ber and name of the selected server. This is a read-only field. Recorder channel Allows (de)selecting the recorder channels of the specified EVS video server of which the record trains will be backed up. By default, all recorder channels available in the given EVS server configuration are deselected and displayed on a pale green background.
Issue 2.13.D XFile Version 2.13 – User Manual EVS Broadcast Equipment – July 2010 4.10.3 SETUP IN QUICKSTART MODE The settings defined in the Storage and Jobs tabs accessed via the menu Configuration > System Configuration are the default settings in QuickStart mode. In the QuickStart Setup window , you can however define different storage and output settings, specifically for the backup jobs in QuickStart mode.
XFile Version 2.13 – User Manual EVS Broadcast Equipment – July 2010 Issue 2.13.D These settings will have priority on the default settings defined in the Jobs tab of the XStream Configuration window. XFile Clipname Specifies the name of the clip that XFile will create for the backup of the record train(s). The same clipname is assigned to each record train that is backed up in a given job.
Issue 2.13.D XFile Version 2.13 – User Manual EVS Broadcast Equipment – July 2010 4.10.5 STORAGE TAB The Storage tab allows the user to define settings on how and where the backup file will be stored. These settings will have priority on the default settings defined in the Storage tab of the XStream Configuration window . 154 Setting Name Description Number of disks Specifies the number of disks assigned to the channels to backup.
XFile Version 2.13 – User Manual Issue 2.13.D EVS Broadcast Equipment – July 2010 5. External modules The different external modules are available from both XFILE and XSTREAM windows. 5.1 EDITING A CLIP Currently, you can edit clips/files backed up in EVS MXF, MXF OP1A or Quick Time Movie. You will only be able to preview backup clips/files having other formats.
Issue 2.13.D XFile Version 2.13 – User Manual EVS Broadcast Equipment – July 2010 The list box in the right area displays all clips saved in a common MXF file. Use the into the MXF file. buttons to make a copy of a selected clip or to delete a clip Note The Nb Videos field is the only way to identify the SuperMotion Backup Mode used to backup SSLM clips: • 1 video(s) for clips backed up with 1/2 or 1/3 fram es. • 2 or 3 video(s) for clips backed up with all frames.
XFile Version 2.13 – User Manual Issue 2.13.D EVS Broadcast Equipment – July 2010 TC M ODE The TC Mode field allows selecting the time code to be dislayed in the Edit Clip window. The user can choose among the following values: TC Mode Name Description Legacy LTC time code without date information, as it was defined before Multicam V 9.00. LTC Original LTC time code with date information, as it is defined from Multicam V 9.00. LTC time code defined when the clip was recorded on the EVS video server.
Issue 2.13.D XFile Version 2.13 – User Manual EVS Broadcast Equipment – July 2010 T IMELINE The timeline at the bottom of the window allows you to search the clip in jog mode B UTTONS The first series of buttons gathers the GRAB & EXPORT functions. The second series of buttons gathers the SEARCH functions. The third series of buttons gathers the commands which modify the clip. The fourth series of buttons gathers the PREVIEW functions.
XFile Version 2.13 – User Manual EVS Broadcast Equipment – July 2010 Issue 2.13.D Note The ShuttlePRO can be used to perform the commands corresponding to the buttons of the IN-OUT tab in the Edit Clip window. For more information on the ShuttlePRO configuration and use with XFile, refer to section 5.2 ‘ShuttlePRO Use in Edit Clip Module’, on page 163. 5.1.
Issue 2.13.D XFile Version 2.13 – User Manual EVS Broadcast Equipment – July 2010 Note No compression artifact is added to this file creation process, so the original quality of the image is kept. 5.1.4 EXPORT OPTION The Export option makes it possible to extract a portion of clip from its original clip and export it to a different MXF file. In this case a different UmID is assigned to the new clip.
XFile Version 2.13 – User Manual EVS Broadcast Equipment – July 2010 5.1.5 Issue 2.13.D CLIPNAME – KEYWORDS TAB In the Clipname – Keyword Tab, you can modify the UmID (ID louth) and VarID (extended ID), as well as modify or add a ClipName or keywords. To modify the UmID, VarID, Clipname or keywords, select a clip in the list. Then enter the new inform ation in the related field. The new clipname/keyword is updated in the upper list.
Issue 2.13.D 5.1.6 XFile Version 2.13 – User Manual EVS Broadcast Equipment – July 2010 HD PREVIEW TAB When editing an HD clip, the HD Preview tab is added to the Edit Clip module in order to play back the clip with full quality preview in a larger view.
XFile Version 2.13 – User Manual Issue 2.13.D EVS Broadcast Equipment – July 2010 5.2 SHUTTLEPRO USE IN EDIT CLIP MODULE From XFile version 1.12, the ShuttlePRO can be used to perform the commands corresponding to the buttons of the IN-OUT tab in the Edit Clip module. This chapter explains how to install and configure the ShuttlePRO for use in the Edit Clip module. It also provides the ShuttlePRO and shortcut commands in the IN-OUT tab of the Edit Clip module. 5.2.
Issue 2.13.D XFile Version 2.13 – User Manual EVS Broadcast Equipment – July 2010 The Import Settings window opens: 4. Select the file XFile ShuttlePRO Settings Vx.xx.pre f (Vx.xx referring to the file version) that contains the ShuttlePRO settings to be loaded and click APPLY. The Application Setting field in the Shuttle Device Configuration window is updated with the reference to the XFile settings: 5. Click APPLY to confirm that the XFile settings are to be applied to the ShuttlePRO.
XFile Version 2.13 – User Manual EVS Broadcast Equipment – July 2010 5.2.2 Issue 2.13.
Issue 2.13.D XFile Version 2.
XFile Version 2.13 – User Manual Issue 2.13.D EVS Broadcast Equipment – July 2010 ShuttlePRO Dommand Keyboard Shortcut Command Description Go to next Goes to the next picture. CTRL+→: jump of 10 frames forwards ALT+→: jump of 1 sec. forwards JOG J o g Le f t Goes to the previous picture. J o g R i g ht Goes to the next picture.
Issue 2.13.D 5.3 XFile Version 2.13 – User Manual EVS Broadcast Equipment – July 2010 XFILE CLIP INFO EXPORTER The XFile Clip Info Exporter is an external module that allows exporting the clip metadata of all the clips located in a given folder to an XML, TXT or CSV file. This option can be useful for printing purposes.
XFile Version 2.13 – User Manual EVS Broadcast Equipment – July 2010 5.3.1 Issue 2.13.D HOW TO EXPORT DATA TO AN XML, TXT OR CSV FILE You can export the metadata of all the clips located in a given folder to a TXT, XML of CSV file. To export data to an external file, proceed as follows: 1. Double-click the XFile Clip Info Exporter icon on the desktop to open the XFile_ClipInfo_Exporter window. Click the BROWSE button in the Folder to Scan area. The Browse for Folder window is displayed. 2.
Issue 2.13.D 5.3.2 XFile Version 2.13 – User Manual EVS Broadcast Equipment – July 2010 CONFIGURING THE XFILE CLIP EXPORTER Configuring the XFile Clip Exporter consists in specifying which metadata fields have to be exported to the output files.
XFile Version 2.13 – User Manual Issue 2.13.D EVS Broadcast Equipment – July 2010 5.3.3 FIELDS IN THE CONFIGURATION WINDOW The following table describes the various fields in the Configuration window: Field Description Drop-down list box in which the user selects the separator to be used in the TXT and CSV files to separate the metadata values of a clip. Left list box List of all selectable clip metadata. Right list box Selection of clip metadata that will be exported to an output file.
Issue 2.13.D XFile Version 2.13 – User Manual EVS Broadcast Equipment – July 2010 Field Description Button to export the selection of metadata fields into an external file. The configuration file is generated in the folder C : \ Pr o gra m Fi l es\ E V S B roa d c as t E q u ip m ent \ X Fi l e and is called X F il e _C li p I nf o _Ex p o rt e r_C o n fi g _Fi l e . xm l . Button to move down one position the clip metadata selected in the right table.
XFile Version 2.13 – User Manual Issue 2.13.D EVS Broadcast Equipment – July 2010 5.3.5 HOW TO IMPORT THE XFILE CLIP EXPORTER CONFIGURATION TO A FILE When a user receives a configuration file generated with the XFile Clip Exporter and needs to apply this configuration to its XFile Clip Exporter module, he needs to import the configuration file. Note In the folder C:\Program Files\EVS Broadcast Equipment\XFile, rename the file XFile_ClipInfo_Exporter_Config_File.
Issue 2.13.D 5.4 XFile Version 2.13 – User Manual EVS Broadcast Equipment – July 2010 STORYBOARD In the XFile List of the Maintenance mode, the Storyboard button is available for exporting data to HTML file format. 5.4.1 HOW TO EXPORT DATA TO HTML FILE (STORYBOARD) To export data to an HTML file, proceed as follows: 174 1. Press 2. Enter a filename for the HTML file. 3. Define a folder to save the thumbnails. 4. Select the data to include in the HTML file. 5.
XFile Version 2.13 – User Manual EVS Broadcast Equipment – July 2010 Issue 2.13.
Issue 2.13.D XFile Version 2.13 – User Manual EVS Broadcast Equipment – July 2010 Appendix 1: XF[2] Hardware HARDWARE DESCRIPTION The XFile software is installed in a workstation operating under Windows XP Pro. The standard system is Intel Core2 Duo E6300 Processor, Intel Motherboard with DRAM 1GB and an EVS PCX board. Note The PCX1 board is not compatible with XFile v2.00 and higher.
XFile Version 2.13 – User Manual EVS Broadcast Equipment – July 2010 Issue 2.13.D INSTALLING A NEW HARD DISK The aim of the following procedure is to describe how to place and format a new storage hard disk into an XF[2 ]. It is divided into three parts: 1. Mounting the Disk into the Carrier 2. Creating a Partition on the Storage Disk 3. Disabling the Disk Indexing M OUNTING THE D ISK INTO THE C ARRIER 1. Configure the hard disk in Master mode.
Issue 2.13.D XFile Version 2.13 – User Manual EVS Broadcast Equipment – July 2010 C REATING A P ARTITION ON THE S TORAGE D ISK 1. From the desktop, right click on My Computer and select Manage from the contextual menu. The Computer Management window opens. 2. Select Disk Management from the Storage section in the Computer Management tree view. The new disk will appear as Unkown and Not Initialized. A red icon is displayed next to the disk name. 3.
XFile Version 2.13 – User Manual Issue 2.13.D EVS Broadcast Equipment – July 2010 HARD DISK CONFIGURATION EVS provides the following hard disks.
Issue 2.13.D XFile Version 2.13 – User Manual EVS Broadcast Equipment – July 2010 CREATING AND REINSTALLING A GHOST OF YOUR SYSTEM The aim of this procedure is to describe how to create a ghost image of your system and how to restore your system with an existing image. Note All delivering system s have a R: RESTORE partition located on the system disk.
XFile Version 2.13 – User Manual EVS Broadcast Equipment – July 2010 Issue 2.13.D H OW TO C REATE A N EW G HOST I MAGE OF YOUR S YSTEM 1. Reboot the system on Bootable DVD (or USB key) which is delivered with the original system. On XFILE system, modify Boot priority in the BIOS settings in order to boot on the USB key. 2. For USB key only, select ‘EVS Ghost Backup or Restore’ in the menu. 3. In the ghost startup window, press [ENTER]. 4.
Issue 2.13.D XFile Version 2.
EVS Broadcast Equipment Liège Science Park 16, rue Bois St Jean B-4102 Ougrée Belgium Corporate Headquarters North & Latin America Headquarters Asia & Pacific Headquarters Other regional offices available on +32 4 361 7000 +1 973 575 7811 +852 2914 2501 www.evs.tv/contact To learn more about EVS go to www.evs.