USER MANUAL Xedio Approval Version 4.
USER MANUAL Xedio 4.35 Xedio Approval Copyright EVS Broadcast Equipment SA– Copyright © 2010-2013. All rights reserved. Disclaimer The information in this manual is furnished for informational use only and subject to change without notice. While every effort has been made to ensure that the information contained in this user manual is accurate, up-to-date and reliable, EVS Broadcast Equipment cannot be held responsible for inaccuracies or errors that may appear in this publication.
USER MANUAL Xedio 4.35 Xedio Approval Table of Contents TABLE OF CONTENTS III WHAT'S NEW? V 1. 1 INTRODUCTION 1.1. Product Description 1 1.2. Opening Xedio Approval 1 1.3. Overview of the Xedio Approval Window 2 1.4. Process Overview 3 2. 4 DATABASE LIST PANE 2.1. Purpose 4 2.2. Overview of the Database List 4 2.3. Elements Grid 5 2.3.1. Sorting the Elements in the Grid 5 2.3.2. Organizing Columns 5 2.3.3. Element Contextual Menu 6 2.4.
USER MANUAL Xedio 4.35 Xedio Approval What's New? In the user manual, the icon has been added on the left margin to highlight information on new and updated features. The sections updated to reflect the new and modified features on Xedio Approval from Xedio Suite 4.3 and 4.35 (compared to Xedio Suite 4.02) are listed below. Audio mono tracks can be used in the Xedio Suite • What's New? See section "Selecting Video and Audio Tracks for Media and Clips" on page 19.
USER MANUAL Xedio 4.35 Xedio Approval 1. Introduction 1.1. Product Description Xedio Approval is an application of the Xedio Suite that allows editorial control over the media and edits items that are produced within the system. All media, clips and edits can be accessed and previewed before being either accepted or rejected for transmission. 1.2. Opening Xedio Approval To start the Xedio Approval application, click on the Xedio Approval icon on the desktop .
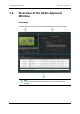
EVS Broadcast Equipment SA 1.3. Issue 4.35.B - August 2013 Overview of the Xedio Approval Window Illustration The Xedio Approval window contains the areas highlighted on the screenshot below: Note The color of some user interface elements may vary with the Xedio skin installed. 2 1.
USER MANUAL Xedio 4.35 Xedio Approval Area Description The table below describes the various parts of the Xedio Approval window: Part Name Description 1. Player pane This pane is used to preview the selected object (media, edit or clip). 2. Database This pane is used to select the media, clip or edited packages to be list assessed for approval. Filtering tools can be applied to the list. 3. Approval pane This pane is used to display information about the selected object and to accept or reject it.
EVS Broadcast Equipment SA 2. Database List Pane 2.1. Purpose Issue 4.35.B - August 2013 The Database List pane allows you to quickly find and browse the available items present within the database that need to be considered for approval. 2.2. Overview of the Database List The Media and Edit radio buttons above the Elements grid are used to select the item type for which you want to get the list.
USER MANUAL Xedio 4.35 Xedio Approval 2.3. Elements Grid 2.3.1. Sorting the Elements in the Grid You can change the sort order of elements in the grid by clicking the column header for the parameter according to which you want to sort the elements. The blue arrow indicates the sorting order. Clicking the column header again changes the sorting order from ascending to descending or vice versa. 2.3.2.
EVS Broadcast Equipment SA Issue 4.35.B - August 2013 1. Right-click a column header. A menu is displayed. 2. Select Choose Displayed Columns. The Select Visible Columns window opens and shows the list of columns in the current order. 3. Select the column name(s) from the Selected pane. 4. Click the appropriate button: ◦ Up: moves the item(s) before the previous one ◦ Down: moves the item(s) after the next one 5. Click OK. 2.3.3.
USER MANUAL Xedio 4.35 Xedio Approval By default, the columns that are taken into consideration for the Quick Text Search are the ones currently visible in the grid. If you wish to search in other columns, and view the string you are searching for in the columns, you can: • add other columns to the Elements grid view • use Filters, as explained in section "Advanced Search" on page 9. These search tools are explained in detail below. An applied filter can be saved for later use.
EVS Broadcast Equipment SA Issue 4.35.B - August 2013 Search String Search Result Yellow card Searches for the strings "yellow" and "card", even if in two different fields (columns), for example "yellow" in Name and "card" in Keywords. For example a clip named "The Yellow Man" with keywords "Red Card" will be found, since it has yellow and card in 2 different fields. "Yellow card" Searches for strings containing "Yellow card".
USER MANUAL Xedio 4.35 Xedio Approval 2.4.3. Advanced Search Purpose and Context of Use The Advanced Search functions are available for more detailed search operations. They allow searches on media and edits metadata. From the Today tab, the filter "creation date = today" is automatically applied. The Advanced Search fields can be displayed on the top left part of the Elements grid.
EVS Broadcast Equipment SA Issue 4.35.B - August 2013 Option Meaning ALL criteria are met All the criteria selected in the Filter fields displayed under the Criteria Combination field must be met. The media displayed in the Elements grid fulfill all the selected filter criteria. ANY criteria is met At least one of the criteria selected in the Filter fields must be met. The media displayed in the Elements grid fulfill at least one of the selected filter criteria.
USER MANUAL Xedio 4.35 Xedio Approval Advanced Search Fields Types Depending on the selected search parameter, different types of advanced search fields will be displayed and available to enter criteria. Timecode or Duration Parameter Such as TC IN, TC OUT, Duration… 1. Select a logical operator in the first field 2. Enter a timecode or duration value in the second field. Timecode Range 1. Select an option from the first field 2. Enter a timecode value.
EVS Broadcast Equipment SA Issue 4.35.B - August 2013 2. This will condition the next step: ◦ Search based on a specific date (e.g. with =…): a calendar will be displayed for the selection of a date. ◦ Search based on an interval (e.g. with […] (between)…): two calendars are displayed for the selection of two dates. ◦ Search based on a specific date calculated from the current date (e.g. with tomorrow, last month,…): no other field appears.
USER MANUAL Xedio 4.35 Xedio Approval 2. This will condition the next step: ◦ Search based on a specific date and time (e.g. with =…): two additional fields will be displayed, a calendar for the selection of a date and drop-down list for the selection of time. ◦ Search based on a specific date and time calculated from the current date and time (e.g. with next hour, last month,…): no other field appears. Number Such as DB Id 1. Select a logical operator in the first field 2.
EVS Broadcast Equipment SA Issue 4.35.B - August 2013 Boolean Such as Published • Select Yes or No from the single criteria field. Free Text Such as Label 1. Select a condition in the first field. 2. Enter free text in the second field. How to Perform an Advanced Search To enter search values in the Advanced Search fields, proceed as follows: 1. Choose the columns you wish to perform a search on. 2. Click the Show/Hide Filter button The Advanced Search area is displayed: 3.
USER MANUAL Xedio 4.35 Xedio Approval 5. Enter filter criteria as explained in section "Advanced Search Fields Types" on page 11. For free text fields, press ENTER to apply the filter. Otherwise, the Elements grid is automatically filtered and refreshed. 6. If required, click the 2.4.4. button to add another advanced search parameter. Using Saved Filters Introduction Once you have defined filters and search terms, you may want to save them for later use.
EVS Broadcast Equipment SA Issue 4.35.B - August 2013 How to Save Filters To save filters, proceed as follows: 1. Define the filter or filters combination you wish to save, as explained in section "How to Perform an Advanced Search" on page 14. 2. Right-click the Filter 0 tab. 3. Select Save Filter As from the contextual menu. The Filter Edit Dialog box opens. 4. Enter a label for the tab you are going to create and, if required, enter a description. 5. Click OK.
USER MANUAL Xedio 4.35 Xedio Approval 3. Player 3.1. Purpose The Player pane is used to preview the selected objects from the Database List. 3.2. Overview of the Player Pane The Player pane provides a video display, a media bar and a jog bar to navigate within the element, video and audio selection buttons, transport buttons and timecode fields. It slightly differs according to the element loaded.
EVS Broadcast Equipment SA 3.3. Issue 4.35.B - August 2013 Video Display Options A contextual menu is available when right-clicking the Video Display area. This gives display options for the video. Option Meaning Show Timecode This option offers various options to display timecode on the Player window. • none: does not display timecode. • Start TC: shows a counter starting with 0 at the first frame of the media. • Intra TC: shows the original timecode of the media.
USER MANUAL Xedio 4.35 Xedio Approval Operation 3.4.2. User Interface Button Description Go to End of Media These buttons are used to move from the current position to the end (on the last frame) of the selected item. Goto Previous Frame Button used to move from the current position to the previous frame. Goto Next Frame Button used to move from the current position to the following frame. Fast Rewind Button used to start moving backwards through the media at a preset fast speed.
EVS Broadcast Equipment SA Issue 4.35.B - August 2013 Here is an example with 4 tracks of stereo channels: The different types of audio tracks of a loaded media or clip are displayed as follows: • A mono track is represented by • A stereo track is represented by • A 5.1 track is represented by . Note If the loaded media/clip contains more than 8 audio tracks, only the first 8 tracks are displayed under the Video Display. A first click on the display the additional tracks.
USER MANUAL Xedio 4.35 Xedio Approval A mono track is removed from the selection by clicking the loudspeaker button on the right of the radio button: A 5.
EVS Broadcast Equipment SA Issue 4.35.B - August 2013 Audio meters located on the right side of the Video Display represent the audio channels of the monitored track. Selecting the Monitored Audio Track for an Edit Number and Type of the Edit Audio Tracks When an edit is loaded on the Player pane, the number and type of the output audio tracks are displayed as radio buttons under the Video Display.
USER MANUAL Xedio 4.35 Xedio Approval Clip When a clip is loaded, the IN point, the OUT point and the nowline are displayed on this top bar. Middle Bar The middle bar is used to zoom into the loaded element. Its dark gray zone shows the section of the media, out of the whole media, visible in the top bar and the relative position of the visible section in the whole media. • When a media or an edit has just been loaded, the top bar represents the whole media.
EVS Broadcast Equipment SA • Issue 4.35.B - August 2013 If you click on the dark gray zone and drag it to the left or to the right, you shift the section of media visible in the top bar to the beginning or to the end of the media. Nowline Display The nowline, representing the current position within the loaded element, is shown as a blue line on the media bar: To place the nowline at a given position, simply click at the requested position on the media bar or drag the line to a new position.
USER MANUAL Xedio 4.35 Xedio Approval 3.5. Loading Media on the Player Window You can proceed in different ways to load an item on the Player: • Drag the media, edit or clip from the Database List to the Player window: • In the Database List, double-click the media, edit or clip to load Once the item is loaded, the Approval Pane displays the media, edit or clip properties. 3.
EVS Broadcast Equipment SA 4. Approval Pane 4.1. Purpose Issue 4.35.B - August 2013 The main purpose of the Approval pane is to reject or accept a media, edit or clip. 4.2. Item Properties The upper part of the Approval pane displays the properties of the loaded item in the General tab and its associated metadata in the Metadata tab.
USER MANUAL Xedio 4.35 Xedio Approval Media Edit 4.3. Acceptance Buttons The lower part of the Approval window is common to all kinds of item and is used to Accept or Reject the media. To reject an item, click the Reject button and then the Update button. "REJECTED" will be displayed in the Validated Date column of the Database List. To accept an item, click the Accept button and then the Update button. The approval date will be displayed in the Validated Date column of the Database List.
Corporate +32 4 361 7000 North & Latin America +1 973 575 7811 EVS Headquarters Liège Science Park 16, rue Bois St Jean B-4102 Seraing Belgium To learn more about EVS go to www.evs.com Asia & Pacific +852 2914 2501 Other regional offices www.evs.com/contact EVS Broadcast Equipment is continuously adapting and improving its products in accordance with the ever changing requirements of the Broadcast Industry. The data contained herein is therefore subject to change without prior notice.