USER MANUAL OpenCube MXFTk® Front-End 2.6 Copyright EVS Broadcast Equipment SA – Copyright © 2005-2013. All rights reserved. This publication, including all photographs, illustrations and software, is protected under international copyright laws, with all rights reserved. Neither this user manual, nor any of the material contained herein, may be reproduced without written consent of the author.
EVS Broadcast Equipment S.A. Issue 2.6.A October 2013 The present document shall be governed by Belgian law. In case of a dispute, all parties shall submit to the exclusive jurisdiction of the court of Liège.
USER MANUAL OpenCube MXFTk® Front-End 2.6 Table of Contents TABLE OF CONTENTS ............................................................................ III REVISION HISTORY................................................................................. V 1. PRELIMINARIES ................................................................................. 1 1.1 MXF File Format ..........................................................................................................1 1.
USER MANUAL OpenCube MXFTk® Front-End 2.6 Revision History Preliminaries Document Version Revision Date Author Change Description 2.6. A 10-Oct-2013 VPO Update user manual to OpenCube MXFTk® Front-End 2.
USER MANUAL OpenCube MXFTk® Front-End 2.6 1. Preliminaries 1.1 MXF File Format MXF (standing for Material eXchange Format) is a file format aiming to improve data and metadata exchange. The targeted objective is the interoperability between content creation mainframes, work stations and peripherals. This wrapper file format was designed to make use of current and forthcoming data formats.
EVS Broadcast Equipment S.A. Issue 2.6.A October 2013 Quit the « License Key Manager » software. You can know execute the 'MXFTkFrontEnd' software. > ~/MXFTkFrontEnd/bin/mxftkfrontend 1.2.3 Apple Platform OpenCube MXFTk® Front-End comes as a self-extractible archive. Double-click on OpenCube MXFTk® Front-End package to launch the installation. The default installation path is in the “Applications” directory however you may choose to install it elsewhere.
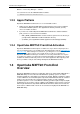
USER MANUAL OpenCube MXFTk® Front-End 2.6 1 2 3 5 4 6 7 Part Description 1 Menu and dockable toolbar. 2 File History Overview. Displays the time of edition, the product used to edit the file and also mentions the operational pattern. 3 Packages Overview. Displays the packages of the file. 4 Data tracks Overview. Displays the tracks of the selected package. 5 Metadata tracks Overview. Displays the metadata tracks of the selected package. 6 7 Preliminaries Framework Sets Overview.
EVS Broadcast Equipment S.A. Issue 2.6.A October 2013 2. OpenCube MXFTk® Front-End in Practice 2.1 MXF File Creation To create a new MXF file you simply need to click on New. This will open a new wizard that will guide you through the different steps required to build a file. 2.1.
USER MANUAL OpenCube MXFTk® Front-End 2.6 This page lets you select the operational pattern (Op) of the file and the media files you want to embed. The drop-down box (1) is a list of operational patterns available for creation. You will also find here some predefined manufacturers patterns that are heavily used (SONY eVTR, XDCam IMX, XDCam DV, XDCam proxy and Panasonic P2/AVCLongG files).
EVS Broadcast Equipment S.A. Issue 2.6.A October 2013 XDCam HD: this will create an Op1a file following the exact properties of a SONY XDCam Optical HD file. You will need to provide one MPEG2 HD following Sony’s requirements and 4 or 8 audio channels depending on the profile. P2: this will create a set of 3 or 5 OpAtom1b files following the exact properties of Panasonic P2 files.
USER MANUAL OpenCube MXFTk® Front-End 2.6 You can also set the default edit rate (3) for the media where this information cannot be directly retrieved from the media itself (audio, still images). You may also choose not to embed the media files in the MXF file but instead to access them as an external reference. In this case, you should check the check box (5). Only one external reference per package is allowed. You can perfectly place an external reference on an existing MXF or on a media file.
EVS Broadcast Equipment S.A. Issue 2.6.A October 2013 1 2 3 4 This dialog box is designed so that you can select a series of still images that will be stored in the same directory and that are also numbered sequentially. You first need to select the directory where the files are located. This step is performed by selecting the Browse button (1).
USER MANUAL OpenCube MXFTk® Front-End 2.6 2.1.3 Output File Selection – Standard Operational Patterns This page will open if you have chosen to create a SONY, Op1a, Op1b, Op2a or Op2b file. It will let you select the path of the output MXF file. Click on the Browse button to open a browser window and select the path where you want to create the MXF file.
EVS Broadcast Equipment S.A. Issue 2.6.A October 2013 2.1.4 Output File Selection – Atomic Operational Patterns This page will open if you have chosen to create a Panasonic, OpAtom_1a, OpAtom_1b, OpAtom_2a or OpAtom_2b file. In that case, several MXF files will be created. Click on the Browse button to open a browser window and select the output directory. You can then type the base name that will be used to name the resulting MXF files.
USER MANUAL OpenCube MXFTk® Front-End 2.6 2.1.5 Source and Output Package Edition This page lets you redefine the name, timecode and descriptive metadata of your output and source packages. Click on Edit to open the package edition dialog in order to set the timecode and/or add descriptive metadata to your package. For further information about package edition, please refer to the chapter Package Timecode and Metadata Edition.
EVS Broadcast Equipment S.A. 2.2 Issue 2.6.A October 2013 MXF File Browsing To open an MXF file you simply need to click on Open. This will launch a new dialog where you will be able to select the file to be displayed in OpenCube MXFTk® Front-End main window. If you wish to open a set of OpAtom files – and notably Panasonic P2 files - you should click on Open OpAtom instead. This will display a new dialog where you will be able to select several MXF files.
USER MANUAL OpenCube MXFTk® Front-End 2.6 2.2.2 File Packages This view draws the list of all the packages included in the file. You may find two types of packages in an MXF file: Output (Material) Package: A material package represents an output of the file. This is a set of tracks built as a combination of the source packages. Most MXF files contain a single output, however highest operational patterns (Op1-2-3c) allow several output packages.
EVS Broadcast Equipment S.A. Issue 2.6.A October 2013 2.2.3 Data Tracks This view displays the essence tracks of the package you selected in the previous view. You may find here four different types of tracks: Timecode tracks are used for timecode annotation. You will find information on the origin and duration of the package here. Picture, sound and data tracks. o If you are in a source package, each of these tracks will display a summary of the media they represent.
USER MANUAL OpenCube MXFTk® Front-End 2.6 o Some MXF files (Digital Cinema Intermediate) may contain encrypted data tracks that you will be able to extract only if you provide the right key. To set the key, right click on the protected track from a source package and select SetCipherKey. This will open a dialog box, where will be reminded the public key protecting this track and where you will be asked to set the corresponding private key.
EVS Broadcast Equipment S.A. Issue 2.6.A October 2013 2.2.5 Framework Sets This view will be available only if you selected a metadata segment in the previous view. It displays the entirety of the descriptive metadata tree. You may click on a set in order to display its properties in the following view. In order to edit the descriptive metadata sets you may refer to the chapter Package Timecode and Metadata Edition for a complete overview of this feature. 2.2.
USER MANUAL OpenCube MXFTk® Front-End 2.6 2.3 Package Timecode and Metadata Edition This dialog box is available when clicking on Edit Package in OpenCube MXFTk® Front-End main window or during file creation. It lets you (re)define the timecode and descriptive metadata tracks of the corresponding package. If you are not familiar with MXF, please refer to the chapter Metadata Tracks for a brief overview of the descriptive metadata structure before continuing.
EVS Broadcast Equipment S.A. 2.3.1 Issue 2.6.A October 2013 New Metadata Track This feature is available when right-clicking on the background of the metadata tracks view or right-clicking on an existing metadata track. It opens the following dialog box. In the drop-down control box you can set the metadata track type (static, timeline or event) and set the name of the track. The choice of the track type depends on the nature of the metadata you wish to add.
USER MANUAL OpenCube MXFTk® Front-End 2.6 There are four fundamental settings to keep in mind when creating a metadata segment: Duration: this is the duration (expressed as a number of frames) of the metadata segment along the metadata track. You should set this value if you are working on an event or timeline track. On a static track the metadata is not related to time annotation. Event tracks allow event of a nil (0) duration and it is perfectly valid to set the duration to -1 if it is unknown.
EVS Broadcast Equipment S.A. Issue 2.6.A October 2013 The drop-down combo box contains the complete list of metadata sets and properties that can be added. The field “Type” is a reminder of the format of the data expected in the field “Value”. 2.3.7 Edit Metadata This feature is available when right-clicking on a metadata set of a metadata tree. It opens a dialog box similar to the previous one. To edit the metadata you can set a new value in the appropriate field. 2.3.
USER MANUAL OpenCube MXFTk® Front-End 2.6 2.4 Partial Restore This dialog box is available when clicking on Partial restore. Thanks to this feature you will be able to create a new MXF file by retrieving only the part of the file you are interested in. You simply need to specify the TC IN (timecode in) and TC OUT (timecode out) and OpenCube MXFTk® Front-End will create the resulting MXF file for you. The dialog box is initialized with the TC IN and TC OUT corresponding to the whole file.
EVS Broadcast Equipment S.A. 2.5 Issue 2.6.A October 2013 DCP Creation OpenCube MXFTk® Front-End includes a wizard to build complete Digital Cinema Packages (DCP) from existing MXF files or from compatible essence. The following wizard appears when clicking on New DCP( ) icon in the main window. Clic on button Next to start creating a new DCP.
USER MANUAL OpenCube MXFTk® Front-End 2.6 The second page of the wizard contains the following fields: Directory is the root folder of the entire DCP. Selecting a directory will enable the other parts of the wizard. It is strongly recommended to choose an empty directory or a directory containing the DCP mxf files only. Label is the name of your composition. Kind is the type of composition (trailer, teaser, ...). By clicking on Next the reel page appears.
EVS Broadcast Equipment S.A. Issue 2.6.A October 2013 In basic mode (default), you can choose the different files which will compose your reel. Check box Enable cut displays new fields used to set origin and duration used for the sources.
USER MANUAL OpenCube MXFTk® Front-End 2.6 In the reel page, you can create a reel from an existing mxf file by clicking on Browse button and selecting a DCP-compatible MXF file. It is possible to create a new MXF file by clicking on New. If you choose the second way, the MXF wizard appears by clicking on New. The MXF wizard is a simplified version of the MXF creation wizard. In this wizard, you have to configure the following elements: Source: JPEG 2000, MPEG-2 video or Wave file.
EVS Broadcast Equipment S.A. Issue 2.6.A October 2013 Now you can choose or create your audio file or choose a subtitle file. Once you have chosen at least a video or an audio MXF file, you can validate your reel by clicking on Next.
USER MANUAL OpenCube MXFTk® Front-End 2.6 A reel has been added, you can now choose to add another reel or finalize your composition. If you choose Yes, the reel page is displayed again for a new reel. If you choose No, you reach the ending page. Clicking on Finish will create your complete Digital Cinema Package.
EVS Broadcast Equipment S.A. 2.6 Issue 2.6.A October 2013 IMP Creation OpenCube MXFTk® Front-End includes a wizard to build complete IMF Packages (IMP) from existing MXF files. The following wizard appears when clicking on New IMP( ) icon in the main window. The first page of the wizard contains the following fields: Directory is the root folder of the entire IMP. Selecting a directory will enable the other parts of the wizard.
USER MANUAL MXFTk® Front-End 2.6 In the next wizard pages you will have to select the Video, Audio, Subtitles and Ancillary Data files that you want to pack in the new IMP. If the selected files are not present in the IMP Directory they will be copied from their current location to the IMP Directory. The IMP Wizard will check the selected files are compliant with the requirements of the selected IMF Application and requirements from the IMF Core Constraints.
EVS Broadcast Equipment S.A. 30 Issue 2.6.
USER MANUAL MXFTk® Front-End 2.6 In the next page of the IMP Wizard, you will define the Composition Playlist (CPL) content. You must first set a label for the CPL and a “Kind” from the list. Then you can edit each Sequence (Image, Audio, Timed-Text, Ancillary Data). By default each sequence is filled with all the corresponding files selected in the previous pages of the IMP Wizard. You can: Add a file from the list of corresponding files selected in the previous pages of the IMP Wizard.
EVS Broadcast Equipment S.A. Issue 2.6.A October 2013 In the next page you will be asked if you want to add another CPL to the IMP. If you answer No, the next page will be the Finalize page. Clicking on Finish will create your complete IMF Package (CPL(s) and PKL).