
User Manual Owner manual

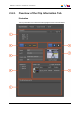


Table Of Contents
- Table of Contents
- What's New?
- 1. Introduction
- 2. User Interface
- 3. Managing Channels
- 4. Loading Media
- 4.1. Introduction
- 4.2. Possible Loading Actions
- 4.3. Loading a Train or a Recording Ingest
- 4.3.1. How to Load a Train from the Channel Explorer
- 4.3.2. How to Load a Train or a Recording Ingest from the Database Explorer
- 4.3.3. How to Select a Train or a Recording Ingest from the Panel
- 4.3.4. How to Reload the Last Loaded Train or Recording Ingest
- 4.3.5. How to Load the Source Media of a Clip
- 4.3.6. How to Load the Train from the Previous or Next Recorder Channel
- 4.3.7. How to Select a Train with the ShuttlePRO
- 4.3.8. How to Snap back to the Last Loaded Train or Recording Ingest
- 4.4. Loading a Clip
- 4.5. Loading a Playlist
- 4.6. Loading a Timeline
- 4.7. Loading a Media with the Take Function in PGM/PRV Mode
- 5. Moving through Media
- 6. Creating Media
- 7. Editing Media
- 8. Publishing a Clip
- 9. Transferring Media
- 10. Exporting and Importing Playlists
- 11. Settings
- 12. Control Panel Shortcuts
Area Description
The table below describes the various parts of the Clip Information tab:
Area Description / See also…
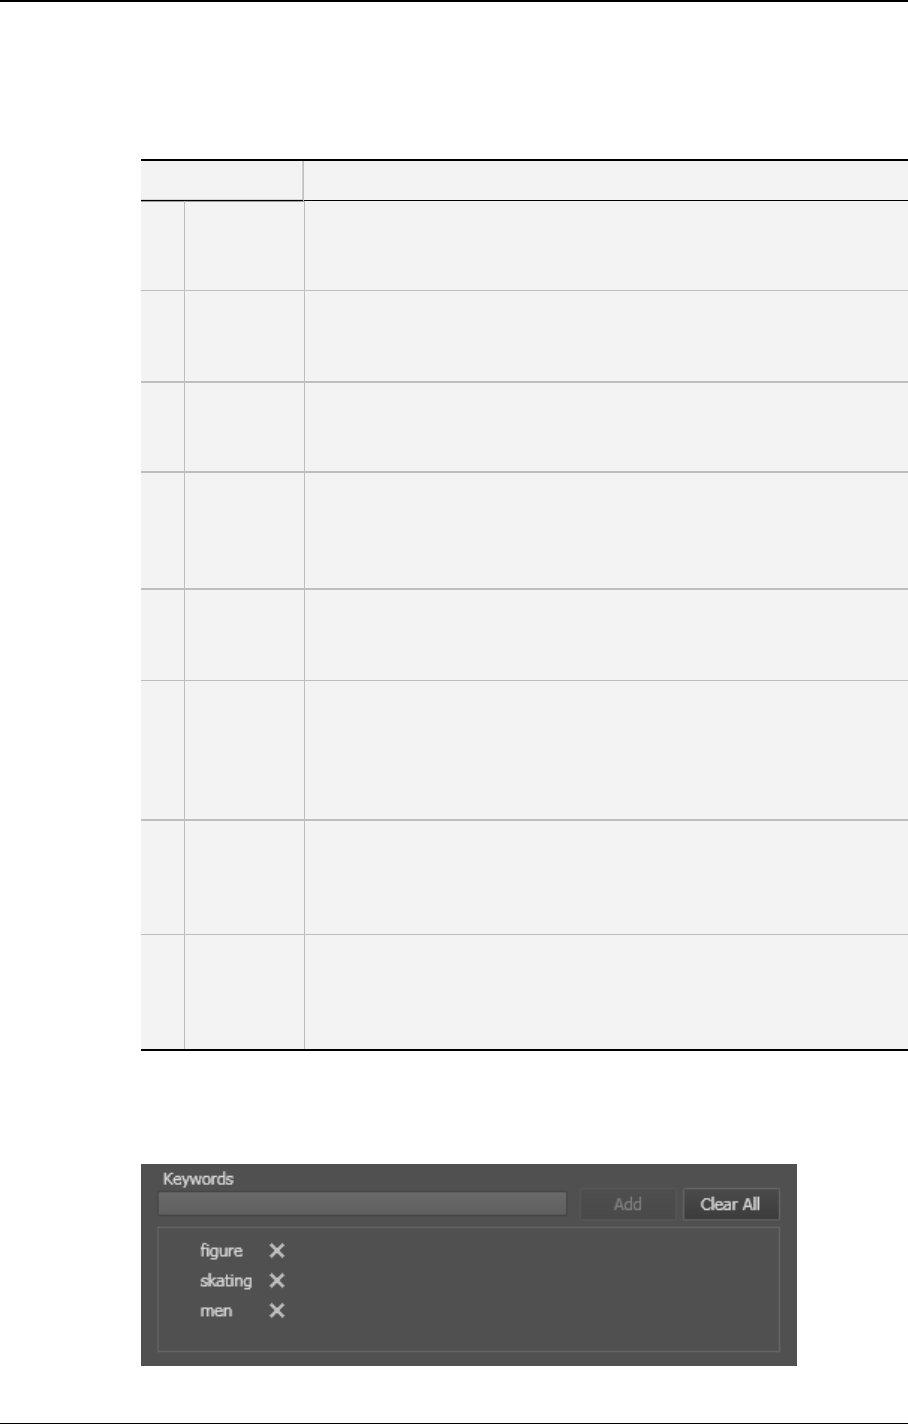
1. Keywords
list
This area displays the keywords assigned to the loaded clip and can
be used to add or delete keywords to that clip.
See section "Keywords List" on page 26.
2. Interest
Level
buttons
The Interest Level buttons allow you to assign an interest rating to a
clip.
See section "Interest Level Buttons" on page 27.
3. Clip Type
buttons
The Clip Type buttons allow you to assign a clip type for use with
Key and Fill operations.
See section "Clip Type Buttons" on page 27.
4. Clip
Creation
Information
fields
Four read-only fields provides information on the recorder used to
create the clip, the EVS video server used to save the clip, the
creation date and the clip owner.
See section "Clip Creation Information Fields" on page 27.
5. Grab
Thumbnail
button
This button is used to manually save a small image of the clip for
use as a thumbnail.
See section "Grab Thumbnails Button" on page 28.
6. Published
To area
This area indicates to which user groups the clip is published, i.e.
available for view or changes depending on the user rights.
All user groups defined in the User Manager application are
displayed in the Publish To area.
See section "How to Publish a Clip to a User Group" on page 91.
7. Linked To
Clips list
This area displays the clips linked to the loaded clip.
See section "Linked to Clips List" on page 28.
A linked clip can be loaded directly from this area. See section "How
to Load a Linked Clip" on page 63.
8. Clips Sent
To list
The Clips Sent to List specifies the last 20 transfers that the user
has performed on the clip. The last transfer is on the top of the list.
The clips sent to the default archive are not displayed here.
See section "Transferring Media" on page 92.
2.6.3. Keywords List
26 2. User Interface
EVS Broadcast Equipment S.A. - June 2013 Issue 6.2.A