
User Manual Owner manual
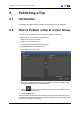


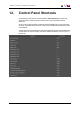
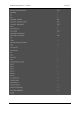


Table Of Contents
- Table of Contents
- What's New?
- 1. Introduction
- 2. User Interface
- 3. Managing Channels
- 4. Loading Media
- 4.1. Introduction
- 4.2. Possible Loading Actions
- 4.3. Loading a Train or a Recording Ingest
- 4.3.1. How to Load a Train from the Channel Explorer
- 4.3.2. How to Load a Train or a Recording Ingest from the Database Explorer
- 4.3.3. How to Select a Train or a Recording Ingest from the Panel
- 4.3.4. How to Reload the Last Loaded Train or Recording Ingest
- 4.3.5. How to Load the Source Media of a Clip
- 4.3.6. How to Load the Train from the Previous or Next Recorder Channel
- 4.3.7. How to Select a Train with the ShuttlePRO
- 4.3.8. How to Snap back to the Last Loaded Train or Recording Ingest
- 4.4. Loading a Clip
- 4.5. Loading a Playlist
- 4.6. Loading a Timeline
- 4.7. Loading a Media with the Take Function in PGM/PRV Mode
- 5. Moving through Media
- 6. Creating Media
- 7. Editing Media
- 8. Publishing a Clip
- 9. Transferring Media
- 10. Exporting and Importing Playlists
- 11. Settings
- 12. Control Panel Shortcuts

10. Exporting and Importing
Playlists
10.1. How to Export a Playlist
You can export a playlist in the .xml or .csv formats. The .xml files can later be imported
into an IPDirector system, whereas the .csv files are only for export purposes.
To export a playlist, proceed as follows:
1. When the playlist to export is displayed in the Clip-List tab, right-click the Playlist
Name field.
The Playlist contextual menu is displayed.
2. Select Export.
The Export Playlist window opens.
Set T/C Track window opens
3. Type the T/C to be used in the export file for the IN point of the first playlist element.
This timecode will also be the initial timecode of the T/C track calculated for the whole
playlist.
4. Click OK.
The Export Playlist window opens.
5. Select the directory to which you want to export the playlist.
6. Select the format for the playlist in the Save as type drop-down list.
7. Click the Save button.
8. If you have chosen the .xml format, the procedure ends here.
In case you have selected the .csv format, the Choose csv Profile window opens.
Follow steps 9 to 11.
9. Select a profile.
The Choose Columns to Export window opens.
10. Select the columns to export from the left area to the right area.
11. Click OK.
The playlist is exported to a file with the requested format to the requested folder. By
default, the file name is the name of the playlist in IPDirector, except if you have modified
it in the Export Playlist window.
10.2. How to Import a Playlist
You can import a playlist from an .xml file.
94 10. Exporting and Importing Playlists
EVS Broadcast Equipment S.A. - June 2013 Issue 6.2.A