USER MANUAL PART 1 - GENERAL WORKSPACE Version 6.
IPDirector - Version 6.00 - User Manual - General Workspace Copyright EVS Broadcast Equipment S.A.– Copyright © 2005-2012. All rights reserved. Disclaimer The information in this manual is furnished for informational use only and subject to change without notice. While every effort has been made to ensure that the information contained in this user manual is accurate, up-to-date and reliable, EVS Broadcast Equipment cannot be held responsible for inaccuracies or errors that may appear in this publication.
EVS Broadcast Equipment S.A.
IPDirector - Version 6.00 - User Manual - General Workspace Table of Contents TABLE OF CONTENTS WHAT'S NEW? 1. 1 1.1. IPDirector Overview 1 1.2. IPDirector Uses 1 1.2.1. Standalone Mode 1 1.2.2. Modular Mode 2 3 1.3.1. Production Workflow 3 1.3.2. Channel Explorer 4 1.3.3. Recorder Panel 4 1.3.4. Ingest Scheduler 5 1.3.5. IPLogger 5 1.3.6. Keyword Management 5 1.3.7. Database Explorer 6 1.3.8. VTR Control Panel 6 1.3.9. Control Panel 6 1.3.10. Playlist Panel 7 1.3.11.
EVS Broadcast Equipment S.A. - November 2012 Issue 6.00.B 2.4.2. Opening and Closing the Channel Status Panels 17 2.4.3. Recorder Status Panel 17 2.4.4. Player Status Panel 18 2.5. Status Bar 3. 20 2.5.1. Introduction 20 2.5.2. Default Item Icons 20 2.5.3. Loaded Layout Icon 21 2.5.4. Minimized Windows 22 2.5.5. Message Panel 22 2.5.6. Process Status Icons 24 2.5.7. License Icon 24 SYSTEM MANAGEMENT 25 3.1. Settings 25 3.1.1. Introduction 25 3.1.2. General Settings 25 3.1.3.
IPDirector - Version 6.00 - User Manual - General Workspace 3.6.3. Quick Reference in Clip Mode 4. 99 3.6.4. Quick Reference in Playlist Mode 100 3.6.5. How to Control a Player with the ShuttlePRO 101 CHANNEL EXPLORER 102 4.1. Introduction 102 4.2. User Interface 104 4.2.1. Opening of Channel Explorer 104 4.2.2. Channel Explorer Views 104 4.2.3. Tree View 104 4.2.4. Recorder View 107 4.2.5. Player View 109 4.2.6. VTR View 110 4.3.
EVS Broadcast Equipment S.A.
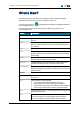
IPDirector - Version 6.00 - User Manual - General Workspace What's New? The following table describes the sections updated to reflect the new and modified features on IPDirector from version 6.0 (compared to version 5.9). In the user manual, the icon new and updated features. has been added on left margin to highlight information on Click the section number (or the description) in the table to jump directly to the corresponding section. Section Description Main Window 1.3.
EVS Broadcast Equipment S.A. - November 2012 Section Issue 6.00.B Description Shortcuts 3.2.4 A new shortcut has been defined to turn the OSD ON or OFF. System Management 3.3.1 Layouts specifically dedicated to a category of users can be predefined and assigned to a user by system administrators, so it becomes its default layout. 3.3.2 Layout Management: layout toolbars are no more used with IPDirector 6.0. 2.3.6 - 3.4.1 - 3.4.2 Edits can now be managed from IPDirector. Metadata can be - 3.4.
IPDirector - Version 6.00 - User Manual - General Workspace 1. Introduction 1.1. IPDirector Overview IPDirector is an integrated suite of software applications designed to enhance the workflow of a television production. IPDirector uses its applications to control multiple channels from several EVS video servers connected to the XNet SDTI network.
EVS Broadcast Equipment S.A. - November 2012 1.2.2. Issue 6.00.B Modular Mode Several workstations can be used, running only the applications required for a specific task. Each workstation is connected through Ethernet with a central Database. When networked together, IPDirector Database information is available to all other workstations used in different production areas while enhancing the overall production workflow.
IPDirector - Version 6.00 - User Manual - General Workspace This can be complemented with a logging module inside IPDirector which can associate data with each recording. The logs created will be accessible by all other users on the different workstations. Other IPDirector workstations dedicated to the production phase allow a control of media while making clips, playlists, timelines, bins and logs. They also allow the transfer of media to third-party editing systems for finalizing edits, for instance.
EVS Broadcast Equipment S.A. - November 2012 1.3.2. Issue 6.00.
IPDirector - Version 6.00 - User Manual - General Workspace 1.3.4. Ingest Scheduler The Ingest Scheduler is a visual tool that allows the creation, editing and view of scheduled ingests on EVS video servers, or from the servers to files on storage via XTAccess. It provides a timeline view of each recorder and stream configured through the Remote Installer and controlled by IPDirector.
EVS Broadcast Equipment S.A. - November 2012 Issue 6.00.B Keyword Management tools allows the addition of single keywords to the database and therefore to any grid. It also allows the import of keyword grids generated by an EVS sever, keyword grids from other IPDirector installations and even the integration of keywords and keyword grids from 3rd party databases which may already exist such as competitor lists and team or event statistical databases.
IPDirector - Version 6.00 - User Manual - General Workspace • clips, record trains, playlists and timelines stored on an EVS video server when the Control Panel is associated to a player channel, • files stored on a nearline folder of the GigE network when the Control Panel is associated to the OCX Software Player (if the workstation has a valid license for it). It provides transport functions to play the media and clip creation functions to clip media or trim existing clips.
EVS Broadcast Equipment S.A. - November 2012 Issue 6.00.B 1.3.13. Director's Cut The Director's Cut application is used in live or near-live post-productions. Takes recorded from several camera angles at a time, as well as the Director's PGM cut which are created with a switcher, are kept on the EVS video servers and streamed or written to a NLE.
IPDirector - Version 6.00 - User Manual - General Workspace 2. IPDirector Main Window 2.1. Introduction The IPDirector main window is the window which opens when IPDirector is started. By default the IPDirector main window opens without no application window opened. However, specific layout of windows display may have been assigned to a user or created and saved by the user, so this layout will automatically be launched when the user logs in.
EVS Broadcast Equipment S.A. - November 2012 Issue 6.00.B Area Description 1. The Menu bar gives access to the several menu commands. Menu bar • The File, View, Windows and Layout menu commands allow the users to modify and customize the IPDirector user interface in which they are working. • The Metadata menu gives access to the options for managing the customer-defined data that can be associated with clips, logsheets, playlists and timelines.
IPDirector - Version 6.00 - User Manual - General Workspace 2.3. Menu Bar 2.3.1. Introduction The Menu bar gives access to a series of menus and buttons which provides various commands described hereafter. 2.3.2. File Menu Clicking the File option on the Menu bar displays the File menu. Menu Item Description Log Off User Logs off the current user and displays the Log In window. Exit Exits IPDirector. Note Prior to log off or exit, it is best practice to save the current layout.
EVS Broadcast Equipment S.A. - November 2012 2.3.4. Issue 6.00.B Windows Menu Clicking the Windows option on the Menu bar displays the Windows menu. 2.3.5. Menu Item Description Close All Windows Closes all the IPDirector applications opened in the current session. Gives the focus on the application corresponding to the selected item and brings it to the front. Layout Menu Clicking the Layout option on the Menu bar displays the Layout menu.
IPDirector - Version 6.00 - User Manual - General Workspace 2.3.7. Tools Menu Tools Menu Options Clicking the Tools option on the Menu bar displays the Tools menu. Menu Item Description Settings Opens the Settings window which gives access to all the categories of IPDirector settings. Some categories relate to a dedicated application and are detailed in the chapter dealing with that application. Other categories are general or common to several applications and are detailed in "Settings" on page 25.
EVS Broadcast Equipment S.A. - November 2012 Issue 6.00.B Recreate All Thumbnails Note Please note that this function is only available for administrators and should be used cautiously. This setting allows the creation of thumbnails from a particular EVS video server when there is an XML unit set to create thumbnails. Normally this process will function as a background process. If a system needs to have its clips thumbnails recreated, this window allows a manual initiation of that process.
IPDirector - Version 6.00 - User Manual - General Workspace Area Description 1. Transfer jobs are presented in rows and all their associated parameters and metadata are in columns. Transfer Jobs grid The grid display is managed like other grids in IPDirector. Filters are available from fields displayed above each column and allow searches on a specific column of the grid. 2. Current Transfers Only button This option only displays the transfers "In-Progress" and "Scheduled" in the grid.
EVS Broadcast Equipment S.A. - November 2012 Issue 6.00.B Users can resubmit jobs with a Cancelled or Error status by selecting them and clicking the Retry Job button. 2.3.8. Help Menu Clicking the Help option on the Menu bar displays the Help menu. The Help menu gives access to version and license checking features, together with Monitoring applications for the use of EVS Staff. 2.3.9.
IPDirector - Version 6.00 - User Manual - General Workspace 2.4.2. Opening and Closing the Channel Status Panels To open the Recorder Status panel or Player Status panel for the first time in a session, proceed as follows: 1. right-click the tab 2. Select the View All Recorders or the View All Players option respectively. The Recorder tab or the Player tab expands to the right: To open the Recorder Status panel or the Player Status panel again during the same session, simply click the REC or PLAY tab.
EVS Broadcast Equipment S.A. - November 2012 • Issue 6.00.B recording status ◦ capacity information on a red background if the channel is recording ◦ capacity information on a gray background if the channel is not recording • Lock icon locked next to the remaining capacity information, if the channel is • Gang Group icon part of a gang group.
IPDirector - Version 6.00 - User Manual - General Workspace Depending on the EVS server configurations, up to 6 player channels can be displayed per server. The Player Status panel provides the following information for each player channel displayed on the panel: • player channel name • player status ◦ on air red icon if the player channel is on air ◦ off air gray icon if the player channel is off air • Lock icon if the channel is locked • Gang Group icon association.
EVS Broadcast Equipment S.A. - November 2012 2.5. Status Bar 2.5.1. Introduction Issue 6.00.B The Status bar contains icons that provide information on the following elements: • default channel • default bin • default playlist • loaded layout • minimized application windows • messages • connection status of IPDirector processes and external components • license The Status bar can be hidden from the View menu of the Menu bar. 2.5.2.
IPDirector - Version 6.00 - User Manual - General Workspace • by right-clicking the Default Player Channel field and selecting the default player channel from the contextual menu. You can clear the default player channel in one of the following ways: • by double-clicking the Default Player Channel field. • by right-clicking the Default Player Channel field and selecting None from the contextual menu.
EVS Broadcast Equipment S.A. - November 2012 Issue 6.00.B You can clear the layout by double-clicking the Loaded Layout field. Warning Clearing the current layout will clear the entire user interface of all open windows! Use this with caution. 2.5.4. Minimized Windows The Minimized field indicates whether windows have been minimized and allows the users to restore the minimized windows. When no window is minimized, the Minimized field has a gray background.
IPDirector - Version 6.00 - User Manual - General Workspace The Message panel expands by clicking the arrow on the right of the Message field. It provides a quick display of the information, warning and error messages generated during the current session. Messages Display The messages include the following information: • the date and time when the message was generated • the message itself The messages are highlighted on a different background color depending on the type of message.
EVS Broadcast Equipment S.A. - November 2012 Issue 6.00.B To disable a filter and remove the corresponding messages from the list, users must click the Message Type button for that filter. The button is then displayed on a gray background. 2.5.6. Process Status Icons The background color of the Status icons provides information on the status of the processes that run in the background: • When the background color is green, the process is running or the connection is established.
IPDirector - Version 6.00 - User Manual - General Workspace 3. System Management 3.1. Settings 3.1.1. Introduction This section only describes the general and global settings applicable to several modules. For more information on specific settings, refer to dedicated chapters: • Playlists settings: detailed in the Playlist Panel user manual. • Control Panel settings: detailed in the Control Panel user manual. • Ingest Scheduler settings: detailed in the Ingest Modules user manual.
EVS Broadcast Equipment S.A. - November 2012 Issue 6.00.B Display XT Structure The Display XT Structure setting makes it possible to display the server structure in different ways in the various applications where it is available, e.g. in the Database Explorer, in the contextual menu of the Control Panel. Three possible displays are available: 26 Display option Description Do not display All elements are listed without displaying the server structure or the page and bank organization.
IPDirector - Version 6.00 - User Manual - General Workspace Display File Directory Structure The Display File Directory Structure setting makes it possible to display the file structure in different ways in the various applications where it is available. Three possible displays are available: Display option Description Do not display Directory Structure All elements are listed without displaying the file directory organization.
EVS Broadcast Equipment S.A. - November 2012 Selected Option Operations performed Windows Style Drag = move Issue 6.00.B CTRL + drag = copy Google Style Drag = copy CTRL + drag = move Confirmation Style When dragging a clip, displays a popup window and asks the operator for the operation to perform.
IPDirector - Version 6.00 - User Manual - General Workspace Auto-Name Settings for Clips Clip Name – Format String Description If the Save Clip window or the New Ingest window are not displayed at clip or ingest creation, the format string defined in the Clip Name - Format String field will be used to create the clip name or ingest name. The various possible format string options are listed with a brief explanation under the field. Double-clicking an item appends it to the format string. 3.
EVS Broadcast Equipment S.A. - November 2012 Issue 6.00.B User Fields Up to 10 user fields can be used in the clip name, provided that a metadata profile has been assigned to the clip and that the selected user field number exist in the profile and has got a value. For example, if %UF3 is used in the clip format string, the value entered in the third user field from the profile will be used in the clip name. This could be text, timecode or date.
IPDirector - Version 6.00 - User Manual - General Workspace The number of digits entered in the Clip Name Counter Value field defines the format of the number. For example, if 0001 is entered in the field, the counter will have 4 digits and the counter will loop from 0001 to 9999. Auto-Name Settings for Files Clip File Name – Format String This setting will be used to name the files created when backing up clips using XFile or XTAccess. If left empty, the default XTAccess or XFile settings will be used.
EVS Broadcast Equipment S.A. - November 2012 Issue 6.00.B Stream File Name – Format String This setting will be used to automatically name files when streaming using XStream or XTAccess. The various possible format string options are listed and explained in the field. Up to 10 user fields can be used in the stream file name. See section "Auto-Name Settings for Clips" on page 29. Double-clicking an item appends it to the format string.
IPDirector - Version 6.00 - User Manual - General Workspace General Settings for Clips Open Save Clip Window If this checkbox is NOT selected, the clip will be made instantly when a new clip is created in the Control Panel. The clip is stored in the next available location on the page designated for IPDirector clips in the EVS server setup (default setting is page 6). If this checkbox is selected, the Save Clip window will open when a new clip is created in the Control Panel.
EVS Broadcast Equipment S.A. - November 2012 Issue 6.00.B Guardbands The guardbands correspond to A/V material which is added on both sides of the clip boundaries when the clip is created. They are defined in seconds in this setting field. When a new clip is saved, the guardbands will automatically be added before the IN point of the clip and after the OUT point of the clip.
IPDirector - Version 6.00 - User Manual - General Workspace Default Clip ID Display Mode The clip ID mode determines which ID will be used by default in the display: Name, UmID or VarID. Default XT for Partial Clip Restore Clips published from XFile are displayed in the Database Explorer, and can be loaded to a Control Panel. When the user creates a sub-clip from a file stored in XFile and published, IPDirector will save the sub-clip on the EVS server specified in the option. Take Settings 3.
EVS Broadcast Equipment S.A. - November 2012 Issue 6.00.B Default Effect Type The Default Effect Type setting allows you to define the default transition effect to be applied when you use the Take function to shift from the PGM to the PRV channel. You can specify different transition effects for the audio track and the video track.
IPDirector - Version 6.00 - User Manual - General Workspace Use of TTL GPIs Each EVS video server has 4 Input GPIs, 4 Output GPIs and 4 TTL GPIs which can be configured either as Input GPIs or as Output GPIs. Depending on the option selected in the How to Use the TTL GPIs field, 4 or 8 GPIs will be displayed. In the Input GPIs Settings window, changing the TTL configuration will result in the following behaviors: • from Input GPIs to Output GPIs: the configuration of the last 4 Input GPIs is cleared.
EVS Broadcast Equipment S.A. - November 2012 Issue 6.00.B Input GPIs Settings The Input GPIs settings make it possible to configure the action to be triggered on a given player channel of the EVS server when a given key is pressed on a GPI device connected to this EVS server. Up to eight GPI inputs can be used on an EVS server. For each Input GPI, the following information needs to be defined: • the action triggered by the GPI key on the EVS server.
IPDirector - Version 6.00 - User Manual - General Workspace Only the GPI keys set up to be managed by IPDirector on the EVS server can be configured in the Input GPIs Settings window. The other ones will be dimmed. Warning The GPIs IN to be used in IPDirector need to be assigned to the IPDP protocol Setup Configuration module of Multicam (SHIFT-F2, Page 4). Otherwise, they cannot be defined in IPDirector.
EVS Broadcast Equipment S.A. - November 2012 Issue 6.00.B Action Description EXITASAP Initiates a command to exit the loop as soon as possible without playing the current element until its end and jump to the selected element. EXITOUT Initiates a command to exit the loop as soon as the OUT point of the current element is reached and jump to the selected element. NONE No value is defined. Channel The Channel field allows the user to define the channel on which the GPI key action will be executed.
IPDirector - Version 6.00 - User Manual - General Workspace Output GPIs Settings Purpose The Output GPIs are signals that are sent from an EVS server under the control of the IPDirector. The Output GPIs are used to send a signal from the IPDirector to a GPI key at a given timecode of a playlist played on a given player channel. This signal can then be used to trigger a record action of the playlist from the given timecode by a third device, for example a VTR.
EVS Broadcast Equipment S.A. - November 2012 Issue 6.00.B For each Output GPI, the output mode, the pulse duration and the offset value can be set when defining the Output GPI. For more detailed information, refer to the Playlist Panel user manual. The Output GPIs Settings window is used to determine how to use the TTL GPIs and to specify the Advance value.
IPDirector - Version 6.00 - User Manual - General Workspace Select an XT Server In the Select an XT server drop-down list, first select the EVS server for which you want to specify OSD settings. OSD Mode Global OSD Mode This mode applies to clips, growing clips, trains, playlist elements and timelines loaded on the channel. 3.
EVS Broadcast Equipment S.A. - November 2012 Issue 6.00.B Basic With this option selected, only the following information is displayed on screen: • the current on-air timecode of the clip, growing clip or train loaded on the channel • the on-air timecode of the playlist element loaded on the channel • the on-air timeline track position of the loaded timeline. Detailed This is the default value. It gives detailed information about the loaded media.
IPDirector - Version 6.00 - User Manual - General Workspace Display Remaining Time This setting defines how the remaining time information will be displayed on screen with playlists: 3.1.7.
EVS Broadcast Equipment S.A. - November 2012 Issue 6.00.B This section only describes the General and Channel Management Shortcuts, which are valid for several applications. For more information on shortcuts specific to an application, refer to: 3.2.2.
IPDirector - Version 6.00 - User Manual - General Workspace ◦ If the new shortcut key is still available, it is automatically modified in the Current Value column. ◦ If the new shortcut key is not available, the following type of error message is displayed: 5. Select OK to confirm the change in the Define Shortcut window. The change in the shortcut definition are saved and available in the application.
EVS Broadcast Equipment S.A. - November 2012 48 Issue 6.00.B 3.
IPDirector - Version 6.00 - User Manual - General Workspace 3.2.4. Channel Management Shortcuts All the Channel Management shortcuts are shown in the screenshots below with their default values. These can be modified and saved by the user if desired. 3.
EVS Broadcast Equipment S.A. - November 2012 3.3. Layout Management 3.3.1. Managing Layouts Issue 6.00.B Context of Use Depending on job content and personal preferences, most users have a preferred screen layout (open windows and window positions). The purpose of the Layout features in IPDirector is to present users their personalized screen layout every time they log on to IPDirector.
IPDirector - Version 6.00 - User Manual - General Workspace 2. Enter a name for the layout. 3. If you want to associate an icon to the layout, click the Select Icon button and select an icon file from the Open Icon window. 4. Click OK. The following message is displayed: 5. Click ◦ Yes if you want to start from a clean working area or ◦ No if you want to create a new layout based on your current working area. The Layout name is displayed in the Status bar of the Main window . 6.
EVS Broadcast Equipment S.A. - November 2012 Issue 6.00.B Steps 5 and 6 may be done later on, provided that you first open the layout with the Layout > Open option. How to Save a Layout with a New Name Once you have opened and arranged some windows in the way you want them to appear, you can save the current layout with a new name. To do so, proceed as follows: 1. Select Save current layout as in the Layout menu. The Save Current Layout As window appears: 2.
IPDirector - Version 6.00 - User Manual - General Workspace 3.3.2. Column 1 Column 2 Save Current Layout as Opens the Save Current Layout As window to allow you to give a name to the current layout. See section "How to Save a Layout with a New Name" on page 52. Delete Opens the Delete Layout window from which you can select the layout(s) to delete. Publish Opens the Publish window from which you can publish a layout to selected users.
EVS Broadcast Equipment S.A. - November 2012 Issue 6.00.B The Layout panel opens when you click the Layout tab on the left screen border. The procedure for creating a Layout shortcut is explained in details below. How to Create a Layout Shortcut To create a layout shortcut, proceed as follows: 1. Click the Layout tab on the left screen border to open the Layout panel. 2. Click the New button from the Layout panel. The Load Layout window opens: 54 3.
IPDirector - Version 6.00 - User Manual - General Workspace 3. Select an existing layout from the list. 4. Click Load. The layout is available from the Layout panel: How to Open an Existing Layout from the Layout Panel To open an existing layout by using the Layout shortcut, proceed as follows: 1. Click the Layout tab on the left screen border to open the Layout panel. 3.
EVS Broadcast Equipment S.A. - November 2012 Issue 6.00.B 2. Click the Layout button corresponding to the layout you want to load. The different windows corresponding to the selected layout open. Operations on Layout Shortcuts A contextual menu appears when you right-clicking a Layout Shortcut button in the Layout panel. The following table describes the commands available from the contextual menu.
IPDirector - Version 6.00 - User Manual - General Workspace 3.4. Metadata Profile Management 3.4.1. Metadata, Profiles, User Fields and Automatic Keywords Metadata is customer-defined data which can be associated with clips, logsheets, playlists, timelines and edits. Metadata Profile A Metadata profile corresponds to a set of user fields which are managed together.
EVS Broadcast Equipment S.A. - November 2012 3.4.2. • the IPLogger user manual ("Overview of the IPLogger Window") • the IPLogger user manual ("Create a New Log Window") Issue 6.00.B Overview of the Metadata Profiles Management Window Introduction To access the Metadata Profiles Management window, select Manage Profiles from the Metadata menu of the IPDirector Menu bar. This interface can only be accessed if you have the appropriate user right. It allows you to create, edit and delete profiles.
IPDirector - Version 6.00 - User Manual - General Workspace • The Logsheet Profiles tab that lists the profiles specifically dedicated to logsheets. Profiles Tab This area gives the list of available profiles which can be associated with clips, playlists, timelines and edits or which can be used when defining a subsequent logsheet profile. The same profile can be used for any of these element types.
EVS Broadcast Equipment S.A. - November 2012 Issue 6.00.B Within the Logsheet Profiles tab, it is possible to select a logsheet profile as the default logsheet profile by selecting the box next to the chosen logsheet profile in the Default column. By doing this, users who do not have the user right to choose a profile will not be able to select another logsheet profile and the selected logsheet profile and its user fields will be applied by default to the new logsheets when they are created.
IPDirector - Version 6.00 - User Manual - General Workspace b. Fill in the Name field and, if required, the Description field c. Choose a type for the new user field from the drop-down list. See section "New Profile Window" on page 61. d. Click the Save button. All the selected and/or added user fields are listed in the Selected User Fields area. 6. Re-order the user fields by drag-and drop operation in the way you want them to appear in the metadata area related to the element. 7. Click Save.
EVS Broadcast Equipment S.A. - November 2012 Issue 6.00.B Window Overview The New Profile window is divided into three areas shortly described in the table below: 62 3.
IPDirector - Version 6.00 - User Manual - General Workspace Area Description 1. General area It contains the Name field and a Description field 2. Available User Fields area It gives the list of the available user fields, and their corresponding type, which can be selected and associated to a profile. It also allows to filter the list through the Filter field or to delete one or several user field(s) by clicking the Delete Selected User Field button. 3.
EVS Broadcast Equipment S.A. - November 2012 Issue 6.00.B User Field Type Will appear in the element metadata area as… Date Date field with drop-down arrow giving access to a calendar. Number Number field with up and down arrows to increase or decrease the value. Predefined Text values (64 characters) Drop-down list displaying all the values which can be entered by the user at creation of the user field (see below).
IPDirector - Version 6.00 - User Manual - General Workspace 1. It is recommended to use the common set of predefined values when ◦ The metadata will be used in only one profile, or ◦ The metadata will be used in several profiles but the predefined values will always be the same. 2. It is recommended to define specific predefined values when ◦ The metadata will be used in several profiles and the predefined values will differ depending on the profile.
EVS Broadcast Equipment S.A. - November 2012 Issue 6.00.B 2. Enter a value in the field above the list of values. 3. Click Add. The value is listed in the Value list. If it is a common set of predefined values: • the new value will be added to the edited profile and • all profiles containing this user field are updated If it is a specific set of predefined values: • the new value will only be added to the edited profile.
IPDirector - Version 6.00 - User Manual - General Workspace 4. Click the arrow to display the list of available profiles. 5. Select a profile to be used as Logsheet User Fields profile. 6. Click at the right of the cell in the Profile for Automatic Keywords column. An arrow appears. 7. Click the arrow to display the list of available profiles. 8. Select a profile to be used as Automatic Keywords profile. 3.4.4.
EVS Broadcast Equipment S.A. - November 2012 Issue 6.00.B How to Edit a Profile or a User Field If you want to edit the information related to each user field (name, description or type), proceed as follows: 1. In the Profiles tab, select the profile you want to edit. 2. Do one of the following: ◦ In the File menu, select Edit. ◦ Right-click the profile line and select Edit from the contextual menu. The Edit Profile window, similar to the Add New Profile window, opens. 3.
IPDirector - Version 6.00 - User Manual - General Workspace Click Yes. The user field is deleted from the Available User Fields list and will no longer be available. How to Delete a Profile You can choose to permanently delete a profile or mark a profile as deleted. To do so, proceed as follows: 1. In the Profiles tab, select the profile to be deleted. 2. Do one of the following: ◦ In the Edit menu, select Delete ◦ Right-click the profile and select Delete from the contextual menu.
EVS Broadcast Equipment S.A. - November 2012 Issue 6.00.B How to Delete a Logsheet Profile To delete a logsheet profile, proceed as follows: 1. In the Logsheet Profiles tab, select the logsheet profile to be deleted. 2. Right-click the logsheet profile 3. Select Delete from the contextual menu. The logsheet profile is deleted from the list. If a logsheet profile is used in a logsheet that has at least one log, it cannot be deleted. 3.4.6.
IPDirector - Version 6.00 - User Manual - General Workspace How to Export a Profile or a Logsheet Profile To export a metadata profile into an XML file, proceed as follows: 1. Select the profile or the logsheet profile to export. 2. In the File Menu, select Export Selected Profiles. The Export Profile window opens: 3. Select the folder where you will export the file in the Save in field and type a file name for the profile to export in the File Name field. 4. Click Save.
EVS Broadcast Equipment S.A. - November 2012 3.5.2. Issue 6.00.B Opening the Control Manager Window The configuration of the remote devices is performed through the Remote Control Manager window. It can be accessed from the IPDirector main window, via Tools > Remote Control Manager. The window displayed several tabs, one for each remote device assigned to a serial communication port in the Remote Installer. 3.5.3.
IPDirector - Version 6.00 - User Manual - General Workspace Then, select the tab corresponding to the MPlay Remote device. Several MPlay remote devices can be connected. In this case, as many tabs are displayed as they are devices. One of the devices is defined as Master, the other ones as slaves. This is done in the Remote Installer. Refer to the Technical Reference manual. You will be able to control up to four player channels with one device.
EVS Broadcast Equipment S.A. - November 2012 Issue 6.00.B 2. Select a player channel. 3. Repeat steps 1 and 2 for all the channels you want to associate to the buttons. The channel name is displayed in the Channel Name field. How to Assign Player or Recorder Channels to Function Buttons from the Channel Explorer To assign player channels to the MPlay Remote by a drag-and-drop operation from the Channel Explorer, proceed as follows: 1. Open the Channel Explorer. 2.
IPDirector - Version 6.00 - User Manual - General Workspace In case the player channel is linked to another one in a PGM/PRV mode, gang mode or Fill and Key mode, the linked channels are listed in the Linked Channels field: Linked Channels In case the channel is linked to another one in a PGM/PRV mode, gang mode or Fill and Key mode, the linked channels are listed in the Linked Channels box.
EVS Broadcast Equipment S.A. - November 2012 Issue 6.00.B 2. Select the function you want to assign to the button. The action name is displayed in the button for the selected channel: Note If the Apply function to all channels checkbox had previously been selected, when the operator assigns a function to a button, it is assigned to all the corresponding buttons for the player channels controlled by the remote. This modification is done on the selected tab only, not on all the connected MPlay devices.
IPDirector - Version 6.00 - User Manual - General Workspace 2. On the MPlay Remote, press the button corresponding to the action you want to apply. The action is performed on the panel or window which is active at the moment you press the button. 3.5.4. BEPlay Remote Introduction The BEPlay remote is a remote controller for browsing, editing and playing content. It can be configured to control selected channels and to send media to predefined destinations.
EVS Broadcast Equipment S.A. - November 2012 Area Issue 6.00.B Description 1. Function Buttons Function buttons are used to control a recorder or a player channel, or the Software Player. 2. Special Buttons 4 buttons can be used with specific actions or together with other buttons. 3. Action Buttons 14 buttons can all be used to perform two different actions, depending on whether the SHIFT button is pressed prior to the button. The actions vary according to the selected layout. 4.
IPDirector - Version 6.00 - User Manual - General Workspace BEPlay Remote Configuration Overview of the Remote Control Manager Window The configuration of the BEPlay remote device is performed from the Remote Control Manager window. You can access this window from the IPDirector main window, via Tools > Remote Control Manager. Then, select the tab corresponding to the BEPlay Remote device. There can only be one BEPlay remote per IPDirector workstation.
EVS Broadcast Equipment S.A. - November 2012 Issue 6.00.B When a serial port has been configured, the Link: RS422 is displayed in the Monitoring area and the system looks for a BEPlay remote on the serial port. If no serial port has been configured, the system tries to detect a BEPlay remote on a USB port. If one is found, Connected – Link: USB is displayed in the Monitoring area. Selecting a Remote Layout Only clips, playlists and timelines can be controlled by the device.
IPDirector - Version 6.00 - User Manual - General Workspace Assigning Channels to Function Buttons See section "Assigning Channels to Function Buttons" on page 89. Selecting Destination Targets From the Destinations area of the Remote Control Manager window, users define the destination targets where the media will be sent to when using the Send to button.
EVS Broadcast Equipment S.A. - November 2012 Issue 6.00.B BEPlay Remote Buttons Function Buttons Function buttons are used to control a recorder or a player channel, or the Software Player. The section "Assigning Channels to Function Buttons" on page 89 describes the possible ways to assign channels to function buttons. The LED of a function button gives indication on the channel assignment.
IPDirector - Version 6.00 - User Manual - General Workspace Button Description RECUE Playlists: Preloads the first frame of the first playlist element from the playlist associated to the controlled channel. Timelines: Acts as Goto Mark IN in the IPEdit Player. Acts as Recue timeline in the IPEdit Timeline. SHIFT, SEL XT Displays a list and allows • to select the EVS server from which the channels will be assigned to the Function buttons in Normal mode.
EVS Broadcast Equipment S.A. - November 2012 Button Issue 6.00.B Description SEND TO Sends the media to the destinations predefined in the Remote Control Manager window. Playlists: sends the loaded playlist. Clips: sends the loaded clip or the marked portion of the loaded clip. Trains: sends the marked portion of the loaded train. See section "BEPlay Remote Configuration" on page 79. SHIFT, GANG When channels have previously been ganged, this function ungangs, or regangs channels.
IPDirector - Version 6.00 - User Manual - General Workspace Button Description SHIFT, PRV TRANS Playlists: NEXT Playlists / clips / trains: Allows the user to preview a transition effect between playlist elements. This starts the play before the element transition, for the duration of the preroll defined in the Playlist Panel. Loads the next playlist element, linked clip or train on the controlled channel.
EVS Broadcast Equipment S.A. - November 2012 Issue 6.00.B Button Description UPDATE Playlist elements / clips: Allows the user to save the changes made to a playlist element or to a clip. TAKE Playlists / clips / trains: If the controlled channel is in PGM/PRV mode, the Take function shifts from the current media on the PGM channel to the media on the associated PRV channel using the Take Effect settings as defined in Tools > Settings > Clips > Clips/Take.
IPDirector - Version 6.00 - User Manual - General Workspace Button Description MENU • "Escape": When using the Sel XT, Last clips, Search TC or Sel Rec options, a list is displayed on the IPDirector screen. The MENU button gets out of the list. • SHIFT When using MENU – wait for 3s - ENTER: locks / unlocks the remote. The SHIFT button is used prior to another button to modify the behavior of this button: • SHIFT, action button: allows to apply the action associated to the upper part of the button.
EVS Broadcast Equipment S.A. - November 2012 Issue 6.00.B VAR Mode The Var wheel mode enables to move in the loaded media at a selected constant review speed. It is activated by pressing the VAR button. The LED is red. The zero position is calculated from the current playout speed to correspond to the point where the speed is null.
IPDirector - Version 6.00 - User Manual - General Workspace Assigning Channels to Function Buttons Assignment Modes Each of the 6 Function buttons can be assigned to a recorder channel, to a player channel or to the Software Player. The assignment of channels to Function buttons can be done in two ways: • Favorite Mode: selected channels are defined in the Remote Control Manager window. This is done during the configuration of the remote.
EVS Broadcast Equipment S.A. - November 2012 Issue 6.00.B and the Function button LED turns red (recorder) or green (player) in the Remote Control Manager and on the remote: How to Assign Player or Recorder Channels to Function Buttons from the Channel Explorer To assign a recorder channel or a player channel to a Function button of the BEPlay Remote by a drag-and-drop operation from the Channel Explorer, proceed as follows: 1. Open the Channel Explorer. 2.
IPDirector - Version 6.00 - User Manual - General Workspace Linked Channels In case the channel is linked to another one in a PGM/PRV mode, gang mode or Fill and Key mode, the linked channels are listed in the Linked Channels box.
EVS Broadcast Equipment S.A. - November 2012 Issue 6.00.B 2. Use the remote wheel to move through the list of EVS servers. 3. Press the ENTER button of the remote to select one of the EVS servers. Note: To cancel the operation: press MENU. The server recorder channels are assigned to the first Function buttons and the corresponding LED are red. The server player channels are assigned to the next buttons and the corresponding LED are green.
IPDirector - Version 6.00 - User Manual - General Workspace Controlling the Software Player Favorite Mode If you work with the player and recorders which have been selected in the Remote Control Manager window, you can take the control of the Software Player with the BEPlay remote in one of the following ways: • Press the Function button which has been assigned the Software Player in the Remote Control Manager window.
EVS Broadcast Equipment S.A. - November 2012 Issue 6.00.B Loading Media Loading a Train Possible Actions Users can load a train on the controlled player channel in one of the following ways: • If the required recorder is assigned to a Function button, press this Function button. The LED flashes red. • In case a train is already loaded on the controlled player, you can press the NEXT or the PREV button to load the train from the next or the previous recorder.
IPDirector - Version 6.00 - User Manual - General Workspace Loading a Clip Possible Sources of Clips Clips can be selected from different sources to load them on the controlled player channel: • From the Search TC list: see section "BEPlay Remote Buttons" on page 82. • From the Last Created Clips list: see section "BEPlay Remote Buttons" on page 82. • From the Database Explorer grid: see section "Browsing Media with the BEPlay Remote" on page 96. How to Load a Linked Clip 1.
EVS Broadcast Equipment S.A. - November 2012 Issue 6.00.B Browsing Media with the BEPlay Remote The BEPlay remote allows the users to browse • elements within a playlist, • clips from the Database Explorer, would they be in the Clips plug-in or in the Bins/Clips plug-in.
IPDirector - Version 6.00 - User Manual - General Workspace Moving through the Database Explorer The users can navigate in the grid, in the tree view or in the saved filters pane if it is displayed. To move from one pane of the Database Explorer to another, use the following remote buttons: • NEXT: move from grid → saved filters, if the pane is displayed → tree view • PREV: move from grid → tree view → saved filters, if the pane is displayed. Note The active pane is not highlighted.
EVS Broadcast Equipment S.A. - November 2012 Issue 6.00.B 3. In the tree view, only the Clips plug-in and the Bins/Clips plug-in can be browsed. Use the wheel to move from one plug-in to the other. 4. Press the ENTER button to open or close a tree node. The corresponding list of clips is displayed in the grid. 5. Press the NEXT button to be able to browse the list. How to Browse a Clip in the Saved Filters To browse clips when the prerequisites are met, proceed as follows: 1.
IPDirector - Version 6.00 - User Manual - General Workspace 3.6.3. Quick Reference in Clip Mode In clip mode, the ShuttlePRO buttons can be used for the following operations: 3.
EVS Broadcast Equipment S.A. - November 2012 3.6.4. Issue 6.00.B Quick Reference in Playlist Mode In playlist mode, the ShuttlePRO buttons can be used for the following operations: 100 3.
IPDirector - Version 6.00 - User Manual - General Workspace 3.6.5. How to Control a Player with the ShuttlePRO To control a player channel or the Software Player with the Shuttle PRO, proceed as follows: 1. Press the Select Player key on the ShuttlePRO controller. This calls up a list of players available to be controlled. 2. Use the jog dial to move through the list and highlight the required player channel or Software Player. 3.
EVS Broadcast Equipment S.A. - November 2012 4. Channel Explorer 4.1. Introduction Issue 6.00.B The Channel Explorer provides an overview of: 102 • logical XNet networks as defined in the Remote Installer, tagged as high resolution or low resolution • EVS servers with their channel configurations (inputs and outputs). Depending on the server configuration, up to 8 channels can be displayed, with a maximum of 6 recorder or 6 player channels.
IPDirector - Version 6.00 - User Manual - General Workspace Through the Channel Explorer, any IPDirector workstation can take control of one or several channels on EVS servers that are connected to the XNet network. You can perform many operations from the Channel Explorer module, for example: • lock channels from use by others • start or stop an ingest • gang multiple channels • create specialized playback modes.
EVS Broadcast Equipment S.A. - November 2012 • Lock Timeline: allowing two channels to be function as Timeline Engine for use with IPEdit. • AB Roll Playlist: to control and play material on up to 4 channels at the same time. 4.2. User Interface 4.2.1. Opening of Channel Explorer To open the Channel Explorer, click the of the main window. 4.2.2. Issue 6.00.
IPDirector - Version 6.00 - User Manual - General Workspace In the Tree view you can see all available resources: EVS video servers with their recorder and player channels, related streams, VTR devices, XF devices. Description of Icons All items are preceded by an icon. Additional information, such as gang mode of channels, is also given by an icon or by text. The meaning of each icon is explained in the following table. 4.
EVS Broadcast Equipment S.A. - November 2012 Icon Issue 6.00.B Description Resolution Information high resolution XNet low resolution XNet Device Information EVS video server connected to the XNet. The XT label is used for any type of EVS video server. VTR device connected to the XNet XF device connected to the XNet Player channel controlled by a ShuttlePRO device Player channel controlled by a BEPlay device.
IPDirector - Version 6.
EVS Broadcast Equipment S.A. - November 2012 Issue 6.00.B In this view you can see the following items: • hi-res and lo-res recorders • hi-res and lo-res streams Click the arrow to the right of the display in the Recorder view: 108 button to select which items you want to 4.
IPDirector - Version 6.00 - User Manual - General Workspace 4.2.5. Player View Click the 4.
EVS Broadcast Equipment S.A. - November 2012 Issue 6.00.B In this view you can see the following items: • high resolution players • low resolution players Tip When a user renames a player channel on an EVS video server, the change is immediately reflected in the IPDirector interface. 4.2.6. VTR View This view is only available if a VTR device is connected to the XTNet. 110 4.
IPDirector - Version 6.00 - User Manual - General Workspace Click the VTR button to activate the VTR View and see the available VTR devices. From the VTR view, you can lock a VTR device or open a VTR Control Panel by rightclicking a VTR name and selecting the appropriate option from the contextual menu. 4.3. Assigning Channels to IPDirector Applications 4.3.1.
EVS Broadcast Equipment S.A. - November 2012 4.3.3. Issue 6.00.B How to Define the Default Player for IPDirector The Default Player setting is used when you open a new application window, such as the Database Explorer or IPLogger. To define the default player channel, proceed as follows: 1. In the Channel Explorer, select the player you wish to define as the default player. 2. Right-click it and select Set as Default Player from the contextual menu.
IPDirector - Version 6.00 - User Manual - General Workspace When the user will open the Database Explorer or the IPLogger, the default player will automatically assigned to the window. Note If the default channel is only accessible to the workstation the user is logged into, the default player assignment may not be accessible when the user moves to another workstation. This is due to a user rights restriction and is intentional. 4.4. Locking Channels 4.4.1.
EVS Broadcast Equipment S.A. - November 2012 Issue 6.00.B Menu Item Meaning Open Ingest Scheduler (new ingest) The recording starts and the Ingest Scheduler window opens. Start XT Ingest (Tree View), or The recording starts but the Ingest Scheduler window does not open. Start Ingest on Selected Channels (Recorder View) In Tree View To start/stop the recording of an XT clip from the Tree view, proceed as follows: 1. Select the desired recorder(s).
IPDirector - Version 6.00 - User Manual - General Workspace 3. To stop the recording, right-click the recorder and select Stop XT Ingest. In Recorder View To start/stop the recording of an XT clip from the Rec View, proceed as follows: 1. Select the desired recorder(s). Use SHIFT+click or CTRL+click to select multiple recorders. 2. Right-click and select Start Ingest on Selected Channels. OR Click the Record Now button 3.
EVS Broadcast Equipment S.A. - November 2012 Issue 6.00.B Hi-res Stream Lo-res Stream Depending on the settings, the resulting file is named automatically or the New Schedule window appears for you to enter a name. 3. Once a stream is running, it can be stopped or killed from the Channel Explorer as well. Right-click the stream and select the desired option: 4.6. Channels Associations 4.6.1.
IPDirector - Version 6.00 - User Manual - General Workspace OR press + 3. The ganged channels will have an 4. Channel Explorer icon next to them to signify their new status.
EVS Broadcast Equipment S.A. - November 2012 Issue 6.00.B 4. To add more channels to a group: select all channels of the group and the new channel, right-click and select Gang again. You can have many different ganged channel groups with a number of channels per group, performing different tasks on a production. Each of the linking icons will have a number next to it in the Channel Explorer to indicate which group the channel belongs to. 4.6.2.
IPDirector - Version 6.00 - User Manual - General Workspace 2. Right-click one of the selected channels 3. Select Pgm/Prv. OR press + . 4. The channels are now shown with the PGM and PRV annotations. Note You can only make a PGM/PRV pair of PGM1-PGM2 or PGM3-PGM4 on any EVS server. PGM1 or PGM3 are always the PGM channels and PGM2 or PGM4 will always be the PRV channels. 4.6.4.
EVS Broadcast Equipment S.A. - November 2012 Issue 6.00.B OR press + . 4. The channels are now shown with the Fill 120 and Key icons: 4.
IPDirector - Version 6.00 - User Manual - General Workspace The association will also be reflected in the title bar of the Control panels. Note The first channel you select will become the Fill and the second one the Key. 4.6.5. How to Lock Player Channels for Timeline Mode The IPEdit module requires two player channels to function. This pair of player channels is called the Timeline Engine.
EVS Broadcast Equipment S.A. - November 2012 Issue 6.00.B The Timeline Lock can be activated from the Channel Explorer. To do so, proceed as follows: 1. Select two channels with SHIFT+click or CTRL+click. 2. Right-click a channel. 3. Select Lock Timeline. Note The Lock Timeline mode is not automatically deactivated when the user leaves IPEdit. It needs to be deactivated manually in the Channel Explorer. 4.6.6.
IPDirector - Version 6.00 - User Manual - General Workspace 3. Right-click the selected channel group 4. Select AB Roll Playlist from the contextual menu. 5. The Configure AB Roll Playlist channel association window opens: 6. In this window you can edit the channel letters in the left column of the table, if so desired. 7. Click OK to accept the presented allocation. The selected channels are now marked with the "Ganged" icon and ready to be used as an AB Roll Playlist channel group: 4.
EVS Broadcast Equipment S.A. - November 2012 4.7. Issue 6.00.B Displaying Information on the OSD The information to display on screen is set in the OSD Settings window. See section "OSD Settings" on page 42. To turn the OSD ON or OFF from the Channel Explorer, proceed as follows: 1. From the Tree view or the Player view, right-click the player channel for which you want to display the OSD information. A contextual menu appears. 2. Select OSD Information on Monitor. The information is displayed on screen.
IPDirector - Version 6.00 - User Manual - General Workspace 4.8.2. How to Launch a Different Predefined Server Configuration It is possible to launch another predefined server configuration provided that you have the appropriate user right. To do so, proceed as follows: 1. Right-click a server name in the Channel Explorer. 2. Select Restart Server from the contextual menu. The Server Configuration window opens: 4.
EVS Broadcast Equipment S.A. - November 2012 Issue 6.00.B On the left, the Application List displays the list of applications available on the selected server and sorted in the same order as in the EVS menu. The application currently launched in Multicam is displayed in red. On the right, the parameters corresponding to the selected configuration are displayed. 3. (optional) If you want to select another server, right-click the Server Name field and choose a server: 4.
IPDirector - Version 6.00 - User Manual - General Workspace The corresponding parameters are displayed in the Application parameters pane. The background button turns blue. 5. Click the Select and Restart Server button to apply the new configuration. 4.8.3. Multicam Web Setup Tool It is possible to access the Multicam Web Setup Tool from IPDirector. To do so, proceed as follows: 1. Right-click a server name in the Channel Explorer. 2. Select Configure Server from the contextual menu.
EVS Broadcast Equipment S.A. - November 2012 5. On-Screen Display 5.1. Configuration and Activation Issue 6.00.B The information to display on a monitor is set in the OSD Settings window. It is defined for each playout channel. This does not apply to recorder channels or software player. See section "OSD Settings" on page 42. The OSD can be turned ON or OFF in several ways: 5.2.
Corporate +32 4 361 7000 North & Latin America +1 973 575 7811 EVS Headquarters Liège Science Park 16, rue Bois St Jean B-4102 Seraing Belgium To learn more about EVS go to www.evs.com Asia & Pacific +852 2914 2501 Other regional offices www.evs.com/contact EVS Broadcast Equipment is continuously adapting and improving its products in accordance with the ever changing requirements of the Broadcast Industry. The data contained herein is therefore subject to change without prior notice.