
User's Manual Instruction Manual


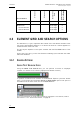


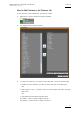
Table Of Contents
- Copyright
- Disclaimer
- Improvement Requests
- Regional Contacts
- User Manuals on EVS Website
- 1. Introduction
- 2. User Interface
- 2.1 OPENING OF DATABASE EXPLORER
- 2.2 OVERVIEW OF THE DATABASE EXPLORER
- 2.3 DATABASE EXPLORER TOOLBAR
- 2.4 TREE VIEW
- 2.5 ELEMENT GRID AND SEARCH OPTIONS
- 2.6 STATUS BAR
- Clips, Clip Elements and Nearline Files
- 4. Clips View
- 4.1 INTRODUCTION
- 4.2 UNDERSTANDING CLIP STRUCTURE ON AN EVS VIDEO SERVER
- 4.3 VIRTUAL LSM ID / REAL LSM ID
- 4.4 CLIP TREE STRUCTURE
- 4.5 CLIP DATA COLUMNS
- 4.6 CLIP CONTEXTUAL MENU
- 4.7 DELETING A CLIP
- 4.8 EDITING A CLIP
- 4.9 COPYING OR MOVING A CLIP
- 4.10 SENDING A CLIP TO A DESTINATION TARGET
- 4.10.1 Send To Menu
- 4.10.2 How to Send a Clip to the Default Archive
- 4.10.3 How to Send a Clip to a Destination Folder (Destination Target)
- 4.10.4 How to Add a Destination Target
- 4.10.5 How to Delete a Destination Target
- 4.10.6 How to Send a Clip to an XStore Workstation (Running CleanEdit Applications)
- 4.10.7 How to Send a Clip to an Avid System Using the AVID Transfer Manager
- 4.10.8 Transfer Monitoring
- 4.11 HOW TO MODIFY THE T/C IN OR THE DATE OF A CLIP
- 4.12 PUBLISHING A CLIP
- 4.13 LINKING CLIPS
- 5. Clip Elements View
- 6. Playlists View
- 7. Timelines View
- 8. Bins View
- 9. Logs View
- 9.1 INTRODUCTION
- 9.2 LOGS TREE STRUCTURE
- 9.3 HOW TO CREATE A LOGS DIRECTORY
- 9.4 HOW TO RENAME A LOGS DIRECTORY
- 9.5 HOW TO DELETE A LOGS DIRECTORY
- 9.6 HOW TO PUBLISH A LOG DIRECTORY OR A LOG SHEET
- 9.7 HOW TO VIEW THE LOG DIRECTORY OR LOG SHEET PROPERTIES
- 9.8 HOW TO DELETE A LOG DIRECTORY OR A LOG SHEET
- 9.9 HOW TO EXPORT A LOG SHEET FROM THE TREE
- 9.10 HOW TO EXPORT A LOGGING PROFILE FROM THE TREE
- 9.11 PRINTING A LOG SHEET
- 9.12 LOG EVENT COLUMNS
- 10. Media Files View
- 11. Searching the Database
- 12. Loading and Playing Media from the Database Explorer
- 13. Database Explorer Shortcuts

IPDirector Version 5.9
–
User Manual
–
Part 3: Browsing
EVS Broadcast Equipment – January 2011
Issue 5.9.B
9
Option Description
Limit Result count When enabled, the Limit Result Count option will limit the
results of any search to the number of elements defined in
the IPDirector Remote Installer (1000 elements by default).
Refer to the Technical Reference Manual for more
information.
Insert mode A submenu proposes the following options:
• First: new items will be inserted at the top of a list
• Last: new items will be inserted at the bottom of a list
• First Display: new items will be inserted at the top of the
visible part of a list
• Sorted: new items will be inserted at their sorted position
in a list
Transfer
Monitoring
Transfer monitoring is explained in section ‘Transfer
Monitoring’ on page 51.
Av
ailable for administrators and users with appropriate user
rights.
My transfer only When enabled, this option will make sure that you can only
see the transfers that you initiated.
Clip element
association
Enables to manually associate a clip element to an existing
clip with matching TC. See procedure hereafter.
How to Manually Associate a Clip Element to an Existing Clip
To manually associate a clip element and an existing clip with matching TC,
proceed as follows:
1. In the Database Explorer grid, select a clip.
2. In the Database Explorer Tools menu, select Clip Element Association.
The Clip Element Association window opens.
3. Drag the clip line on the Name field of the Clip Element Association window.
Fields are automatically filled with clip information.
4. In the Database Explorer grid, select a clip element.
5. Drag the clip element line on the right pane of the Clip Element Association
window.
The association is created.
Note
Both LTC and USER TC must match for the association to be accepted.