
User's Manual Owner's manual
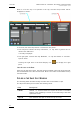

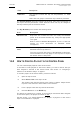


Table Of Contents
- Copyright
- Disclaimer
- Improvement Requests
- Regional Contacts
- Part 1: General Workspace
- Part 2: Logging
- Part 3: Browsing
- Part 4: Ingest
- Part 5: Playout – Control Panel
- Part 6: Playout – Playlist Panel
- Part 7: Editing
- 1. Player Control Panel
- 1.1 INTRODUCTION
- 1.2 USER INTERFACE
- 1.2.1 Opening of Control Panel
- 1.2.2 Overview of the Control Panel
- 1.2.3 Views of The Control Panel
- 1.2.4 Channel Media Pane
- 1.2.5 Transport Functions Pane
- Time Information Group Box
- Left Timecode Field
- Right Duration field
- Play Mode Button
- Browsing within Video Material with the ShuttlePRO
- Jog Bar
- Playlist Element Tags
- Play Button
- Custom Speed Field
- Pause Button
- Fast Rewind Button
- Fast Forward Button
- E/E Button
- Direct Access Buttons to the Trains on the ShuttlePRO
- Snap Button
- Ret Button
- 1.2.6 Clip Creation Pane
- 1.2.7 Clip Information Tab
- 1.2.8 Metadata Tab
- 1.2.9 Ganged Channels Tab
- 1.2.10 Clip-List Tab
- 1.2.11 Control Panel Contextual Menu
- 1.2.12 Settings
- 1.2.13 Control Panel Shortcuts
- 1.3 ASSIGNING A CHANNEL OR THE SOFTWARE PLAYER
- 1.4 LOADING MEDIA
- 1.5 MOVING WITHIN MEDIA
- 1.6 CREATING MEDIA
- 1.7 EDITING MEDIA
- 1.7.1 How to Rename a Loaded Clip
- 1.7.2 How to Modify Playlist Information or Rename a Loaded Playlist
- 1.7.3 How to Edit a Clip Duration
- 1.7.4 Modifying a Playlist Element
- 1.7.5 How to Move Elements Within a Playlist
- 1.7.6 Adding Elements to a Playlist
- 1.7.7 How to Remove Elements From a Playlist
- 1.7.8 Applying a Macro Command on a Playlist Element
- 1.8 DELETING MEDIA
- 1.9 USING KEYWORDS & METADATA
- 1.10 PUBLISHING AND TRANSFERRING MEDIA
- 1.10.1 How to Publish a Clip to a User Group
- 1.10.2 How to Send a Clip to an External Destination
- 1.10.3 How to Send a Playlist to an External Destination
- 1.10.4 How to Export a Playlist
- 1.10.5 How to Export a Part of an Element to a target From the ShuttlePro
- 1.10.6 How to Export a Part of an Element to a target From the Control Panel
- 1.10.7 How to Import a Playlist
- 1.10.8 How to Restore a File to an EVS Video Server
- 1.11 USING GANGED CHANNELS
- Software Player
- Video Display
Issue 5.8.B IPDirector Version 5.8
–
User Manual
–
Part 5: Playout
–
Player Control Panel
EVS Broadcast Equipment – July 2010
64
Field Description
Publish To User groups to which the clip can be published, i.e. made
available.
Select the user groups to which the clips should be published.
The Clip Information pane also displays the IN point, OUT point and duration of
the clip as read-only information. These timecode values can only be changed in
the Clip Creation pane of the Control Panel.
The Clip Metadata pane contains the following fields:
Field Description
Current Profile Drop-down list in which the users can modify the metadata
profile to be associated with the clip, if they have appropriate
user rights.
Refer to section ‘Metadata Management’ in part 1 of the user
manual for more information on Metadata Profile
management.
Metadata Profile
fields
Fields belonging to the Metadata Profile displayed in the
Metadata Profile drop-down list.
The user can modify the values of the Metadata profile fields.
The modifications will only apply to the clip and not impact
the default values of the profile.
1.6.3 HOW TO CREATE A PLAYLIST IN THE CONTROL PANEL
You can create simple playlists in the Control Panel.
To be able to create playlists in the Control Panel, you need to ensure that you
have assigned a channel to the Control Panel. See section 1.3 ‘Assigning a
Ch
annel or the Software Player’ on page 51.
To
create a playlist in the Control Panel, proceed as follows:
1. Open the Clip-List tab.
2. Select Menu > New in the Clip-List tab.
The Create a New Playlist window opens. Refer to chapter ‘Playlist Panel’
in part 6 of the manual for more details on this window.
3. Fill in a playlist name and any desired information.
4. Click the OK button or the ENTER key.
The playlist is created but it is empty. In case a player channel has been assigned
to the control panel, the playlist is created on-line.
See the section 1.7.6 ‘Adding Elements to a Playlist’ on page 67 for the various
ways to add elements to a playlist.