
User's Manual Owner's manual
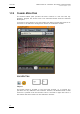
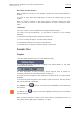

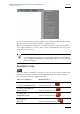


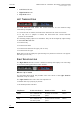


Table Of Contents
- Copyright
- Disclaimer
- Improvement Requests
- Regional Contacts
- Part 1: General Workspace
- Part 2: Logging
- Part 3: Browsing
- Part 4: Ingest
- Part 5: Playout – Control Panel
- Part 6: Playout – Playlist Panel
- Part 7: Editing
- 1. Player Control Panel
- 1.1 INTRODUCTION
- 1.2 USER INTERFACE
- 1.2.1 Opening of Control Panel
- 1.2.2 Overview of the Control Panel
- 1.2.3 Views of The Control Panel
- 1.2.4 Channel Media Pane
- 1.2.5 Transport Functions Pane
- Time Information Group Box
- Left Timecode Field
- Right Duration field
- Play Mode Button
- Browsing within Video Material with the ShuttlePRO
- Jog Bar
- Playlist Element Tags
- Play Button
- Custom Speed Field
- Pause Button
- Fast Rewind Button
- Fast Forward Button
- E/E Button
- Direct Access Buttons to the Trains on the ShuttlePRO
- Snap Button
- Ret Button
- 1.2.6 Clip Creation Pane
- 1.2.7 Clip Information Tab
- 1.2.8 Metadata Tab
- 1.2.9 Ganged Channels Tab
- 1.2.10 Clip-List Tab
- 1.2.11 Control Panel Contextual Menu
- 1.2.12 Settings
- 1.2.13 Control Panel Shortcuts
- 1.3 ASSIGNING A CHANNEL OR THE SOFTWARE PLAYER
- 1.4 LOADING MEDIA
- 1.5 MOVING WITHIN MEDIA
- 1.6 CREATING MEDIA
- 1.7 EDITING MEDIA
- 1.7.1 How to Rename a Loaded Clip
- 1.7.2 How to Modify Playlist Information or Rename a Loaded Playlist
- 1.7.3 How to Edit a Clip Duration
- 1.7.4 Modifying a Playlist Element
- 1.7.5 How to Move Elements Within a Playlist
- 1.7.6 Adding Elements to a Playlist
- 1.7.7 How to Remove Elements From a Playlist
- 1.7.8 Applying a Macro Command on a Playlist Element
- 1.8 DELETING MEDIA
- 1.9 USING KEYWORDS & METADATA
- 1.10 PUBLISHING AND TRANSFERRING MEDIA
- 1.10.1 How to Publish a Clip to a User Group
- 1.10.2 How to Send a Clip to an External Destination
- 1.10.3 How to Send a Playlist to an External Destination
- 1.10.4 How to Export a Playlist
- 1.10.5 How to Export a Part of an Element to a target From the ShuttlePro
- 1.10.6 How to Export a Part of an Element to a target From the Control Panel
- 1.10.7 How to Import a Playlist
- 1.10.8 How to Restore a File to an EVS Video Server
- 1.11 USING GANGED CHANNELS
- Software Player
- Video Display

Issue 5.8.B IPDirector Version 5.8
–
User Manual
–
Part 5: Playout
–
Player Control Panel
EVS Broadcast Equipment – July 2010
14
On-Air Display
This functionality is used to show that the loaded channel or the Software Player
is on air and to inform other users that they should not perform any action on the
on-air channel.
Activation and Deactivation
Right-click the Channel field and select On Air from the menu to activate the on-
air status. The background of the field will then flash alternately red.
To deactivate the on-air function, right-click the Channel field and uncheck On Air
from the menu.
GPI Associated to the On-Air Status
An INPUT GPI for the Tally (on-air function) can be defined in the setup of the
EVS video server and associated to IPDirector. The user can then assign the
‘Tally’ function via the main menu Tools > Settings > Input GPI category. In this
case, the on-air status will flash red when the EVS server receives the
corresponding GPI pulse. The IPDirector users will no longer be able to control
the on-air function.
Refer to section ‘Settings’ in part 1 of the manual for more information on how to
define Input GPI.
Secondary Control mode
Exclusive control of any channel by a third party protocol (switcher, editor
controller or 3
rd
party device) can be achieved using the 2
nd
Controller feature of a
Control Panel. This feature allows switching the control between IPDirector and
the other device, when the port and protocol settings have been assigned to work
in Exclusive mode.
You can toggle the control between the Control Panel and the secondary control
device via the 2
nd
Controller option in the contextual menu available on the player
channel name: