
User's Manual User guide

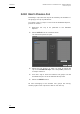
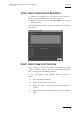
Table Of Contents
- Copyright
- Disclaimer
- Improvement Requests
- Part 1: Introduction
- Part 2: Logging and Browsing
- Part 3: Ingest and Play-Out
- Part 4: System Management and Troubleshooting
- 1. IP Logger
- 1.1 INTRODUCTION
- 1.2 CREATING A LOG SHEET WITH IP LOGGER
- 1.3 USING KEYWORDS WITH LOGS
- 1.4 IP LOGGER FILE MENU
- 1.4.1 Opening an Existing Log Sheet
- 1.4.2 Updating the Log Sheet Attributes
- 1.4.3 Importing an Existing Log Sheet
- 1.4.4 Exporting an Existing Log Sheet
- 1.4.5 How to Import a Logging Profile
- 1.4.6 XML Logging Profile
- 1.4.7 Exporting a Current Logging Profile
- 1.4.8 How to Delete a Logging Profile
- 1.4.9 How to Print a Log Sheet
- 1.4.10 Print Log Sheet Window
- 1.5 IP LOGGER TOOLS MENU
- 1.6 CREATING EVENTS ON A LOG SHEET
- 1.6.1 How to Log LIVE Action in an Event
- 1.6.2 Fields in the Create a New Log Window
- 1.6.3 How to Add Keywords Specifically to a Log Entry
- 1.6.4 How to Modify Automatic Keywords Added to Log Entries
- 1.6.5 How to Assign a Playback Channel For Use With IP Logger
- 1.6.6 Editing and Deleting a Log Entry
- 1.6.7 How to Edit Log Entries in the Log Sheet
- 1.6.8 How to Edit the Timecode of a Log Entry
- 1.6.9 How to View a Event on a Log
- 1.6.10 How to Recall an Associated Clip
- 1.6.11 How To Make Automatic Clips Based on a Logged Event
- 1.7 IP LOGGER COLUMN HEADINGS
- 1.8 IP LOGGER SHORTCUTS
- 2. Keyword Management
- 2.1 INTRODUCTION
- 2.2 KEYWORD LIST TOOL
- 2.2.1 How to Open the Keyword List Tool
- 2.2.2 How to Add Keywords
- 2.2.3 Keyword Types
- 2.2.4 Changing the Keywords Type
- 2.2.5 How to Rename Keywords
- 2.2.6 How to Delete Keywords
- 2.2.7 Keywords Display Options
- 2.2.8 Refresh List
- 2.2.9 Rules for Keyword File Import
- 2.2.10 How to Import Keywords
- 2.2.11 How to Cancel the Last Keyword Import
- 2.2.12 How to Export Keywords
- 2.3 KEYWORD GRID TOOL
- 2.4 DICTIONARY TOOL
- 2.4.1 Keyword Dictionary Menu
- 2.4.2 How to Create a Dictionary
- 2.4.3 How to Add New Keywords in a Dictionary
- 2.4.4 How to Add Existing Keywords in a Dictionary
- 2.4.5 How to Move Keywords in a Dictionary
- 2.4.6 How to Delete Keywords in a Dictionary
- 2.4.7 How to Change the Keywords Type
- 2.4.8 Renaming Keywords
- 2.4.9 Description View Option
- 2.4.10 Dictionary and Grid Editing
- 3. Database Explorer
- 3.1 INTRODUCTION
- 3.2 CLIPS
- 3.2.1 Understanding XT Clip Structure
- 3.2.2 Clips Tree Structure
- 3.2.3 Clip Data Column Headings
- 3.2.4 Clip Contextual Menu
- 3.2.5 How to Edit a Clip From Within the Database Explorer
- 3.2.6 Edit Clip Window
- 3.2.7 How to Copy or Move a Clip Within Database Explorer
- 3.2.8 How to Send a Clip to the Default Archive
- 3.2.9 How to Send a Clip to A Destination Folder (Destination Target)
- 3.2.10 How to Add a Destination Target
- 3.2.11 New Archive Target Window
- 3.2.12 How to Delete a Destination Target
- 3.2.13 How to Send a Clip to an XStore Workstation (Running Clean-Edit Applications)
- 3.2.14 How to Send a Clip to an AVID System Using the Transfer Manager
- 3.2.15 Monitoring Transfers
- 3.2.16 Transfer History
- 3.2.17 How to Modify the T/C in or the Date of a Clip
- 3.2.18 How to Publish a Clip
- 3.2.19 How to View the Clip Properties
- 3.2.20 How to Link Clips Together
- 3.2.21 How to Create a Fill and Key Relationship Between Clips
- 3.3 PLAY-LISTS
- 3.4 BINS
- 3.5 LOGS
- 3.5.1 Introduction
- 3.5.2 Logs Tree Structure
- 3.5.3 How to Publish a Log Directory or a Log Sheet
- 3.5.4 How to View the Log Directory Properties
- 3.5.5 How to Delete a Log Sheet From the Tree
- 3.5.6 How to Export a Log Sheet From the Tree
- 3.5.7 How to Export a Logging Profile From the Tree
- 3.5.8 How to Print a Log Sheet
- 3.5.9 Logs Data Column Headings
- 3.6 VIEWING, BROWSING AND SEARCH OPTIONS
- 3.7 DATABASE EXPLORER TOOLS
- 3.8 DATABASE EXPLORER SHORTCUTS
- 4. Mini Database Explorer
- A
- B
- C
- D
- E
- F
- H
- I
- K
- L
- M
- O
- P
- R
- S
- T
- U
- V
- X
Issue 4.3.C
IP Director Version 4.3 – User Manual – Part 2 – Logging and Browsing
EVS Broadcast Equipment
70
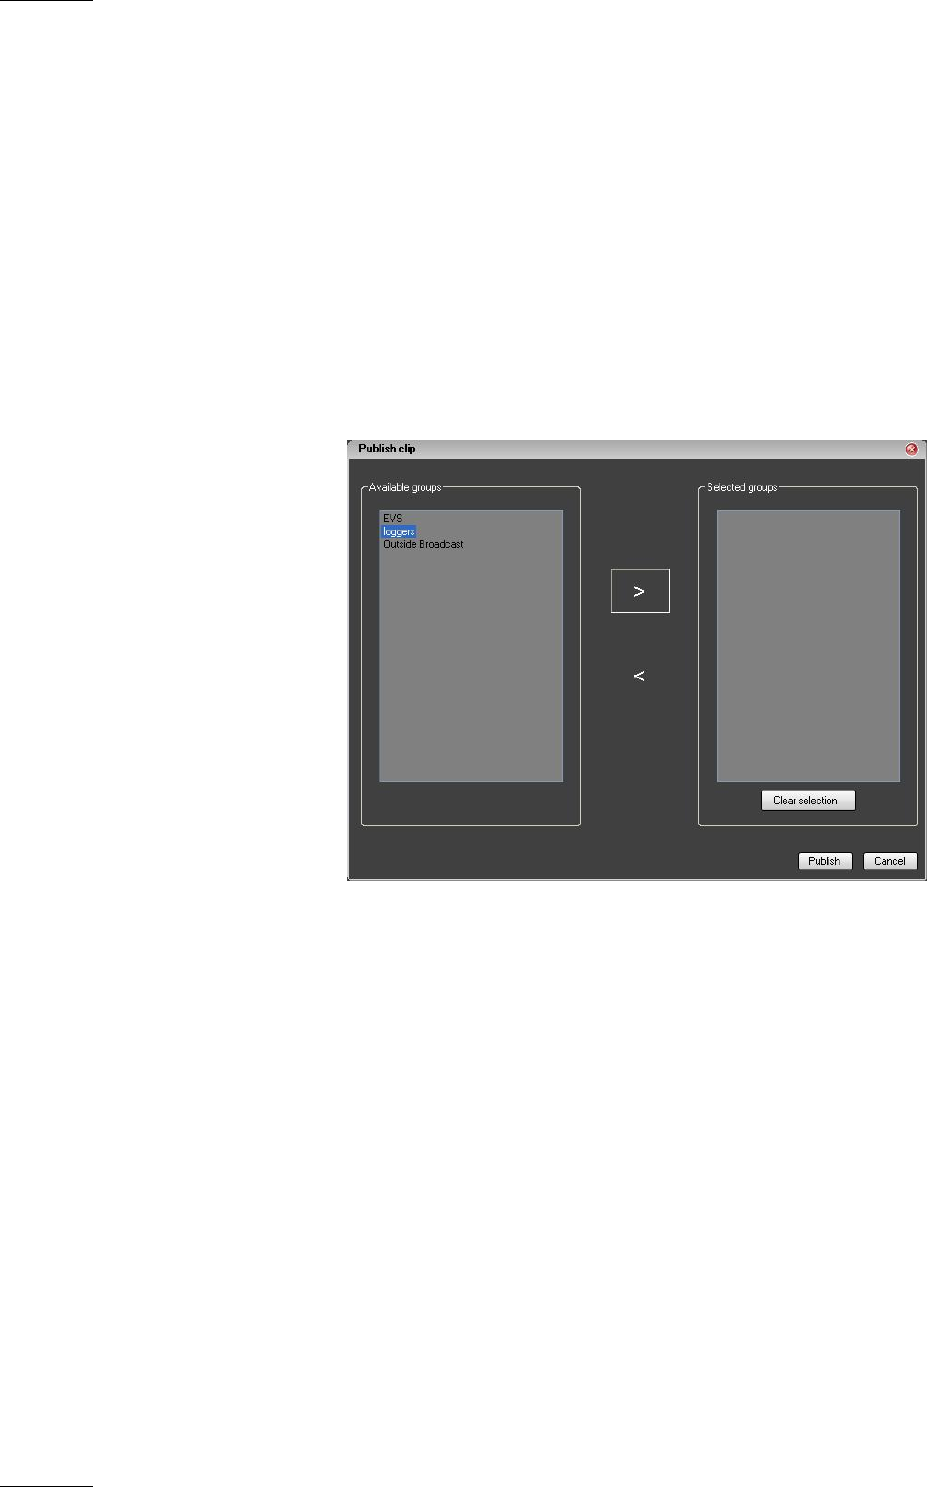
3.2.18 HOW TO PUBLISH A CLIP
Publishing a clip means the clip will be visible by the members of
the group(s) the clip is published to.
To publish a clip to groups of users from the Database Explorer,
proceed as follows:
1. Right-click the clip to be published in the Database
Explorer.
2. Select Publish from the contextual menu.
The Publish Clip window opens.
3. Select the user group(s) to which you want to publish the
clip in the Available Groups area. Keep CTRL pressed for
a multiple selection.
4. Click the > sign to move the selected user groups from the
Available Groups area to the Selected Groups area.
5. Select the Publish button.
All users belonging to the selected user groups and having
visibility rights on the clips will be able to view the clip.