
User's Manual User guide

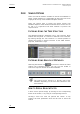
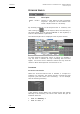
Table Of Contents
- Copyright
- Disclaimer
- Improvement Requests
- Part 1: Introduction
- Part 2: Logging and Browsing
- Part 3: Ingest and Play-Out
- Part 4: System Management and Troubleshooting
- 1. IP Logger
- 1.1 INTRODUCTION
- 1.2 CREATING A LOG SHEET WITH IP LOGGER
- 1.3 USING KEYWORDS WITH LOGS
- 1.4 IP LOGGER FILE MENU
- 1.4.1 Opening an Existing Log Sheet
- 1.4.2 Updating the Log Sheet Attributes
- 1.4.3 Importing an Existing Log Sheet
- 1.4.4 Exporting an Existing Log Sheet
- 1.4.5 How to Import a Logging Profile
- 1.4.6 XML Logging Profile
- 1.4.7 Exporting a Current Logging Profile
- 1.4.8 How to Delete a Logging Profile
- 1.4.9 How to Print a Log Sheet
- 1.4.10 Print Log Sheet Window
- 1.5 IP LOGGER TOOLS MENU
- 1.6 CREATING EVENTS ON A LOG SHEET
- 1.6.1 How to Log LIVE Action in an Event
- 1.6.2 Fields in the Create a New Log Window
- 1.6.3 How to Add Keywords Specifically to a Log Entry
- 1.6.4 How to Modify Automatic Keywords Added to Log Entries
- 1.6.5 How to Assign a Playback Channel For Use With IP Logger
- 1.6.6 Editing and Deleting a Log Entry
- 1.6.7 How to Edit Log Entries in the Log Sheet
- 1.6.8 How to Edit the Timecode of a Log Entry
- 1.6.9 How to View a Event on a Log
- 1.6.10 How to Recall an Associated Clip
- 1.6.11 How To Make Automatic Clips Based on a Logged Event
- 1.7 IP LOGGER COLUMN HEADINGS
- 1.8 IP LOGGER SHORTCUTS
- 2. Keyword Management
- 2.1 INTRODUCTION
- 2.2 KEYWORD LIST TOOL
- 2.2.1 How to Open the Keyword List Tool
- 2.2.2 How to Add Keywords
- 2.2.3 Keyword Types
- 2.2.4 Changing the Keywords Type
- 2.2.5 How to Rename Keywords
- 2.2.6 How to Delete Keywords
- 2.2.7 Keywords Display Options
- 2.2.8 Refresh List
- 2.2.9 Rules for Keyword File Import
- 2.2.10 How to Import Keywords
- 2.2.11 How to Cancel the Last Keyword Import
- 2.2.12 How to Export Keywords
- 2.3 KEYWORD GRID TOOL
- 2.4 DICTIONARY TOOL
- 2.4.1 Keyword Dictionary Menu
- 2.4.2 How to Create a Dictionary
- 2.4.3 How to Add New Keywords in a Dictionary
- 2.4.4 How to Add Existing Keywords in a Dictionary
- 2.4.5 How to Move Keywords in a Dictionary
- 2.4.6 How to Delete Keywords in a Dictionary
- 2.4.7 How to Change the Keywords Type
- 2.4.8 Renaming Keywords
- 2.4.9 Description View Option
- 2.4.10 Dictionary and Grid Editing
- 3. Database Explorer
- 3.1 INTRODUCTION
- 3.2 CLIPS
- 3.2.1 Understanding XT Clip Structure
- 3.2.2 Clips Tree Structure
- 3.2.3 Clip Data Column Headings
- 3.2.4 Clip Contextual Menu
- 3.2.5 How to Edit a Clip From Within the Database Explorer
- 3.2.6 Edit Clip Window
- 3.2.7 How to Copy or Move a Clip Within Database Explorer
- 3.2.8 How to Send a Clip to the Default Archive
- 3.2.9 How to Send a Clip to A Destination Folder (Destination Target)
- 3.2.10 How to Add a Destination Target
- 3.2.11 New Archive Target Window
- 3.2.12 How to Delete a Destination Target
- 3.2.13 How to Send a Clip to an XStore Workstation (Running Clean-Edit Applications)
- 3.2.14 How to Send a Clip to an AVID System Using the Transfer Manager
- 3.2.15 Monitoring Transfers
- 3.2.16 Transfer History
- 3.2.17 How to Modify the T/C in or the Date of a Clip
- 3.2.18 How to Publish a Clip
- 3.2.19 How to View the Clip Properties
- 3.2.20 How to Link Clips Together
- 3.2.21 How to Create a Fill and Key Relationship Between Clips
- 3.3 PLAY-LISTS
- 3.4 BINS
- 3.5 LOGS
- 3.5.1 Introduction
- 3.5.2 Logs Tree Structure
- 3.5.3 How to Publish a Log Directory or a Log Sheet
- 3.5.4 How to View the Log Directory Properties
- 3.5.5 How to Delete a Log Sheet From the Tree
- 3.5.6 How to Export a Log Sheet From the Tree
- 3.5.7 How to Export a Logging Profile From the Tree
- 3.5.8 How to Print a Log Sheet
- 3.5.9 Logs Data Column Headings
- 3.6 VIEWING, BROWSING AND SEARCH OPTIONS
- 3.7 DATABASE EXPLORER TOOLS
- 3.8 DATABASE EXPLORER SHORTCUTS
- 4. Mini Database Explorer
- A
- B
- C
- D
- E
- F
- H
- I
- K
- L
- M
- O
- P
- R
- S
- T
- U
- V
- X

IP Director Version 4.3 – User Manual – Part 2: Logging and Browsing
EVS Broadcast Equipment
Issue 4.3.C
99
TRANSPORT FUNCTIONS IN AUTO-CHAIN MODE
Various transport functions are available in auto-chain mode to
shift the auto-chain play mode on to a clip than is not the next
one in the sequence.
The transport functions are executed in the following way:
Double-click: Double-clicking a clip preloads it onto the
player channel. The operator needs to use the
Play shortcut (P) to play the clip.
Click: Clicking a clip loads it onto the player channel
and plays it immediately.
CTRL+Click: Clicking a clip with the CTRL key pressed
plays the selected clip when the current one is
played out.
USING AUTO-CHAIN MODE IN SEVERAL
DATABASE EXPLORER WINDOWS
The operator can open several Database Explorer windows and
use them in auto-chain mode with the same player channel or
with different player channel assigned.
If different players are assigned, they will be considered as
independent from each other. Using the auto-chain mode in one
of the window will not affect the second open Database Explorer
window.
If the same player is assigned, the Data Explorer window on
which the auto-chain mode has been used last is considered as
the master window. It has the lead over the player channel.
Using two Database Explorer windows assigned to the same
player channel leads to the following possible situations:
• When the operator performs a search on the master
Database Explorer window, the current clip is played out and
the first clip of the search results is automatically chained.
• When the operator performs a search in the secondary Data
Explorer window, this does not impact the auto-chain in the
master window. The operator needs to activate the auto-
chain to take the lead over the player channel and start
playing the clips in auto-chain mode.