User's Manual - PART 2 - Version 4.3 - October 2007 Video Production Management Software www.evs.
C OPYRIGHT EVS Broadcast Equipment – Copyright © 2005-2007. All rights reserved. D ISCLAIMER The inform ation in this manual is furnished for inform ational use only and subject to change without notice. While every effort has been made to ensure that the information contained in this user manual is accurate, up-to-date and reliable, EVS Broadcast Equipment cannot be held responsible for inaccuracies or errors that may appear in this publication.
Issue 4.3.C ii IP Director Version 4.
IP Director Version 4.3 – User Manual – Part 2: Logging and Browsing EVS Broadcast Equipment Issue 4.3.C Table of Contents 1. 1.1 1.2 IP Logger ............................................................................................................... 1 1.2.1 1.2.2 1.2.3 1.2.4 1.2.5 Introduction............................................................................................................................. 1 Creating a Log sheet with IP Logger...........................................
Issue 4.3.C 2.2.4 2.2.5 2.2.6 2.2.7 2.2.8 2.2.9 2.2.10 2.2.11 2.2.12 EVS Broadcast Equipment Changing the Keywords Type........................................................................................................ 33 How to Rename Keywords ............................................................................................................ 33 How to Delete Keywords ...............................................................................................................
IP Director Version 4.3 – User Manual – Part 2: Logging and Browsing EVS Broadcast Equipment 3.3.4 3.3.5 3.3.6 Issue 4.3.C Play-List Contextual Menu............................................................................................................. 74 How to Delete A Play-List .............................................................................................................. 77 Play-List Imports...........................................................................................
Issue 4.3.C 4.5.3 4.5.4 4.6 vi IP Director Version 4.3 – User Manual – Part 2 – Logging and Browsing EVS Broadcast Equipment How to Create and Store a Search Filter..................................................................................... 124 How to Apply a Search in The Mini Database Explorer ............................................................... 125 Mini Database Explorer Shortcuts ......................................................................................
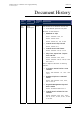
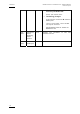
IP Director Version 4.3 – User Manual – Part 2: Logging and Browsing Issue 4.3.C EVS Broadcast Equipment Document History Date Author Document Modifications Issue Oct. 2007 Anne Delbruyère 4.3.C User manual for IP Director version 4.3. • User Manual split into four parts Sections on new features: • Metadata on clips Part 1: sections 2.2.5, 2.7 Part 2: section 3.2.6 Part 3: section 4.7, 4.9, 4.19.3 • Control Panel: Clip-List tab Part 3, section 4.
IP Director Version 4.3 – User Manual – Part 2 – Logging and Browsing Issue 4.3.C EVS Broadcast Equipment • Play-List Editor: contextual menu from Play-List Name field Part 3: new section 6.6.5 • Terminology changes Control Panel: View pane Î Channel Media pane Layout: Layout pane, Layout toolbar and Layout shortcuts Mini Database Explorer: Object list Î Element list viii Sep. 2007 Mike Davis, 4.3.B James Stellpflug, Martin Tirtiaux Reviews and comments modified sections. Sep.
IP Director Version 4.3 – User Manual – Part 2: Logging and Browsing Issue 4.3.C EVS Broadcast Equipment About this Manual This manual is intended to cover all aspects of IP Director. It should be seen as a reference guide that provides a detailed description on the various modules of IP Director, as well as procedural inform ation on how to work with the IP Director system. The user manual for IP Director Version 4.
IP Director Version 4.3 – User Manual – Part 2 – Logging and Browsing Issue 4.3.C EVS Broadcast Equipment Chapter Description assign keywords to logs or clips in a unified manner. Assigning keywords to logs and clips make it possible to search on the video material stored on the XNet network and easily find it back.
IP Director Version 4.3 – User Manual – Part 2: Logging and Browsing Issue 4.3.C EVS Broadcast Equipment Chapter Description Play-List Editor This chapter describes the Play-List Editor module that allows complex play-lists to be made, modified and played to air using an efficient workflow.
IP Director Version 4.3 – User Manual – Part 2: Logging and Browsing Issue 4.3.C EVS Broadcast Equipment 1. IP Logger 1.1 INTRODUCTION IP Logger can be used to create a log which relates events with timecodes, camera angles, clip numbers and metadata in a fast and efficient way. In this way, IP Logger does not interfere with, but compliments a live production, while also producing invaluable data for use of the material during or after the event.
IP Director Version 4.3 – User Manual – Part 2 – Logging and Browsing Issue 4.3.C EVS Broadcast Equipment Each step is concisely described on screen to assist in defining the characteristics of the log sheet. The user accesses the window specific to the step by clicking the corresponding button. 1.2.
IP Director Version 4.3 – User Manual – Part 2: Logging and Browsing Issue 4.3.C EVS Broadcast Equipment G ENERAL L OG S HEET I NFORMATION Option Description Name Name of the log sheet. This is a mandatory field. Parent Name of the folder in which the log sheet is to be filed in the tree structure of the Database Explorer. Browsing in this field displays the folders already created in the Logs section of the Database Explorer, allowing the users to select the requested folder.
IP Director Version 4.3 – User Manual – Part 2 – Logging and Browsing Issue 4.3.C EVS Broadcast Equipment 1.2.2 STEP 2: DEFINING THE LOG SHEET KEYWORDS The Log Sheet Keywords window opens when you click the button beside the Step 2 indication. A list of all keyw ords available in the IP Director database is displayed in the Keyword List box. By associating any of these with the log sheet, each event logged will have these as an additional set of keywords.
IP Director Version 4.3 – User Manual – Part 2: Logging and Browsing Issue 4.3.C EVS Broadcast Equipment F IELDS IN THE L OG S HEET K EYWORD D EFINITION WINDOW The following table describes the fields available in the Log Sheet Keyword Definition window: Field Description Search for Keyword (left) Allows the user to search for a keyword in the Keyword List box. Type the beginning of the keyword searched for and the first keyword matching the search criteria will be highlighted.
IP Director Version 4.3 – User Manual – Part 2 – Logging and Browsing Issue 4.3.C EVS Broadcast Equipment H OW TO A SSOCIATE P ARENT K EYWORDS TO A L OG S HEET To associate parent keywords to the log sheet, proceed as follows: 1. In the Keyword List box, select the keywords that you want to add to the log sheet using CTRL (+SHIFT) for multiple selection. 2. Click the Add button. The keywords selected in the Keyword List box are added to the Keyword Selection box. 3. Click the OK button.
IP Director Version 4.3 – User Manual – Part 2: Logging and Browsing EVS Broadcast Equipment Issue 4.3.C D EFINING A P REVIEW R ECORDER The preview recorder definition is used to provide the timecode displayed in the LIVE area of the log sheet. It will also be the angle selected when the operator double-clicks on an event in a log that loads to an associated channel for viewing.
IP Director Version 4.3 – User Manual – Part 2 – Logging and Browsing Issue 4.3.C EVS Broadcast Equipment 1.2.5 LOG SHEET READY FOR USE When the wizard has been completed it will show its name and a running timecode in yellow in the LIVE area. Note If running timecode is not displayed in the LIVE area, it means the preview recorder is located on a server with no RS-422 connection to the IP Director network.
IP Director Version 4.3 – User Manual – Part 2: Logging and Browsing EVS Broadcast Equipment 1.3 Issue 4.3.C USING KEYWORDS WITH LOGS Three types of keywords can be assigned to a log element in a log sheet: 1.3.1 PARENT KEYWORDS Definition The parent keywords are defined when the users create the log sheet, in the step 2 of the Log Sheet wizard (i.e. in the Log Sheet Keyword Definition window). Assignment The parent keywords are autom atically assigned to all log entries of a log sheet.
IP Director Version 4.3 – User Manual – Part 2 – Logging and Browsing Issue 4.3.C EVS Broadcast Equipment Each automatic keyword tag defined in a logging profile appears on the Automatic Keywords tab as a text field or as a drop-down list, depending on the field definition in the logging profile. Assignment The automatic keywords allow the users to assign keywords to log entries in a log sheet.
IP Director Version 4.3 – User Manual – Part 2: Logging and Browsing EVS Broadcast Equipment 1.3.3 Issue 4.3.C LOG ENTRY SPECIFIC KEYWORDS Definition It is possible to assign keywords to individual log entries. To do so it is necessary to have previously set up and named one or more keyword grids for use with the log sheet. Once set up, as many keyword grids can be used with a log as required.
IP Director Version 4.3 – User Manual – Part 2 – Logging and Browsing Issue 4.3.C EVS Broadcast Equipment 1.4 IP LOGGER FILE MENU 1.4.1 OPENING AN EXISTING LOG SHEET To open an existing log sheet, select the File > Open Log Sheet menu in IP Logger. 1.4.2 UPDATING THE LOG SHEET ATTRIBUTES To update the inform ation entered in the Log Sheet wizard, select the File > Properties menu. Select the relevant area of the wizard and make the changes. 1.4.
IP Director Version 4.3 – User Manual – Part 2: Logging and Browsing EVS Broadcast Equipment Issue 4.3.C Note Once the media has been restored or published on the XNet network, it will be automatically associated with the imported log sheet. The log sheet must be imported after the media has been restored or published. 1.4.4 EXPORTING AN EXISTING LOG SHEET If a log sheet is to be used within a different system, it can be exported using the Export command in File Menu in IP Logger.
IP Director Version 4.3 – User Manual – Part 2 – Logging and Browsing Issue 4.3.C EVS Broadcast Equipment 1.4.5 HOW TO IMPORT A LOGGING PROFILE To im port a logging file, proceed as follows: 1. Select the menu File > Import > A logging profile from the IP Logger application. The Import a Logging Profile window opens: 2. Click the Browse button next to the File Name field and browse for the location of the logging profile. 3.
IP Director Version 4.3 – User Manual – Part 2: Logging and Browsing Issue 4.3.C EVS Broadcast Equipment 1.4.6 XML LOGGING PROFILE The IP Logger has an optional method for incorporating user fields and automatic keywords into log sheets. To manage which data should be used in a log sheet being created, an XM L file is imported into the system.
IP Director Version 4.3 – User Manual – Part 2 – Logging and Browsing Issue 4.3.C EVS Broadcast Equipment An example of an XML Profile is show n below:
IP Director Version 4.3 – User Manual – Part 2: Logging and Browsing EVS Broadcast Equipment Issue 4.3.C Once imported to the IP Director database, the profile will remain available for all new log sheets being created. Logging profiles must also be exported with the log sheets when exporting to ensure the correct formatting is maintained when a log sheet is re-imported later. 1.4.7 EXPORTING A CURRENT LOGGING PROFILE In a later release, the logging profiles will be created from within IP Director.
IP Director Version 4.3 – User Manual – Part 2 – Logging and Browsing Issue 4.3.C EVS Broadcast Equipment 1.4.9 HOW TO PRINT A LOG SHEET To print a Log sheet, proceed as follows: 1. Load the log sheet via the File > Open Log Sheet menu 2. Open the Print Log Sheet window via the File > Print menu 3. Define the print options. For more information on the Print options, refer to the section 1.4.10 ‘Print Log Sheet Window’, on page 18. 4 Select the Print button.
IP Director Version 4.3 – User Manual – Part 2: Logging and Browsing Issue 4.3.C EVS Broadcast Equipment Option Description Default fields only appear in the header of the page the fields specified in the log sheet header are not repeated in each log record. They are only specified in the log sheet header. Selected This setting excludes the first radio button. Print header on every page When this check box is selected, the log sheet header is printed on every page.
IP Director Version 4.3 – User Manual – Part 2 – Logging and Browsing Issue 4.3.C EVS Broadcast Equipment 1.5 IP LOGGER TOOLS MENU 1.5.1 PROTECT ALL MEDIA ASSOCIATED TO LOGS Using the Protect All Media Associated to Logs command from the Tools menu, the users ensure that all events logged are within a clip on the relevant records. This will protect all media associated to the entire log sheet.
IP Director Version 4.3 – User Manual – Part 2: Logging and Browsing EVS Broadcast Equipment 1.5.4 Issue 4.3.C REFRESH GRID Selecting this menu command performs a refresh of the grid (log entry list) when necessary. 1.6 CREATING EVENTS ON A LOG SHEET 1.6.1 HOW TO LOG LIVE ACTION IN AN EVENT To create a new log entry in a loaded log sheet, proceed as follows: 1.
IP Director Version 4.3 – User Manual – Part 2 – Logging and Browsing Issue 4.3.C EVS Broadcast Equipment 1.6.2 FIELDS IN THE CREATE A NEW LOG WINDOW The following table describes the fields available in the Create a New Log window : 1.6.3 Field Description Level Rating A rating can be given to an event from no stars to ***. Description To add alphanumeric free text from the keyboard.
IP Director Version 4.3 – User Manual – Part 2: Logging and Browsing Issue 4.3.C EVS Broadcast Equipment The Keyword Grid or Dictionary is now active as the Apply button is highlighted in orange. 4. Select the keywords in the grid or dictionary. The selected keywords are added to the log entry. Note In the Edit mode, selected from the Keyword Grid menu, a grid layout type can be selected using the tab or defined using the selection.
IP Director Version 4.3 – User Manual – Part 2 – Logging and Browsing Issue 4.3.C EVS Broadcast Equipment • To add a new value in a drop-down list, select the + sign beside the field, enter the new keyword and click OK. Select then the new value. Any new log entry created afterwards will have automatic keywords assigned as they have been modified. 1.6.
IP Director Version 4.3 – User Manual – Part 2: Logging and Browsing Issue 4.3.C EVS Broadcast Equipment 1.6.6 EDITING AND DELETING A LOG ENTRY Once created, the log entries can be edited and/or viewed in a Video Display. You access the View and Edit options when right-clicking on a log entry and selecting one of the following options in the contextual menu displayed: 1.6.7 Field Description Edit Opens the Edit a Log window that allows the users to modify the log entry characteristics.
IP Director Version 4.3 – User Manual – Part 2 – Logging and Browsing Issue 4.3.C EVS Broadcast Equipment more details to previously logged action: 3. 1.6.8 Once the log entry is modified, click the Update button to confirm the modifications. HOW TO EDIT THE TIMECODE OF A LOG ENTRY The time code position can be manually modified in the Timecode field in the Edit a Log window. To edit the timecode of the log entry, proceed as follows: 1.
IP Director Version 4.3 – User Manual – Part 2: Logging and Browsing EVS Broadcast Equipment 1.6.9 Issue 4.3.C HOW TO VIEW A EVENT ON A LOG To view a log entry of a log sheet (i.e. load the log on the player channel at the relevant timecode position), proceed in one of the following ways: • Double-click a log entry from the log. • Right-clicking the log entry and select View from the contextual menu.
IP Director Version 4.3 – User Manual – Part 2 – Logging and Browsing Issue 4.3.C EVS Broadcast Equipment 1.6.11 HOW TO MAKE AUTOMATIC CLIPS BASED ON A LOGGED EVENT To automatically make a clip based on a log entry on the record train selected as the preview recorder, click on the event on the log sheet and drag the clip onto a bin in the Database Explorer tree or onto an open window.
IP Director Version 4.3 – User Manual – Part 2: Logging and Browsing Issue 4.3.C EVS Broadcast Equipment Column Name Description Keywords Displays all the keywords added per event. Participants Displays all the participant keywords added per event.
IP Director Version 4.3 – User Manual – Part 2 – Logging and Browsing Issue 4.3.C EVS Broadcast Equipment 1.8 IP LOGGER SHORTCUTS In the IP Director main window, the menu Tools > Define Shortcuts in the menu bar allows the users to define shortcuts for most of the common operations with the IP Director. Shown in the screenshots below are all items that are available in the IP Logger with shortcuts, the default values are shown. These can be modified and saved by the system user if desired.
IP Director Version 4.3 – User Manual – Part 2: Logging and Browsing Issue 4.3.C EVS Broadcast Equipment 2. Keyword Management 2.1 INTRODUCTION Keywords are an essential element to the IP Director system, bridging the gap between the XT servers and a conventional database by allowing the user to search for material using keywords which relate to the media rather than searching by storage locations. Keywords allow you to perform searches in logs or clips in a unified manner.
IP Director Version 4.3 – User Manual – Part 2 – Logging and Browsing Issue 4.3.C EVS Broadcast Equipment Dictionaries allow you to manage all your Keywords in a structured hierarchy. This hierarchy allows for similar items to be grouped under headings that are collapsible and expandable. 2.2 KEYWORD LIST TOOL The Keyword List tool allows adding, removing or renam ing keywords in the IP Director database.
IP Director Version 4.3 – User Manual – Part 2: Logging and Browsing EVS Broadcast Equipment Issue 4.3.C If you want to define a keyword as a participant keyword, activate the Participant check box before you click the Add button to save and add the keyword. The participant keywords can be differentiated by a little blue icon next to the keyword. 2.2.
IP Director Version 4.3 – User Manual – Part 2 – Logging and Browsing Issue 4.3.C EVS Broadcast Equipment Note The system does not accept several keywords having the same spelling (case non sensitive). 2.2.
IP Director Version 4.3 – User Manual – Part 2: Logging and Browsing EVS Broadcast Equipment 2.2.7 Issue 4.3.C KEYWORDS DISPLAY OPTIONS You can change the way the list display the keywords. The following options are available: • All Database Keywords (Alphabetic Order) • All Database Keyw ords (Insertion Order) • Participant Keywords (Alphabetic Order) • Participant Keywords (Insertion Order) • KG: Keyw ord Grid Name Display only keywords and participant keywords from a specific keyword grid.
IP Director Version 4.3 – User Manual – Part 2 – Logging and Browsing Issue 4.3.C EVS Broadcast Equipment 2.2.9 RULES FOR KEYWORD FILE IMPORT Before importing the keyword file, check the file structure and the settings to ensure that the following conditions are met: • Each keyword in the keyword file must be on its own line within the file. • The general IP Director settings must be set to manage 64 character keyw ords. Otherw ise, the keywords will be truncated to 12 characters if they are longer.
IP Director Version 4.3 – User Manual – Part 2: Logging and Browsing EVS Broadcast Equipment Issue 4.3.C 2.2.12 HOW TO EXPORT KEYWORDS To export the current listed keywords into an external file, proceed as follows: 1. In the Keyword List, select the menu File > Export in the Keyword List. The Keyword Export window opens. 2. In the window, select the folder in which to export the .txt file. 3. Type a name for the .txt file. 4. Click the Save button. The keywords are saved in the given .
IP Director Version 4.3 – User Manual – Part 2 – Logging and Browsing Issue 4.3.C EVS Broadcast Equipment 2.3.1 HOW TO OPEN THE KEYWORD GRID TOOL To manage keyword grids, you must use the keyw ord list tool as well as the keyword grid tool. To open both tools, select Keywords > View All from the Application bar.
IP Director Version 4.3 – User Manual – Part 2: Logging and Browsing Issue 4.3.C EVS Broadcast Equipment Horizontal view 2.3.2 KEYWORD GRID FILE MENU The various menu items in the File menu of the Keyword Grid are detailed in the table below: Menu Item Description New Opens a dialog window to define a new keyword grid and optional description. Rename Allows the renaming of an opened keyword grid in the database.
IP Director Version 4.3 – User Manual – Part 2 – Logging and Browsing Issue 4.3.C EVS Broadcast Equipment Menu Item Description Open Allows the opening a keyword grid. Publish Allows the publishing of the opened keyword grid to predefined user groups.
IP Director Version 4.3 – User Manual – Part 2: Logging and Browsing EVS Broadcast Equipment 2.3.3 Issue 4.3.C HOW TO CREATE A NEW KEYWORD GRID The Keyword Grid tab allows the user to build groups of up to 300 keywords. These keyword grids will first be used in the logging and creation of the metadata, to be associated with log sheets and individual clips. They can then be used to search the metadata to retrieve required media.
IP Director Version 4.3 – User Manual – Part 2 – Logging and Browsing Issue 4.3.C EVS Broadcast Equipment pages, rows in a page and columns in a page that the keyword grid should contain. 5. Click OK. The keyword grid is created with the parameters specified. It opens automatically in Edit mode. 6. In the Keyword List, select the keywords to be added to the keyword grid. Click CTRL (+SHIFT) for a multiple selection. 7.
IP Director Version 4.3 – User Manual – Part 2: Logging and Browsing Issue 4.3.C EVS Broadcast Equipment Menu Item Description Rename the opened Keyw ord grid Delete a page Clear a page Note If the keyword grid has been changed in the width of the window , the above mentioned buttons may not appear as visible. At this time, the user must select the drop down arrow on the window to see all icons.
IP Director Version 4.3 – User Manual – Part 2 – Logging and Browsing Issue 4.3.C EVS Broadcast Equipment 2.3.5 KEYWORD GRID VIEW OPTIONS Menu Item Description Empty Position Shows the empty keywords cells. Description Shows the keyword grid description. Keyword Numbers Shows the index number of each keyword in a grid. Note Keyword number allows a fast selection using the numeric pad of your keyboard, ‘+’ and ‘-‘ keys.
IP Director Version 4.3 – User Manual – Part 2: Logging and Browsing Issue 4.3.C EVS Broadcast Equipment 2.4 DICTIONARY TOOL A Dictionary allows the user to organize keywords in a tree structure. The Dictionary tool allows creating, modifying or deleting Dictionaries in the IP Director database. Note The Dictionaries are kept in the IP Director database which means that you work on shared data. All updates performed on Dictionaries will be reverberated on each IP Director. 2.4.
IP Director Version 4.3 – User Manual – Part 2 – Logging and Browsing Issue 4.3.C EVS Broadcast Equipment 2.4.2 HOW TO CREATE A DICTIONARY On the left side the keyword list display the keywords that have been entered into the database. To help in discriminating which words have already been used on a dictionary, each word already used is highlighted in yellow text. The name you gave to your new dictionary take place as the root of your keywords tree.
IP Director Version 4.3 – User Manual – Part 2: Logging and Browsing EVS Broadcast Equipment 2.4.3 Issue 4.3.C HOW TO ADD NEW KEYWORDS IN A DICTIONARY Select the keyword you want to be the parent keyword of the one you want to insert. To insert the keyword, type the word into the edit box and click Add or immediately press ENTER on the keyboard. You can add as many keywords as you want in any of the tree branch.
IP Director Version 4.3 – User Manual – Part 2 – Logging and Browsing Issue 4.3.C EVS Broadcast Equipment 2.4.5 HOW TO MOVE KEYWORDS IN A DICTIONARY To move keywords from one parent to another, select the keywords and drag them onto the new parent keyword. 2.4.6 HOW TO DELETE KEYWORDS IN A DICTIONARY You can delete keywords from a dictionary using the contextual menu (right-click). 2.4.
IP Director Version 4.3 – User Manual – Part 2: Logging and Browsing EVS Broadcast Equipment 2.4.8 Issue 4.3.C RENAMING KEYWORDS To renam e a keyword, right-click on the keyword and select Rename Keyword from the contextual menu. 2.4.9 DESCRIPTION VIEW OPTION You can show the dictionary description using the View menu of the Dictionary tool. 2.4.
IP Director Version 4.3 – User Manual – Part 2 – Logging and Browsing Issue 4.3.C EVS Broadcast Equipment 3. Database Explorer 3.1 INTRODUCTION The Database Explorer is an application designed to allow the user to organize and search all media and data that is available within the server network into a system by which any user can access it, whether they have knowledge of the ‘clip hierarchy’ methods used in EVS XT servers or by using standard windows database search techniques.
IP Director Version 4.3 – User Manual – Part 2: Logging and Browsing EVS Broadcast Equipment 3.2 Issue 4.3.C CLIPS One library method used by IP Director is to mimic the hierarchical structure adopted by the XT range of servers to store media, which is based on the remote panel design with a limited amount of buttons and desk space 3.2.1 UNDERSTANDING XT CLIP STRUCTURE Each XT unit can store up to 900 clips (with each clip containing up to 6 sub clips, lettered A to F).
IP Director Version 4.3 – User Manual – Part 2 – Logging and Browsing Issue 4.3.C EVS Broadcast Equipment 3.2.2 CLIPS TREE STRUCTURE Within the clip tree structure of IP Director each XT machine can be searched by filtering down in the tree from network number > page > bank 3.2.3 CLIP DATA COLUMN HEADINGS Each clip record in the result list is detailed in variable width columns providing information about the stored clip. Some of the details can be edited from here, others are for information.
IP Director Version 4.3 – User Manual – Part 2: Logging and Browsing Issue 4.3.C EVS Broadcast Equipment Column Name Description location of the clip is moved within the XNet. ID Material A unique identifier given to an original clip by EVS not generally in use at an operational level. This ID stays with the clip and will keep track of copies of a clip related to the original by using this ID as it will not change on the clip copies. ID Louth An ID generated to give the clip a UmID.
IP Director Version 4.3 – User Manual – Part 2 – Logging and Browsing Issue 4.3.C EVS Broadcast Equipment Column Name Description associated with the clip 54 Creation Date The date that the clip was created on Aspect Ratio 4:3 or 16:9 Video Format and Frequency Shows the video standard of the clip: Video Compression Type JPEG, MPEG IMX etc. Video Compression Rate The compression rate the clip was recorded at. Source N ame The record source name of the channel where the clip was created.
IP Director Version 4.3 – User Manual – Part 2: Logging and Browsing Issue 4.3.C EVS Broadcast Equipment 3.2.4 CLIP CONTEXTUAL MENU The Clip Contextual menu is available when right-clicking a clip in the element list. It gives access to the actions that can be performed on clips in the Database Explorer: The following table describes briefly the commands available from the contextual menu: Command Description Cut Not relevant in the element list. Copy Copies the clip to the clipboard.
IP Director Version 4.3 – User Manual – Part 2 – Logging and Browsing Issue 4.3.C EVS Broadcast Equipment Command Description Import a playlist … Not relevant in the element list. Publish Opens the Publish Clip window from which the selected clip can be published, i.e. made available, to selected groups of users. See also the section 3.2.18. Delete Deletes Server. the selected clip from the XT View Key Clip Displays the Key clip associated with a Fill clip that is selected.
IP Director Version 4.3 – User Manual – Part 2: Logging and Browsing Issue 4.3.C EVS Broadcast Equipment Command Description For more information on this window, see the section 3.2.16. Properties 3.2.5 Displays information related to the owner and the groups the selected clip has been published to. HOW TO EDIT A CLIP FROM WITHIN THE DATABASE EXPLORER To edit the clip data, proceed as follows: 1. Select the clip. 2. Right-click on the mouse to show the contextual menu. 3. Select Edit.
IP Director Version 4.3 – User Manual – Part 2 – Logging and Browsing Issue 4.3.C EVS Broadcast Equipment ID This is the LSM ID, i.e. the location where the clip should be stored on the XNet network. It is not editable as it is the unique identifier of the clip on the XT server. C LIP N AME The name field is used to add a nam e to the clip or modify it. The user can assign a name that should contain maximum 24 alphanumeric characters. Only 12 characters of this name can be displayed by LSM systems.
IP Director Version 4.3 – User Manual – Part 2: Logging and Browsing Issue 4.3.C EVS Broadcast Equipment Part 2 of this user manual for more information on how to maintain keywords. The Interest Level icons allow you to assign an interest rating to a clip. Four interest levels can be defined, from no star to 3 stars (***).The background of the button corresponding to the selected interest level is in blue. The default value is the no star level.
IP Director Version 4.3 – User Manual – Part 2 – Logging and Browsing Issue 4.3.C EVS Broadcast Equipment 3.2.7 HOW TO COPY OR MOVE A CLIP WITHIN DATABASE EXPLORER U SING D RAG - AND -D ROP A clip can be selected in the right pane of the Database Explorer and dragged to a new location on the XT tree structure on the left side of the window: • To MOVE the clip, simply drag and drop • To COPY the clip, hold down the CTRL key on the keyboard while dragging and dropping.
IP Director Version 4.3 – User Manual – Part 2: Logging and Browsing EVS Broadcast Equipment Issue 4.3.C U SING D UPLICATE OR M OVE TO AN E XACT L OCATION To duplicate or move a clip to an exact location, proceed as follows: 1. Select a clip to be moved or copied and right-click on the mouse to show a contextual menu 2. Select the Move option or Duplicate option from the contextual menu. 3. The Move window or Duplicate window is displayed asking for the LSM ID for the new location. 4.
IP Director Version 4.3 – User Manual – Part 2 – Logging and Browsing Issue 4.3.C EVS Broadcast Equipment 3.2.9 HOW TO SEND A CLIP TO A DESTINATION FOLDER (DESTINATION TARGET) To send a clip to a destination folder, proceed as follows: • Select a predefined destination directory (target) from the Send To sub menu of the clip contextual menu. The destination folder can be located anywhere on the IP network. This gives full flexibility to directly send A/V files to third party systems (i.e.
IP Director Version 4.3 – User Manual – Part 2: Logging and Browsing Issue 4.3.C EVS Broadcast Equipment Field Description Target The destination folder where the file will be copied. Be sure this directory is shared with full control access. Wrapping format The file wrapper. It can be MXF EVS or MXF OP1A. Link To If the box is checked it means you want that all files sent to the destination target to be managed by one specific XML unit. Select the unit from the drop-down list. 3.2.
IP Director Version 4.3 – User Manual – Part 2 – Logging and Browsing Issue 4.3.C EVS Broadcast Equipment 3.2.13 HOW TO SEND A CLIP TO AN XSTORE WORKSTATION (RUNNING CLEAN-EDIT APPLICATIONS) To send a clip to an XStore workstation, proceed as follows: • Select a predefined XStore (CleanEdit) target from the Send To > CleanEdit sub menu of the clip contextual menu. Once the clip has been sent, it is immediately available in the CleanEdit database.
IP Director Version 4.3 – User Manual – Part 2: Logging and Browsing EVS Broadcast Equipment Issue 4.3.C On a Unity system , once the clip has been sent, it is immediately available in the AVID media manager database. It can then be inserted into a bin and can be inserted into an edit. Required Configuration These AVID destination targets are predefined from the IP Director Remote Installer. Refer to the IP Director Remote Installer manual for more information.
IP Director Version 4.3 – User Manual – Part 2 – Logging and Browsing Issue 4.3.C EVS Broadcast Equipment T YPE OF T RANSFER • Target (Target name): all transfers resulting from a ‘Send To - Destination target’ operation. • CleanEdit (Target name): all transfers resulting from an ‘Send To - CleanEdit’ operation. • AVID (Target name): all transfers resulting from a ‘Send To Avid’ operation.
IP Director Version 4.3 – User Manual – Part 2: Logging and Browsing Issue 4.3.C EVS Broadcast Equipment 3.2.16 TRANSFER HISTORY The history of all transfers can be displayed by selecting Tools > View own clips status and history from the IP Director main menu. This opens the Status and History window: In this window, one line corresponds to one transfer.
IP Director Version 4.3 – User Manual – Part 2 – Logging and Browsing Issue 4.3.C EVS Broadcast Equipment S TATUS The status of the transfer can be one of the following SUCCESS The transfer has been successfully transferred to the corresponding target IN PROGRESS The transfer is still in the transfer queue. It is not completed. ERROR The transfer has not been successfully completed. Some errors occurred. Refer to the Error message column to know what could be the cause of the error.
IP Director Version 4.3 – User Manual – Part 2: Logging and Browsing EVS Broadcast Equipment Issue 4.3.C 3.2.17 HOW TO MODIFY THE T/C IN OR THE DATE OF A CLIP The T/C and date corresponding to the IN point of a clip can be modified from the clip contextual menu. This operation is very useful when re-ingesting a feed which must then be associated to a log sheet, or simply because the A/V material ingested corresponds to A/V material which was originally recorded at a different T/C and date.
IP Director Version 4.3 – User Manual – Part 2 – Logging and Browsing Issue 4.3.C EVS Broadcast Equipment 3.2.18 HOW TO PUBLISH A CLIP Publishing a clip means the clip will be visible by the members of the group(s) the clip is published to. To publish a clip to groups of users from the Database Explorer, proceed as follows: 1. Right-click the clip to be published in the Database Explorer. 2. Select Publish from the contextual menu. The Publish Clip window opens. 3.
IP Director Version 4.3 – User Manual – Part 2: Logging and Browsing EVS Broadcast Equipment Issue 4.3.C 3.2.19 HOW TO VIEW THE CLIP PROPERTIES To establish the ownership on a clip and the user groups to which a clip has been published, proceed as follows: • Right-click on the clip and select Properties from the clip contextual menu. The Clip Properties window opens and displays the requested information: 3.2.
IP Director Version 4.3 – User Manual – Part 2 – Logging and Browsing Issue 4.3.C EVS Broadcast Equipment 3.2.21 HOW TO CREATE A FILL AND KEY RELATIONSHIP BETWEEN CLIPS To link two clips in a Fill and Key relationship, proceed as follows: 1. Open the Database Explorer 2. Search for the clips to link together in a Fill and Key association. 3. Select the Key clip to link. 4. Drag and drop it onto the Fill clip keeping the CTRL and SHIFT pressed.
IP Director Version 4.3 – User Manual – Part 2: Logging and Browsing Issue 4.3.C EVS Broadcast Equipment 3.3 PLAY-LISTS 3.3.1 INTRODUCTION Play-Lists are a group of clips put together to play out in a desired order. Depending on the complexity required, different video and audio transitions can be defined between each element of the play-list. Two types of play-lists exist: off-line and on-line play-lists.
IP Director Version 4.3 – User Manual – Part 2 – Logging and Browsing Issue 4.3.C EVS Broadcast Equipment 3.3.4 Column Name Description Name A play-list can be named using the XT keyboard, from the Database Explorer, or from the Mini Database Explorer in the Play-List Editor. Description Not implemented LSM ID XT server that the play-list is on Duration Length of the play-list. Clip Count Number of clips in the play-list.
IP Director Version 4.3 – User Manual – Part 2: Logging and Browsing Issue 4.3.C EVS Broadcast Equipment Command Description Cut Not relevant in the element list. Copy Copies the play-list to the clipboard. The clip can then be pasted in a bin. Paste Not relevant in the element list. Send to Provides a list of possible destinations, in a submenu, to which the selected play-list can be sent.
IP Director Version 4.3 – User Manual – Part 2 – Logging and Browsing Issue 4.3.C EVS Broadcast Equipment Command Description them can be deleted. For more information, see the section “How to Delete Unused Play-Lists” in the Play-List Editor chapter, part 3 of this user manual. Rename Opens the Enter a New Play-List Name window in which the users can modify the name of the play-list selected in the element list.
IP Director Version 4.3 – User Manual – Part 2: Logging and Browsing Issue 4.3.C EVS Broadcast Equipment Command Description published to. For more information on these actions, refer to the Play-List Editor chapter, in part 3 of this user manual. 3.3.5 HOW TO DELETE A PLAY-LIST To delete a play-list, proceed as follows: 1. Right-click the play-list to delete. 2. Select Delete from the contextual menu. 3.
IP Director Version 4.3 – User Manual – Part 2 – Logging and Browsing Issue 4.3.
IP Director Version 4.3 – User Manual – Part 2: Logging and Browsing EVS Broadcast Equipment 3.4 BINS 3.4.1 INTRODUCTION Issue 4.3.C All media connected with a particular project or event can be organised into a bin, regardless of its clip number or storage location. This makes it possible to treat the whole XNet network as one storage location searchable by a standard database.
IP Director Version 4.3 – User Manual – Part 2 – Logging and Browsing Issue 4.3.C EVS Broadcast Equipment 3.4.3 BINS DATA COLUMN HEADINGS Each bin contains a list of clips or offline play-lists with all the data available for each element. The data column headings are therefore the same as the Clip and play-list column headings, they can be edited in the same way as in the Clips or Play-List tree as described in the section 3.2.5 “How to Edit a Clip From Within the Database Explorer”, on page 57.
IP Director Version 4.3 – User Manual – Part 2: Logging and Browsing Issue 4.3.C EVS Broadcast Equipment Clip contextual menu from the Bin tree view Play-list contextual menu from the Bin tree view Command Description Delete from bin only Removes the selected clip or play-list from the bin. Delete from bin and XT Deletes the selected clip or play-list from the bin and the XT server. This option is not available if the clip is part of a play-list.
IP Director Version 4.3 – User Manual – Part 2 – Logging and Browsing Issue 4.3.C EVS Broadcast Equipment 3.4.5 HOW TO OPEN A BIN IN A BIN WINDOW To open a bin window to drag clips into or see clips that are included in it, proceed as follows: • 3.4.6 Double-click the bin icon related to that bin. DEFINING BIN RULES A bin rule is a set of criteria that allow clips or play-lists made on selected record trains to be automatically copied to a bin. A bin rule is always defined for a given bin.
IP Director Version 4.3 – User Manual – Part 2: Logging and Browsing Issue 4.3.C EVS Broadcast Equipment H OW TO M ODIFY AN E XISTING B IN R ULE To modify an existing bin rule, proceed as follows: 1. Select a bin in the tree structure and right-click to open the contextual menu. 2. Select the Bin Rule > Modify menu item. The Bin Rules window opens. 3. Select the Clips or Play-Lists tab depending on which elements the rules should be modified. 4. In the tab, do one of the following: • • 5.
IP Director Version 4.3 – User Manual – Part 2 – Logging and Browsing Issue 4.3.C EVS Broadcast Equipment 3.4.7 BIN RULES WINDOW When you create or modify a bin rule related to a given bin, you can specify criteria that will be applied to clips or play-lists in the Bin Rules window. The bin rules defined will only be applied to the clips created after the bin rule has been created. When a clip is created or modified, IP Director checks the clip information against the bin rules defined.
IP Director Version 4.3 – User Manual – Part 2: Logging and Browsing Issue 4.3.C EVS Broadcast Equipment C RITERIA O VERVIEW Different criteria are available depending on the element, i.e. clip or play-list, on which you want to specify bin rules. The following table provides an overview of the available criteria and indicates on which elem ent they can be defined: Field Criteria based on the … Clip Play -List Creation Date Date when the element has been created.
IP Director Version 4.3 – User Manual – Part 2 – Logging and Browsing Issue 4.3.C EVS Broadcast Equipment contain one of the defined values, i.e. one of the defined keywords, will fulfil the criterion. This principle is also valid for the Status, Owner and Recorder fields. • When several criteria are defined in a bin rule, the clips should meet at least one value in each of the defined criteria to match the bin rule.
IP Director Version 4.3 – User Manual – Part 2: Logging and Browsing Issue 4.3.C EVS Broadcast Equipment T/C The T/C criterion allows specifying a timecode. The clips that contain the specified timecode, between its limit IN and limit OUT, will meet the Timecode criterion. If the limit IN or limit OUT of the clip corresponds to the specified timecode, the clip will also fulfil the criterion.
IP Director Version 4.3 – User Manual – Part 2 – Logging and Browsing Issue 4.3.C EVS Broadcast Equipment Icon Description When this yellow icon is selected, the clips which are still in the process of being sent to AVID fulfil the Status criterion. When this green icon is selected, the clips which have successfully been sent to a destination target fulfil the Status criterion. When this icon is selected, the clips which have successfully been sent to an XFile fulfil the Status criterion.
IP Director Version 4.3 – User Manual – Part 2: Logging and Browsing Issue 4.3.C EVS Broadcast Equipment Icon Description When this icon is selected, the clips which have the Fill type assigned fulfil the Type criterion. When this icon is selected, the clips which have the Key type assigned fulfil the Type criterion. K EYWORD The Keyword criterion allows specifying one or more keywords. The clips having one of the keywords specified in the criterion fulfil the Keyword criterion.
IP Director Version 4.3 – User Manual – Part 2 – Logging and Browsing Issue 4.3.C EVS Broadcast Equipment The Recorder criterion allows specifying one or more recorders. The clips that have been created on one of the selected recorders fulfil the Recorder criterion. The play-lists that are stored on one of the selected recorders fulfil the Recorder criterion. The Recorder drop-down list gives access to the XT server structure which displays all the recorders on all XT servers of the XNet network.
IP Director Version 4.3 – User Manual – Part 2: Logging and Browsing EVS Broadcast Equipment 3.5 LOGS 3.5.1 INTRODUCTION Issue 4.3.C The logs section of the Database Explorer allows the user to browse for a log of any event for which a log has been created and then to use the free text search engine or Keyword Grids to filter the data to provide required results.
IP Director Version 4.3 – User Manual – Part 2 – Logging and Browsing Issue 4.3.C EVS Broadcast Equipment 3.5.3 HOW TO PUBLISH A LOG DIRECTORY OR A LOG SHEET A log can be made available to all users or only to certain groups of users as defined by the user rights managem ent system in IP Director. To publish a log to given groups of users from the Database Explorer, proceed as follows: 1. Right-click the log to be published in the Database Explorer. 2. Select Publish from the contextual menu.
IP Director Version 4.3 – User Manual – Part 2: Logging and Browsing EVS Broadcast Equipment Issue 4.3.C Note User rights are set up in the User Manager application provided with IP Director and can be set only by an administrator. 3.5.4 HOW TO VIEW THE LOG DIRECTORY PROPERTIES To establish the ownership on a clip and the user groups to which a log directory has been published, proceed as follows: • Right-click on the log and select ‘Properties’ from the clip contextual menu.
IP Director Version 4.3 – User Manual – Part 2 – Logging and Browsing Issue 4.3.C EVS Broadcast Equipment 3.5.6 HOW TO EXPORT A LOG SHEET FROM THE TREE A log sheet can be exported from the tree structure either in XML or in text format (CSV). To export a log sheet from the tree structure, proceed as follows: • 3.5.7 Right-clicking the log sheet and select Export from the contextual menu.
IP Director Version 4.3 – User Manual – Part 2: Logging and Browsing Issue 4.3.C EVS Broadcast Equipment Column Name Description Description Free text entry description added by user Level A rating can be given to a log from no stars to three stars (***). This can be done at any time and can provide a useful search filter for use in the Database Explorer. Keyword The first five keywords associated with this log sheet Parent Keyword The keywords associated globally to the entire log sheet.
IP Director Version 4.3 – User Manual – Part 2 – Logging and Browsing Issue 4.3.C EVS Broadcast Equipment 3.6 VIEWING, BROWSING AND SEARCH OPTIONS 3.6.1 INTRODUCTION This section includes three subsections on viewing, browsing and filtering options available in the Database Explorer: Name Description View Options Options to modify the view structure and/or the result list. of the tree For more information, refer to section 3.6.2 ‘View Options’, on page 96.
IP Director Version 4.3 – User Manual – Part 2: Logging and Browsing EVS Broadcast Equipment Issue 4.3.C Note Thumbnails can be created automatically when there is an XFile designated within the thumbnails configuration in the Remote Installer application of IP Director. Refer to the Technical Reference manual for further details. Thumbnails can be created manually from the Control Panel and from the Database Explorer. Refer to the chapters related to these applications for further details. 3.6.
IP Director Version 4.3 – User Manual – Part 2 – Logging and Browsing Issue 4.3.C EVS Broadcast Equipment A UTO -C HAIN The auto-chain mode makes it possible to play clips one after the other as they are displayed in the Database Explorer window. The clips are played without transition effects on the player channel assigned to the Database Explorer. The clips can be played from the clip structure, from a bin or from the result of a search in the Database Explorer.
IP Director Version 4.3 – User Manual – Part 2: Logging and Browsing Issue 4.3.C EVS Broadcast Equipment T RANSPORT F UNCTIONS IN A UTO -C HAIN M ODE Various transport functions are available in auto-chain mode to shift the auto-chain play mode on to a clip than is not the next one in the sequence. The transport functions are executed in the following way: Double-click: Double-clicking a clip preloads it onto the player channel. The operator needs to use the Play shortcut (P) to play the clip.
IP Director Version 4.3 – User Manual – Part 2 – Logging and Browsing Issue 4.3.C EVS Broadcast Equipment 3.6.4 SEARCH OPTIONS There are several methods available to search the database for media. These methods are customizable by the menus and icons displayed at the top of the Database Explorer window. There are several ways to define the search criteria from Database Explorer. Each method described here can be used on its own or in conjunction with other methods to produce the required result.
IP Director Version 4.3 – User Manual – Part 2: Logging and Browsing Issue 4.3.C EVS Broadcast Equipment H OW TO C OMBINE S EARCH F ILTERS Different filters can be used at the same time to refine the search. For example, you can use the Keywords filter (selecting ‘Goal’ and ‘Beckam’ keywords in a Keyword Grid) with the ‘Date’ filter (today) to perform a search on all clips which correspond to the goals Beckam scored today. Note Only ‘AND’ mode of searching is available currently.
IP Director Version 4.3 – User Manual – Part 2 – Logging and Browsing Issue 4.3.C EVS Broadcast Equipment H OW TO H IDE THE F ILTER T OOLBAR Clicking on the Search icon when the Filter toolbar is displayed will reset the search result and hide the Filter toolbar. 3.6.5 SEARCHING FOR CLIPS T EXT S EARCH Shortcut Description SHIFT + CTRL + F Search for clips based on a free text. The engine only searches in the columns selected in the drop-down menu.
IP Director Version 4.3 – User Manual – Part 2: Logging and Browsing Issue 4.3.C EVS Broadcast Equipment Parameter How to use Date Interval Select the 2 dates From/To defining the interval of the search. Last x days Select the number of days starting today going back in time on which the search will be performed. T IMECODE S EARCH Shortcut Description SHIFT + CTRL + T Search for timecode. Parameter How to use T/C Type the timecode to search for.
IP Director Version 4.3 – User Manual – Part 2 – Logging and Browsing Issue 4.3.C EVS Broadcast Equipment Parameter How to use Star buttons Select the level from 0 to 3 stars. >= If pressed, the search includes clips with at least the selected level. For example, if is selected, the result will return clips with interest level of 2 or 3 stars. If not pressed, the result will only return clips which have the exact selected level.
IP Director Version 4.3 – User Manual – Part 2: Logging and Browsing Issue 4.3.C EVS Broadcast Equipment S EARCH BASED ON THE C LIP S TATUS Shortcut Description SHIFT + CTRL + U Select clips with a certain status. Parameter How to use Status Clips which have not been sent to any destination target. Clips which have been sent to a destination target, for which the transfer is not yet complete. Clips which have been sent to an XFile, for which the transfer is not yet complete.
IP Director Version 4.3 – User Manual – Part 2 – Logging and Browsing Issue 4.3.C EVS Broadcast Equipment K EYWORD S EARCH Shortcut Description SHIFT + CTRL + K Search for clips based on their associated keywords. Keywords can be selected from either a Keyword Grid or a dictionary. By selecting keywords on the Keyword Grid or dictionary and from the Keyword Grid, the dictionary or then clicking on the filter toolbar (or even pressing ENTER on the keyboard) a search of the database is performed.
IP Director Version 4.3 – User Manual – Part 2: Logging and Browsing Issue 4.3.C EVS Broadcast Equipment • GOAL and Freidrich, or • GOAL and Kehl, or • GOAL and Ballack, or • GOAL and Klose If player 1 is the parent of some keywords, they are not taken into consideration in the search request because the recursive mode is only available one level down the selected dictionary tree.
IP Director Version 4.3 – User Manual – Part 2 – Logging and Browsing Issue 4.3.C EVS Broadcast Equipment 3.6.7 Parameter How to use T/C Type the timecode to search for. Range The range defines the interval around the timecode entered for which the search will also apply. The default range entry is 5 seconds. Grab If a player channel is associated to the Database Explorer, clicking on Grab will grab the current timecode of that channel.
IP Director Version 4.3 – User Manual – Part 2: Logging and Browsing EVS Broadcast Equipment 3.6.8 Issue 4.3.C HOW TO MAKE AUTOMATIC CLIPS BASED ON A LOGGED EVENT To automatically make a clip based on a log entry on the record train selected as the preview recorder, proceed as follows: 1. Click on the event on the log sheet in the Database Explorer. 2. Drag the log entry onto a bin in the Database Explorer tree or onto an open BIN window.
IP Director Version 4.3 – User Manual – Part 2 – Logging and Browsing Issue 4.3.C EVS Broadcast Equipment 3.6.9 HOW TO RECALL AN ASSOCIATED CLIP If an associated clip is selected from the drop-down box that appears when the associated clip area is selected on an event, this clip will appear on the assigned player channel regardless of its record source. The player area will display the timecode within the clip that has been recalled.
IP Director Version 4.3 – User Manual – Part 2: Logging and Browsing EVS Broadcast Equipment 3.7 Issue 4.3.C DATABASE EXPLORER TOOLS This section provides a description of some tools used to define how the Database Explorer window is set up, is used or how it looks like. It covers the following tools: 3.7.1 COLUMN ORGANIZER The Column Organizer window, available from the Tools > Organize menu, makes it possible to specify which columns should be displayed on the result list.
IP Director Version 4.3 – User Manual – Part 2 – Logging and Browsing Issue 4.3.C EVS Broadcast Equipment 3.7.2 LIMIT RESULT COUNT When enabled, the Limit Result Count option, available from the Tools > Limit Result Count, will limit the results of any search to the number of elements defined in the IP Director configuration tab of the console management application (1000 elements by default). Refer to the Technical Reference Manual for more information. 3.7.
IP Director Version 4.3 – User Manual – Part 2: Logging and Browsing EVS Broadcast Equipment 3.7.5 Issue 4.3.C STATUS AREA The Status Area contains four zones. These are described below. E LEMENT N UMBER Z ONE The first zone from the left of the Status bar shows in green how many elem ents are included in the result list of the Database Explorer. N EXT C LIP Z ONE The second zone from the left of the Status bar shows in green the next clip to be played if the Auto-Chain mode is being used.
IP Director Version 4.3 – User Manual – Part 2 – Logging and Browsing Issue 4.3.C EVS Broadcast Equipment 3.7.6 HOW TO ASSIGN A PLAYER CHANNEL TO THE DATABASE EXPLORER To assign a player channel to the Database Explorer, proceed as follows: 1. Open the Channel Explorer and the Database Explorer applications. 2. In the Channel Explorer, select the player channel to assign to the Database Explorer. 3.
IP Director Version 4.3 – User Manual – Part 2: Logging and Browsing EVS Broadcast Equipment 3.8 Issue 4.3.C DATABASE EXPLORER SHORTCUTS In the IP Director main window, the menu Tools > Define Shortcuts in the menu bar allows the users to define shortcuts for most of the common operations with the IP Director. Shown in the screenshots below are all items that are available in the Database Explorer with shortcuts, the default values are shown. These can be modified and saved by the system user if desired.
IP Director Version 4.3 – User Manual – Part 2 – Logging and Browsing Issue 4.3.C EVS Broadcast Equipment 4. Mini Database Explorer 4.1 INTRODUCTION The Mini Database Explorer is an integrated part of the Clip Editor and the Play-List Editor applications used to easily browse the database content and then use the selected material in either of the applications without the requirement to have a full Database Explorer Panel open.
IP Director Version 4.3 – User Manual – Part 2: Logging and Browsing EVS Broadcast Equipment 4.1.2 Issue 4.3.C PLAY-LIST EDITOR In the Play-List Editor, the Mini Database Explorer is also linked at the left of the Control Panel as shown by the red border in the screenshot below. The difference between the 2 panels shown above is the addition of the ability to select a play-list based explorer when the panel is included in the Play-list editor application.
IP Director Version 4.3 – User Manual – Part 2 – Logging and Browsing Issue 4.3.C EVS Broadcast Equipment 4.1.3 SECTIONS OF MINI DATABASE EXPLORER A Mini Database Explorer panel has four sections: The Tree View: Tree View This shows the relevant tree as selected in the display options panel at the base of the Mini Database Explorer. The tree view can contain a tree for the XT clips, bins, or play-list structure.
IP Director Version 4.3 – User Manual – Part 2: Logging and Browsing EVS Broadcast Equipment 4.2 Issue 4.3.C CLIPS MODE When the Clips icon is selected in the Display Options area, the Clips Tree View displays the XT structure in the workgroup controlled by the IPD Director. Each XT machine can be searched by filtering down in the tree from network number -> page -> bank. The results are displayed in the Objects List.
IP Director Version 4.3 – User Manual – Part 2 – Logging and Browsing Issue 4.3.C EVS Broadcast Equipment 4.3 BINS MODE When the Bins icon is selected in the Display Options area, the Tree View displays the bin tree structure. From this tree view, a bin or bin directory can be selected to display its contents in the Objects List area.
IP Director Version 4.3 – User Manual – Part 2: Logging and Browsing EVS Broadcast Equipment Issue 4.3.C Right-clicking a clip or a play-list from the Element list view will open the following contextual menu. The selections available in this contextual menu depend on whether a clip or play-list is selected. However, they are the same as for a full Database Explorer panel. 4.4 PLAY-LISTS MODE This mode is only available in the Play-List Editor.
IP Director Version 4.3 – User Manual – Part 2 – Logging and Browsing Issue 4.3.C EVS Broadcast Equipment 4.4.1 ON-LINE PLAY-LISTS The Online Play-List tree displays the XT structure to enable a play-list that has on-line status, and is therefore present on the XNet network with a play-list number and location, to be selected. Note The XT structure displayed depends on the setting of the View XT Structure option in the Settings menu.
IP Director Version 4.3 – User Manual – Part 2: Logging and Browsing EVS Broadcast Equipment Issue 4.3.C of elements easier and quicker. Each type of view has its own set of search filters, so when a different view is selected the available search filters for each will change. Full search criteria as shown below only apply when a search for clips is being made. The search criteria for bins and play-lists only contain a free text search. 4.5.
IP Director Version 4.3 – User Manual – Part 2 – Logging and Browsing Issue 4.3.C EVS Broadcast Equipment 4.5.3 HOW TO CREATE AND STORE A SEARCH FILTER To create a search filter, proceed as follows: 1. In the Mini Database Explorer, right-click the Search Filters area. The contextual menu opens: 2. Select New from the contextual menu. The New Search Filter window is displayed to allow the selection of the filter’s criteria. 3. Select the icon corresponding to the search criteria you want to add.
IP Director Version 4.3 – User Manual – Part 2: Logging and Browsing EVS Broadcast Equipment 4.5.4 Issue 4.3.C HOW TO APPLY A SEARCH IN THE MINI DATABASE EXPLORER The display area for the Search Filters shows the list of search filters that have been created. To apply the required searches, check the box next to the filter to be applied and select APPLY button. The button will be coloured green when a search has been applied and the results will be displayed in the Objects List area.
Issue 4.3.
IP Director Version 4.3 – User Manual – Part 2: Logging and Browsing Issue 4.3.
Issue 4.3.
IP Director Version 4.3 – User Manual – Part 2: Logging and Browsing Issue 4.3.
Issue 4.3.C keyword grid · 44 log entry · 25, 27 media corresponding to log · 108 view properties log directory · 93 130 IP Director Version 4.