
User Manual User guide


If F keys have been configured, steps 2 to 7 of the complete procedure can be performed
at once by clicking the appropriate F key. See section "Configuring F Keys to Add Logs"
on page 73.
Simplified Procedure: Automatic Creation of a Clip at Log
Creation
To add logs to portions of a train previously recorded, when a clip has not yet been
created, proceed as follows:
1. Move through the loaded train thanks to the transport functions of the Clip Infos pane.
2. Click the Create a New Log button.
3. (optional) Enter metadata for the log as described in steps 3 et to 7 of the complete
procedure
4. Save the log by clicking the Create a New Log button or the Save Log button.
The clip INpoint is automatically recorded at the log timecode. The INpoint timecode
value is displayed in the INfield.
5. Create as many logs as you want to add to the clip.
As soon another log is saved at a timecode greater than the first log, the clip
OUTpoint is automatically recorded. Its timecode corresponds to the frame after the
last log. The OUTpoint timecode value is displayed in the OUTfield. The clip OUT
point is updated each time a new log is saved after the last log of the clip.
In case a log is created at a timecode smaller than the first log of the clip, the clip
INpoint is updated.
6. Enter clip metadata in the Clip Infos pane as described"Creating Clip(s) in a Live
Session" on page 68
7. Click the Save Clip button to save the clip. This button is available as soon as a
name has been entered for the clip.
9.5.3. How to Log an Existing Clip
Prerequisites
Load a clip on the Player pane, as described in section "How to Load a Clip" on page 57.
Complete Procedure
To add logs to an existing clip, proceed as follows:
1. Browse through the loaded clip to select the moment to log.
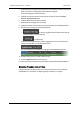
2. Click the Create a New Log button.
The log timecode is displayed in the Log Timecode field.
3. (optional) Enter a free-text description in the Description field.
IPClipLogger- Version 6.15- User Manual
9. Adding Logsto Media 79