
Use and Care Manual


www.evolutionbuild.com
7
loosening and then re-tightening the Bevel Lever Lock at
front of saw.
4. When making long, straight cuts, insert the edge guide to
the desired width and secure with thumb screw.
5. Adjust to the proper depth of cut by loosening and re-
tightening the rear Lever Lock at rear of saw. In most
cases, depth should be set at maximum unless there are
obstructions below the work surface. Depth can be set
by observing index marks printed on housing along depth
bracket.
6. Connect machine to power source.
7. Firmly grasp guide handle and trigger handle.
8. Position saw base plate on work surface near the cutting area.
9. When ready, start saw motor by activating trigger switch.
10. Slowly approach material edge and gently apply pressure
until saw blade has established a cutting groove in the material.
11. Apply smooth, constant pressure without over-loading
saw motor.
WARNING! IF SAW MOTOR SHOULD STALL OR STOP
BEFORE A COMPLETE CUT IS MADE ALWAYS REMOVE
FROM MATERIAL BEFORE ATTEMPTING TO RESTART
MOTOR. FAILURE TO DO SO COULD RESULT IN
PERSONAL INJURY.
AFTER COMPLETING THE CUT
1. After the cut, release trigger switch to the “OFF”
position.
2. When saw motor completely stops, place saw on secure
and level surface.
WARNING! ALWAYS DISCONNECT THE SAW FROM
POWER SOURCE BEFORE CHANGING BLADES.
WARNING! ALWAYS DISCONNECT THE SAW FROM
POWER SOURCE BEFORE CHANGING BLADES, CLEARING
CHIPS OR MAKING ADJUSTMENTS.
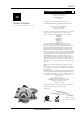
CHANGING SAW BLADE
Refer to the pictures on page 8.
1. Place saw on a level, secure surface.
2. Engage spindle lock.
3. Using supplied wrench, loosen and remove blade drive
flange.
4. Remove saw blade.
5. Thoroughly clean inner and outer blade drive flanges and
blade mounting surface before installing new blade.
6. Reverse process to install new blade.
CABLE REPLACEMENT
If the supply cord of this power tool is damaged, it must be
replaced by a specially prepared cord available through the
service organization.
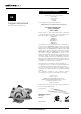
Model Evolution Rage-B Specifications
Motor (120V ~ 60 Hz) (Watts): 1200
Maximum Box (1/8” 3mm Wall 900): (2-1/4”) 60mm
Maximum Box (1/8” 3mm Wall 450): (1-3/8”) 40mm
Optimum Cutting Thickness (Mild Steel Plate): (1/8”) 3mm
Maximum Cutting Thickness (Wood 90º): (2-1/4”) 60mm
RPM No Load (min
-1
): 3700
Recommended Maximum Duty Cycle (Minutes): 30
Sound Pressure Level (dB(A)): 96.8(K=3)
Sound power level (dB(A)) 107.8(K=3)
Vibration Level (Under Load) (m/s
2
): 2.048(K=1.5)
Weight: 9.7lb
Maximum Dimensions HWD: (11”x15-1/2”x17-3/4”)
280x395x450
Minimum Dimensions HWD: (9-1/2”x10-1/4”x15-3/4”)
240x260x400
Blade Dimensions
Maximum Diameter: (7-1/4”) 185mm
Bore Diameter: 20mm
Thickness: (1/16”) 1.7mm
Ear and eye protection MUST be worn while operating
this equipment. Do NOT touch the blade while in motion.
Always follow the Personal Protection Equipment (PPE)
recommendations while operating this tool.
The declared vibration value has been measured in
accordance with a standard test method (EN60745) and may
be used for comparing one tool with another. The declared
vibration value may also be used in a preliminary assessment
of exposure.
WARNING. The vibration emission value during actual
use of the power tool can differ from the declared value
depending on the ways in which the tool is used. Identify
safety measures to protect the operator that are based on an
estimation of exposure in the actual conditions of use (taking
account of all parts of the operating cycle such as the times
when the tool is switched off and when it is running idle in
addition to the trigger time).
SPECIFICATIONS
US
MAINTAINENCE
US
RAGE-B