
Use and Care Manual


• When you put the tool away, switch off the motor and ensure that all
moving parts have come to a complete standstill.
• Ensure that moveable guards operate freely without jamming.
• Never use the tool without the original protection guard system.
Do not lock the moving guard in the open position.
• In case of jamming, immediately switch off the tool and disconnect
the plug.
• Ensure that the cutting depth adjustment, angle adjustment and
vice mechanisms are rmly xed whilst using the tool.
• Only use the anges and washers that are supplied with the tool,
and replace them if they become damaged or scored.
• Do not operate the tool under the inuence of drugs, alcohol or
medication. Keep loose items of clothing away from moving parts of
the saw. Keep hands away from blade whilst in motion.
• After installing a new blade, always run the machine for
approximately one minute before cutting. If the blade has a aw it
may shatter in this time, so stand away from the blade.
• Ensure that you use all necessary personal safety protection
equipment and follow all safety guidelines at all times.
Machine Set Up
Power Supply
It is recommended that the RAGE 2 should be used on a separate power
supply of not less than 12 AWG wire, and be protected by a Residual
Current Device. Any extension cable should be no longer than 15 Metres
and should be 1.5mm
2
for 240v and 2.5mm
2
for 110v machines.
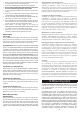
Changing Blades: Ensure the machine is unplugged. Undo the buttery
nut (g. 1. ref. A) and rotate the blade cover. Press in the spindle lock and
check that it is fully engaged by manually rotating the blade. Using the
supplied 8mm Hex wrench, undo the hex bolt that secures the blade by
turning it counter clockwise, and remove the bolt, washer, outside blade
ange and blade. Note: Do not remove inside blade ange. Press in
the spindle lock. Replace blade, making sure that the printed side of the
blade is facing you then ret the outside blade ange, washer, and hex
bolt. Turn the hex bolt clockwise to tighten. Note: Check that the spindle
lock is fully released by manually rotating the blade before use. Rotate
the blade cover back into position and tighten the buttery nut. Ret the
Hex wrench to the holder on the machine.
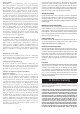
Adjustment Of The Cutting Depth Stop
The down stop (g. 2. ref. A) should be adjusted so that the maximum
cutting capacity is maintained without the blade hitting the base. Lower
the cutter head until the arm hits the down stop. If necessary adjust the
down stop screw and lock nut until the correct clearance is achieved.
Tighten the lock nut to lock in position.
Adjustment Of The Cutting Angle
The vice can be adjusted from 0 to 45 degrees. Loosen the orange lever
on the vice and adjust to the required cutting angle. Tighten lever to lock
in position.
Adjustment Of The Stationary Vice
The vice can be repositioned by removing the orange lever and Allen
screw, and then sliding the fence to the desired position. Replace and
tighten the lever and screw to lock in position.
Metal Cutting Saw Safety
Operating Advice
Always securely clamp the material to be cut in the vice. To start the tool,
you must depress the main trigger switch to power the motor. With the
motor head in the raised position, switch on the motor and allow to come
up to full speed. Lower the motor head to begin cutting. When starting
a cut take care to introduce the blade to the material slowly, using light
pressure at rst to keep blade from grabbing, and then continue with
Σταθεροποίηση του Υλικού Εργασίας
Τοποθετήστε το υλικό εργασίας στη μέγκενη έτσι ώστε εάν
προκύψει μια εμπλοκή, η λάμα να μην έχει την τάση να το
πετάξει από τη. Στερεώστε το καλά. Οι γωνίες θα πρέπει να είναι
σε ανάστροφη θέση έτσι ώστε το σημείο διατομής να είναι στην
υψηλότερη θέση. Το πριόνι κόβει πιο αποτελεσματικά εάν η λάμα
κόβει στο λεπτότερο τμήμα του υλικού (Εικόνα 3).
Συντήρηση και Μηχανικές Βλάβες
Διατηρείτε το εργαλείο και το καλώδιό του καθαρό. Με τακτική
αναρρόφηση η εμφύσηση αέρος να διατηρείτε το σύστημα
εξαερισμού του κινητήρα καθαρό και επίσης να ελέγχετε την
καλή λίπανση του μηχανήματος κάθε εβδομάδα. Αποφεύγετε
την χρήση καθαριστικών προϊόντων στα οποία περιλαμβάνονται
βενζίνη, τριχλωροαιθυλένιο, χλώριο και αμμωνία καθώς αυτά
μπορεί να προκαλέσουν ζημία στα πλαστικά μέρη. Σε περίπτωση
μηχανικής ή ηλεκτρικής δυσλειτουργίας σβήστε αμέσως το
εργαλείο και αποσυνδέστε το από το ρεύμα.
Καθαρισμός του Δίσκου Ρινισμάτων
Καθαρίζετε περιοδικά τον δίσκο ρινισμάτων αφαιρώντας τη βίδα
(Εικόνα 2, Παραπομπή Β) και βγάζοντας τον δίσκο. Αδειάστε
τον δίσκο σε ένα κατάλληλο δοχείο απόρριψης και στη συνέχεια
επαναπροσαρμόστε τον δίσκο και τη βίδα κρατήματος.
Επιθεώρηση Ψήκτρας (καρβουνάκι) και Αντικατάσταση
Υπερβολικοί σπινθήρες υποδεικνύουν συνήθως την παρουσία
ρύπων στον κινητήρα ή φθορά στα καρβουνάκια. Ελέγξατε
τη φθορά μετά τις πρώτες 50 ώρες χρήσης και στη συνέχεια
ανά διαλείμματα 10 ωρών χρήσης. Αντικαταστήστε τα όταν το
πάχος τους φθάσει τα 6mm. Οι υποδοχές για τα καρβουνάκια
βρίσκονται στο κάλυμμα του κινητήρα το ένα απέναντι στο άλλο
και το οποίο ξεβιδώνετε για να έχετε πρόσβαση σε αυτό. Για
οποιοδήποτε άλλο σέρβις και συντήρηση πηγαίνετε το μηχάνημα
σε ένα εξουσιοδοτημένο κέντρο σέρβις.
Λίπανση
Τα ρουλεμάν του κινητήρα του μηχανήματός σας έχουν λιπανθεί
στο εργοστάσιο με ικανή ποσότητα λιπαντικού ώστε να
διατηρηθεί για όλη τη διάρκεια ζωής του μηχανήματος, κάτω από
φυσιολογικές συνθήκες λειτουργίας. Άλλα κινητά μέρη μπορούν
να λιπανθούν με λεπτό μηχανικό λάδι όπως κρίνετε απαραίτητο,
Συνιστάται να πηγαίνετε το μηχάνημα στο πλησιέστερο
ΕΞΟΥΣΙΟΔΟΤΗΜΕΝΟ ΚΕΝΤΡΟ ΣΕΡΒΙΣ τουλάχιστον μια
φορά το χρόνο για ένα λεπτομερές καθάρισμα και λίπανση. Όλες
οι επισκευές και το σέρβις που γίνεται από αυτά τα κέντρα είναι
πλήρως εγγυημένα έναντι ελαττωματικών υλικών και εργασίας.
12 Μηνων Εγγυηση
12 ΠΕΡΙΟΡΙΣΜΕΝΗ ΕΓΓΥΗΣΗ ΕΝΟΣ ΜΗΝΟΣ Η EVOLUTION
POWER TOOLS ΔΙΑΤΗΡΕΙ ΤΟ ΔΙΚΑΙΩΜΑ ΝΑ ΚΑΝΕΙ ΒΕΛΤΙΩΣΕΙΣ
ΚΑΙ ΤΡΟΠΟΠΟΙΗΣΕΙΣ ΣΤΟ ΣΧΕΔΙΟ ΧΩΡΙΣ ΠΡΟΗΓΟΥΜΕΝΗ
ΠΡΟΕΙΔΟΠΟΙΗΣΗ.
Η Evolution Power Tools, εντός δώδεκα (12) μηνών από την
αρχική ημερομηνία αγοράς, θα επιδιορθώσει ή θα αντικαταστήσει
οποιαδήποτε προϊόντα διαπιστωθεί ότι είναι ελαττωματικά σε υλικά
και κατασκευή. Η εγγύηση αυτή είναι άκυρη εάν το εργαλείο που
επιστραφεί έχει χρησιμοποιηθεί για να κόψει υλικά πέρα από τα
υποδεικνυόμενα στο Εγχειρίδιο Οδηγιών ή εάν το πριόνι έχει υποστεί
βλάβη από ατύχημα, αμέλεια, ή μη σωστό σέρβις. Η εγγύηση αυτή δεν
ισχύει για μηχανήματα και/ή εξαρτήματα που έχουν υποστεί μεταβολή,
έχουν αλλαχτεί, ή τροποποιηθεί με οποιοδήποτε τρόπο, ή έχουν
γίνει αντικείμενο χρήσης πέρα από τις συνιστώμενες δυνατότητες
και προδιαγραφές. Τα ηλεκτρικά εξαρτήματα καλύπτονται από
αντίστοιχες εγγυήσεις κατασκευαστών. Όλα τα προϊόντα που
4 31