
Installation Guide
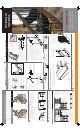

1. A firm twist of the baluster
may be all that is necessary
to remove baluster from
tread and handrail. Remove
any nails remaining or
fasteners.
2.
Once loosened, lift the
baluster up into the handrail,
enough to clear the stair
tread at the bottom, and
then tilt it to the side and pull
out from the handrail.
1.
Cut baluster in half with a
hand or power saw.
2. Twist each half to loosen.
3. Remove each half of the
baluster from the stair tread
and handrail, and any nails
remaining or fasteners.
4. If glue and/or wood still
remains in the holes, a
drill with a 1/2” bit can
be used to remove any
excess.*
Flat Shoe
Rake Shoe
Choose your look ...
*Check local building codes to ensure compliance
Replacing Wood Balusters with Iron Balusters
1st Method:
Wood-to-Iron Retrofit in just a day!
Double
Basket
Baluster
Single
Basket
Baluster
Add the Elegance of Iron to your home.
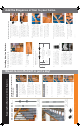
Trim Iron Balusters to fit.
Using a metal tape measure,
measure the distance from
the front hole in the stair tread
to the corresponding hole in
the bottom of the handrail.
It may be necessary to drill
the hole deeper into the
handrail to accommodate the
baluster. Be careful to NOT
drill through top of handrail.
Do this same procedure
for the all holes in the
stair tread.
To each of these measurements add 1½”.
Example: 35” + 1½” = 36 -½”
This is your baluster length.
Using the above measurement,
cut the baluster to the length
needed. Be sure to cut from the
bottom of your baluster. The top
is the end with the rounded tip.
A Chop Saw with a metal-
cutting blade is the preferred
way to cut the iron balusters.
Take care when marking and
cutting the balusters. Use safety
glasses and follow proper
safety precautions while cutting
balusters. Note: Iron can be
extremely hot after cutting.
Flat
Shoe
Rake
Shoe
Rake
1.
2.
3.
5.
4.
Before placing the balusters in
the staircase, top and bottom
“shoes” must be inserted
on both ends. Loosen set
screws to insert baluster
ends. Face set screws in
same direction.
6.
A RAKE shoe should be
placed at the top (Pin end) of
each baluster. A FLAT shoe
will go at the cut end of each
baluster. Tighten in place a
few inches from each end.
This keeps them secure during
placement of the baluster.
7.
Make sure the “rake” of the
shoe coincides with the angle
of the handrail. The angle of
the rake shoes may have to
be adjusted with a grinder or
belt sander for the best fit.
TIP: Test-fit all balusters
before securing with epoxy.
8.
Once the epoxy has set, the
rake and flat shoes can be put
into position and secured with
an allen wrench.
11.
Place the Pin Top into the
handrail hole first and then into
the stair tread hole. Straighten
baluster once inserted. The
Pin Top should press firmly
against the front of the
handrail hole,making sure that
the flat shoe at the bottom
squares up with the front of
the step.
10.
Following manufacturers
instructions, place epoxy in
the stair tread hole and some
on the Pin Top of the baluster.
9.
Two Methods for the Removal of
Old Balusters:
Installing New Iron Balusters
Double
Twist
Baluster
Single
Twist
Baluster
2nd Method
3. If glue and/or wood still
remains in the holes, a
drill with a 1/2” bit can
be used to remove any
excess.*
Install and Secure Balusters
2 Balusters per step*
3 Balusters per step*
Baluster Top
35”
Add
1½”
36½”
Trim
and
discard
this
section
The measurement from the top
of the stair tread to the bottom
of the handrail.
This is the length to
which you trim
the baluster.
SOM300114 Effective 11/20/2006 rev062010
*Note: a. 1/2” balusters require 5/8” holes.
b. 5/8” balusters require 7/8” holes.