
Installation Guide

Face Mounting Installation - starting, knee wall and balcony applications
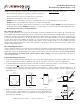
1. Determine mounting location, centerline (figure 6) and finished rail height. Then measure, mark and cut bottom of
newel post base to accommodate. To minimize tearout, pre-score all cut lines with a razor knife and use a sharp saw
blade (figure 3 - page 1).
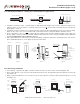
2. If required, notch the newel post to accept the first step or balcony (knee wall applications may not require notching)
(figure 7). As in step 1, pre-score all cut lines with a razor knife and use a sharp saw blade to minimize tearout.
3. From scrap lumber, cut 7” to 8” long support block(s) (quarter notch and intermediate landing notch require two
blocks). Apply construction adhesive and and clamp into the inside bottom of the newel post. Nail block(s) for additional
strength. Predrill all holes into newel base (figure 8).
4. Drill countersunk holes in newel base for lag bolts and apply construction adhesive to mounting location. Put newel in
place and install lag bolts to secure (figure 9). Plug holes and sand.
Box Newel Cap Installation
1. Select flat top or pyramid cap. Apply construction adhesive to the top of the newel center shaft (figure 10).
2. Place newel cap base on top of newel center shaft and check for level. Then pin nail in place through side of newel cap
base (figure 11).
3. Apply construction adhesive to recessed area on top of newel cap base. Then press flat or pyramid cap into recessed
area (figure 12).
distributed by Surewood-LNL • www.surewoodlnl.com
Installation Instructions:
Fixed Base Box Newel (page 2 of 2)
Top View: Kneewall
Baluster Centerline
Baluster Centerline
Top View: Landing
Baluster Centerline
Top View: Open Tread
figure 6
figure 7
figure 10 figure 11 figure 12
figure 8 figure 9
half notch quarter notch
intermediate
landing notch
apply
construction
adhesive to
top of
center
shaft
place newel cap
base on center shaft
press newel cap
into recessed area
pin nail all
four sides
Side View
center
shaft
newel
cap base
newel
cap
newel cap base
apply construction
adhesive to recessed area
Top View Side View TopView Side View
clamp and
nail suppor
t
block
apply
construction
adhesive to
all mounting
surfaces
7” to 8”
apply construction adhesive
to all mounting surfaces
drill holes,
install lag bolts,
plug and sand