
Installation Guide

Package Contents
1of3
markingpen,1/4”
drillbitanddrill.
IntegratedLED20W.
20-30minutes
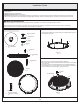
Identifyandinspectallpartsbeforebeginninginstallation.Checkpackagecontentlistanddiagramsbelowtoensureallpartsare
present.Ifanypartsaremissingordamaged,donotattempttoassemble,install,oroperatethefixture.Contactyouroriginalplaceofpurchase.
LightSource:
EstimatedAssemblyTime:
Preparation:
ToolsRequired: Flathead screwdriver, Phillips screwdriver, pliers, wire cutters, wire strippers, electrical tape, safety glasses,
Warnings and Cautions
Turn off electricity at circuit breaker or main fuse box before installation. Consult a licensed electrician if in doubt.
These instructions are provided for your safety. It is very important you read them completely before installing the fixture. We strongly
recommend that a licensed, professional electrician perform the installation.
A
Inner Backplate
x1
Mounting Screw
x3
B
Support Rod
x6
H
Lock Screw
x6
F
Crystal
(2 free replacement
crystals are included)
x44
I
Diffuser
x1
K
C
Wall Anchor
x3
D
Screw
x3
Washer
x3
E
G
N
D
Fixture Body
x1
G
Bottom Plate
x1
J
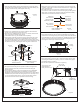
STEP 1 Install Support Rods-
A. Thread Support Rods (H) onto the bolts on the Bottom Plate (K) and
hand tighten until snug.
K
H
Figure 1
STEP 2 Install Diffuser-
A. Remove lock nuts and tabs from the Bottom Plate (K).
B. Place the Diffuser (I) onto the Bottom Plate (K) with the crystal beads
are on the top.
C. Place the previously removed tabs back onto the Bottom Plate (K)
and the Diffuser (I). Thread the previously removed lock nuts back to
secure the Diffuser (I). Hand tighten gently until snug.
Lock Nut
Tab
K
I
Crystal Beads
Figure 2
Installation Guide