
Full Product Manual


18
MIG/FLUX-CORED WIRE, DRIVE ROLL AND GUN INFORMATION
The MIG gun has a Euro-style quick connect that is used to connect the gun to the welder. This type of connection is the most common throughout the world and
most major MIG gun manufacturers can supply any MIG gun in this type of conguration If you need to change your gun to match other guns in your shop (to
keep consumables the same), contact the manufacturer of your preferred gun for a replacement gun with this type of back-end. The Euro-style quick-connect can
be rapidly connected and disconnected from the welder without the use of any tools.
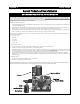
To install the MIG Gun:
• Align the pins and the wire pick-up on the torch connector with the holes on the feeder receptacle on the welder.
• Fully engage the connector into the receptacle, wiggling slightly to ensure the ttings seat home.
• Using your hand, twist the plastic hand nut on the gun connector clockwise until it is snug.
• Check for side to side play once more by wiggling it.
• Re-tighten if necessary.
The MIG un supplied with this unit is an air-cooled 15 Series, up to 200 Amp gun design. This gun is a common Binzel®-type gun. This is a commonly used gun
design and offers excellent ergonomics and dependability.
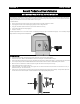
To load the spool of wire:
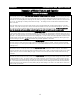
• Loosen and remove the nger nut and tension spring on the spool carrier by turning the nut counter-clockwise.
• Remove the outer carrier. Notice the wide shoulder of the outer carrier is facing out. The narrow shoulder is facing in.
• Slide the spool onto the shaft and onto the inner carrier. Reinstall the outer carrier with the narrow shoulder facing in. The spool should ride on the shoulder.
• For 4 inch spools, the spool will be sandwiched between the two carriers and will not ride on the carriers. It will ride directly on the stud shaft.
• Make sure the wire is unwinds from the bottom of the spool. The guide cable should not be severely bent at an angle.
• Adjust de-spooling tension by turning the nger nut.
• Lightly spin the spool. If it free-wheels more than 1/4 turn, tighten hex nut. If it does not free-wheel at all, loosen tension until it free wheels 1/4 turn. (4”
spools do not freely spin. Use minimum tension.)
• Locate the end of the wire and clip the bent end of the wire so that it will feed through the wire feed mechanism smoothly. Carefully hold the spool of wire
with one hand so the wire will not de-spool. Proceed to instructions on the next page regarding feeding the wire.
Section 2 Setup Guide
General Product and Use Information
(Viewed from the Rear)
Tension
Spring
Nut
Stud
Inner Carrier
Outer Carrier