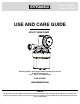
SKU # 1002303674 Model # LTS250A USE AND CARE GUIDE UTILITY SINK PUMP Questions, problems, missing parts? Before returning to the store call Everbilt Customer Service 8 a.m. - 6 p.m., EST, Monday-Friday 1-844-241-5521 WWW.HOMEDEPOT.COM THANK YOU We appreciate the trust and confidence you have placed in Everbilt through the purchase of this utility sink pump. We strive to continually create quality products designed to enhance your home.
Table of Contents Pre-Installation .............................................................. 4 Operation ....................................................................... 8 Care and Cleaning ........................................................ 9 Troubleshooting .......................................................... 10 Table of Contents .......................................................... 2 Performance ..................................................................
Safety Information (continued) IMPORTANT: Ensure the electrical power source is adequate for the requirements of the pump. WARNING: Ensure that the electrical circuit to the pump is protected by a 15 Amp fuse or circuit breaker. IMPORTANT: This pump is made of high-strength, corrosion-resistant materials. It will provide trouble-free service for a long time when properly installed, maintained, and used. However, inadequate electrical power to the pump, dirt, or debris may cause the pump to fail.
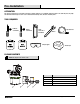
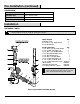
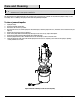
Pre-Installation APPLICATION This pump is designed to be used with a sink where a gravity drain line is not available. Attach the pump to the drain tail piece; the pump will start when water begins to drain. Uses include basement laundry sinks, wet bars and utility sinks. TOOLS REQUIRED Flathead Screwdriver Phillips Screwdriver Hand Hacksaw or PVC Cutter Wrench Safety Goggles Tape Measure Thread Tape PACKAGE CONTENTS NOTE: The adaptor is not shown to scale.
Pre-Installation (continued) SPECIFICATIONS Power supply 115V, 60 HZ., 15 Amp Circuit Liquid temp. range 32°F to 120°F (0°- 50°C) Pump Inlet 1-1/2 in. NPT Pump discharge 1-1/4 in. NPT Installation (SEE FIGURES 1 AND 2) WARNING: Electric Shock Hazard. Plug pump into a properly grounded, GFCI protected outlet. Do NOT plug in the pump until after it is completely installed. Do not remove or modify the grounding pins on the plugs.
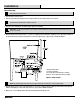
Installation Mount the pump NOTE: DO NOT use plumber’s pipe threading compound (“pipe dope”) on plastic pipe; it can damage the plastic, causing leaks and piping failure and void the warranty. 1. Place the sink in its final location. 2. Remove any existing drain fittings back to the tail piece. Make sure the existing tail piece does not leak. NOTE: If the sink-drain tail piece is not 1-1/2 in. NPT, you will have to adapt it (bushings, reducers, etc.).
Installation (continued) 7. Do a trial assembly (dry - no glue) of the pump onto the drain pipe. Swing the pump until it accurately faces the discharge piping, and then mark the pump and the inlet pipe/adapter assembly so that you can accurately install the pump in Step 8. Arrange a temporary support under the pump to relieve the strain on the sink drain piping while the glue is setting. Leave it in place while you measure and cut the discharge piping (Step 12). 8.
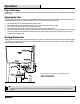
Operation Plug in the Pump AFTER the pump is completely installed, plug the switch into a GFCI protected, properly grounded outlet. Plug the pump into the back of the switch’s plug. Adjusting the Flow The drain pump can pump up to 21 gallons per minute (GPM). Normal sink drains allow only 5 to 6 GPM to flow. Adjust the discharge shutoff/flow balancing valve as follows so that the pump does not cycle on and off when the faucets are on full. Run water into the sink.
Care and Cleaning CAUTION: Always use the handle to lift the pump. Never use the power cord to lift the pump. To avoid skin burns, unplug the pump and allow time for it to cool after periods of extended use. This pump requires very little maintenance and should provide a long service life. Problems are rare; when the pump flow drops off, the most likely cause is something solid going down the drain and jamming the impeller. To clear a jammed impeller: Unplug the Pump.
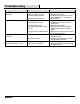
Troubleshooting Problem Possible Cause Corrective Action Pump does not run when water flows in from the sink. 1. The pump is unplugged. 2. There is no power to the outlet. 3. The pump impeller is jammed. 1. Plug in the pump. 2. Check the fuse / breaker. 3. Unplug the pump and follow the procedure under “Maintenance” to clear the pump. 4. Remove stopper. 4. The sink stopper is in the drain. Pump runs but does not empty the sink. 1. The drain is clogged. 2. The discharge line is clogged. 3.
Questions, problems, missing parts? Before returning to the store call Everbilt Customer Service 8 a.m. - 6 p.m., EST, Monday-Friday 1-844-241-5521 WWW.HOMEDEPOT.
SKU # 1002303674 Modelo # LTS250A GUÍA DE USO Y DE MANTENIMIENTO BOMBA PARA FREGADERO DE USO GENERAL ¿Preguntas, problemas, piezas que faltan? Antes de devolverla a la tienda, llame a Servicio al Cliente de 8:00 AM a 6:00 pm EST de Lunes a Viernes. 1-844-241-5521 HOMEDEPOT.COM ¡GRACIAS! Nosotros agradecemos la confianza que Usted ha puesto en Everbilt por la compra de esta Everbilt por la compra de esta bomba para fregadero de uso general.
Table des matières Table des matières ...................................................... 14 Funcionamiento ........................................................... 14 Información De Seguridad ......................................... 14 Garantía ........................................................................ 15 Pre-Montaje ................................................................. 16 Montaje ........................................................................ 17 FUNCIONAMIENTO ..
Consignes de sécurité (suite) ADVERTENCIA: Asegúrese de que el circuito eléctrico a la bomba este protegido por un fusible de 15 amperios o un cortacircuitos. IMPORTANTE: Asegure que la fuente de electricidad es adecuada para los requisitos que exige la bomba. IMPORTANTE: Esta bomba está hecha de materiales de alta fuerza y resistentes a la corrosión. Cuando ha sido correctamente instalada no tendrá problemas de mantenimiento o de uso por mucho tiempo.
Pre-Montaje APLICACIÓN Esta bomba ha sido diseñada para usarse con un fregadero en donde no se dispone de una tubería de desagüe por gravedad. Conecte la bomba a la pieza de conexión de desagüe; la bomba se encenderá cuando el agua comience a drenar. Los uso sin cluyen tinas de lavandería en sótanos, frigobares y fregaderos de uso general.
Pre-Montaje (seguido) CARACTÉRISTIQUES Fuente de Alimentación 115 Volteos, 60 HZ., 15 Ampos de Mínimo Circuito Alcance de Temperatura de Líquidos 32 a 120°F (0 a 50°C) Entrada de La bomba NPT de 1-1/2 pulgadas Tamaño del Desagüe NPT de 1-1/4 pulgadas Montaje (VER FIGURAS 1 Y 2) ADVERTENCIA: Peligro de choque eléctrico. Enchufe la bombaen un tomacorriente debidamente puesto a tierra y protegido porun disyuntor de escape a tierra, (GFCI).
Montaje(seguido) Fixation de la pompe AVISO: NO use un compuesto de plomería para roscas detuberías (compuesto lubrificante) en tuberías de plástico, ya quepuede dañar el plástico, provocar fugas y fallas en la tubería e invalidará la garantía. 1. 2. Coloque el fregadero/la pileta en la ubicación final. Saque todos los accesorios de desagüe presentes hasta el cabo de conexión. Verifique que el cabo de conexión presente no tenga fugas.
Montaje (seguido) 6. Mida la tubería de PVC de 1-1/2” PVC contra el desagüe y la bomba y recorte la tubería para adaptarla al tamaño correcto. 7. Haga una prueba para armar la bomba (en seco - sin pegamento)en la tubería de desagüe. Haga balancear la bomba hasta que quede precisamente orientada hacia la tubería de desagüe, y luego marque tanto la bomba como la unidad dela tubería de admisión/adaptador, para poder instalar la bomba correctamente en el Paso 8.
FUNCIONAMIENTO Enchufe la bomba DESPUÉS de haber completado la instalación de la bomba,enchufe el interruptor en un tomacorriente con protección GFCI (disyuntor de escape a tierra), debidamente puesto a tierra. Enchufe la bomba en la parte posterior del interruptor de ficha. Cómo regular el flujo Cómo regular el flujo la bomba de drenaje puede bombear hasta 21 galones por minuto (GPM). Los drenajes normales de fregaderos permiten un flujo de sólo 5 a 6 GPM.
CUIDADO Y LIMPIEZA PRECAUCIÓN: Siempre utilice el mango para levantar la bomba. Nunca use el cable de conexión para levantar la bomba. Para prevenir quemaduras en la piel, desenchufe la bomba y dele tiempo a que se enfríe después de periodos extensos de uso. Esta bomba requiere muy poco mantenimiento y deberá proporcionarle un servicio prolongado.
RESOLUCIÓN DE PROBLEMAS Problema Causas Probables Acción Correctiva La bomba no marcha cuando corre agua desde el fregadero 1. La bomba está desenchufada. 2. El tomacorriente no tiene potencia. 3. El impulsor de la bomba está atascado. 1. Enchufe la bomba.. 2. Inspeccione el fusible / disyuntor. 3. Desenchufe la bomba; Siga el procedimiento indicado en la sección de “Mantenimiento” para despejar la bomba. 4. Saque el tapón. 4. Tapón del fregadero en el desagüe.
Questions, problèmes, pièces manquantes ? Avant de retourner au magasin, appelez le Service à la clientèle Everbilt du lundi au vendredi, de 8 h à 18 h, heure normale de l’Est 1-844-241-5521 WWW.HOMEDEPOT.