User Guide WARNING Use only with supplied power supply. Avoid spilling liquids onto/into the unit. Do not expose to excessive heat or moisture. Do not open – there are no user serviceable parts inside. This equipment has been tested and found to comply with the limits for a Class B digital device pursuant to Part 15 of FCC rules.
TimeFactor User Guide Blank Page
TimeFactor User Guide Table of Contents WARNING ........................................................................................................................... 1 Introduction ....................................................................................................................... 7 A Few Words of Advice....................................................................................................... 7 Key Features .............................................................
TimeFactor User Guide Table of Contents The Effects ........................................................................................................................ 22 Selecting Effects ...................................................................................................... 22 Control Knobs/Effect Parameters ...................................................................................... 23 Dly Mix ................................................................................
TimeFactor User Guide Table of Contents Organizing Your Presets in Banks ................................................................................... 42 Dumping (Backing-up) Presets and System Settings ........................................................ 42 Restoring Presets and System Settings ............................................................................ 42 Auxiliary Switches ........................................................................................................
TimeFactor User Guide Table of Contents Restoring Factory System Settings .................................................................................. 59 Restoring Factory Presets and System Settings ................................................................ 59 Software Updates ......................................................................................................... 59 MIDI Implementation Chart ....................................................................................
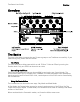
TimeFactor User Guide Introduction Introduction Congratulations on choosing an Eventide Effects Processor. For years we’ve dreamed of putting our rack mount effects in the hands of performing musicians and, in particular, at the feet of guitar players. TimeFactor is the realization of that dream; bringing true studio-quality audio, massive processing power, world-class effects, and unmatched flexibility to your live sound.
TimeFactor User Guide Overview Overview The Basics There are a few basic concepts that you’ll have to grasp to use TimeFactor successfully. If you read nothing else, please read this section. The Effects There are ten distinct delay types which we call “Effects.” Select an Effect by turning the Encoder knob. Only one Effect can be active at a time. Controlling the Effects Each Effect has parameters that can be modified by turning the ten Control Knobs.
TimeFactor User Guide The Basics The Presets TimeFactor lets you save an Effect after you’ve adjusted the Control Knobs. An Effect along with a particular setting of its parameters is called a “Preset.” TimeFactor lets you save up to 100 Presets. Instructions on saving Presets are covered later in this User Guide. The Banks TimeFactor lets you quickly switch between two Presets. In Bank Mode, just press either the Left or Middle Footswitch to instantly call up your Preset.
TimeFactor User Guide The Basics that’s in Bypass. Press the same switch again to enable the Preset. The Billboard briefly displays [ACTIVE] to indicate that the Preset is enabled. Changing Banks In Bank Mode, 2 of the 100 Presets are instantly accessible. In order to access the other 98 Presets, you’ll have to change Banks. TimeFactor gives you the ability to turn Banks on and off. This ability is important for performance – you can choose to only activate the Banks and Presets that you’ll need.
TimeFactor User Guide Connections Connections TimeFactor is designed to be flexible and can support both instrument and line-level inputs and outputs. Rear panel toggle switches allow you to independently select input and output levels. Audio Inputs and Outputs accept standard mono (unbalanced) ¼” phone plugs. TimeFactor can be connected directly to your guitar, behind another pedal, in your Amp’s effects loop or to your mixer’s send/return or insert.
TimeFactor User Guide Typical Setups Guitar > TimeFactor > Amp - Mono In/Mono Out This is the simplest way to connect TimeFactor. Connect your guitar cable to TimeFactor Input 1 and a cable from TimeFactor Output 1 to your amp. Input and Output Level switches (In Lvl & Out Lvl) should be set to GUITAR and AMP. If you are using other stompboxes or pedals, it’s best to connect them in front of TimeFactor. Connect TimeFactor’s Input 1 to the output of the last pedal.
TimeFactor User Guide Typical Setups Guitar > TimeFactor > Amp 1/Amp2 – Mono or Stereo In/Stereo Out Connect your guitar cable to TimeFactor Input 1 and a cable from TimeFactor Output 1 to one amp and a second cable from TimeFactor Output 2 to the other amp. Input Level switch (In Lvl) should be set to GUITAR and Output Level switch (Out Lvl) set to AMP. If you are using other stompboxes or pedals, it’s best to connect them in front of TimeFactor.
TimeFactor User Guide Typical Setups Guitar > Amp Effects Send > TimeFactor > Amp Effects Return If your Amp has an Effect Loop, you can connect TimeFactor’s Input to the Amp Effect Loop Send and TimeFactor’s Output to the Amp Effect Loop Return. Most guitar amp’s Effects Loop run at Line Level so set TimeFactor’s Input and Output Level Switches to “Line.
TimeFactor User Guide Typical Setups Mixer Effects Send> TimeFactor > Mixer Effects Return When connecting TimeFactor to a Mixer, set TimeFactor’s Input and Output Level Switches to “Line.
TimeFactor User Guide Setting and Monitoring Levels Setting and Monitoring Levels The TimeFactor’s output levels can be adjusted to optimize performance in most setups. It is sometimes desirable to adjust the output level of a given Effect/Preset. For example, an effect like DuckedDelay may have changes in amplitude and, depending on a given Preset’s parameter settings, you may find it too quiet or too loud. This is a consequence of the effect and not a question of level matching to best fit in a setup.
TimeFactor User Guide SpillOver SpillOver SpillOver provides smooth transitions when changing Presets by fading the lingering echoes of one Preset into the echoes of the next Preset. SpillOver [SPILL] can be turned ON or OFF from the Utility section of the System menu. Default is OFF. Here’s how to change this: 1) Press and hold the Encoder and Right Footswitch simultaneously for a few seconds to enter System Mode. Release the Encoder. 2) Turn the Encoder until [UTILITY] is displayed.
TimeFactor User Guide Swell Input and Output Swell The expression pedal can be used to give a volume swell, either before or after the effect. This can be enabled either globally, meaning it is active all the time, or on a preset by preset basis. You might want to use it before the effect to disconnect or reduce the input, and listen to the effect die away, whereas after the effect it can be used as a volume control or to perform fadeouts.
TimeFactor User Guide Bypass Bypass It’s important to select the TimeFactor Bypass function that works best with your setup. TimeFactor gives you the choice of three types of Bypass – DSP Bypass, Relay Bypass, and DSP+FX Bypass. TimeFactor’s default Bypass setting is DSP Bypass. DSP Bypass TimeFactor’s default is [DSP] Bypass. When set to [DSP] Bypass, bypassing sends the audio at the DSP’s inputs directly to the outputs without any effects processing. This type of bypassing works well in most situations.
TimeFactor User Guide Mix Control Note: TimeFactor has been carefully designed to not mess with your tone in any of the Bypass settings. Note: When connecting TimeFactor to a computer, we suggest that you use a dedicated audio interface (e.g. a Firewire Interface) and to select the type of Bypass that works best for your application. Note: When TimeFactor is turned Off, the relays automatically Bypass the unit.
TimeFactor User Guide Mix Control Global - Mix Mix values are always saved with each Preset. Often however, it’s useful to set the same Mix values for all of the Presets that you’re using. To do this, use the MIX function under the System GLOBAL command. When MIX is ON, the Mix values saved with the Preset are ignored and the current Mix value is used for all Presets. Turning MIX ON or OFF. The factory default is OFF.
TimeFactor User Guide The Effects The Effects TimeFactor has nine distinct delay Effects – DigitalDelay, VintageDelay, TapeEcho, ModDelay, DuckedDelay, BandDelay, FilterPong, MultiTap, Reverse - and a Looper. DigitalDelay – Twin 3 second delays with independent delay time and feedback controls. VintageDelay – Simulates the sound of analog and digital delays from days gone by. TapeEcho – Simulates the saturation, wow and flutter of analog tape delay.
TimeFactor User Guide Control Knobs/Effect Parameters Control Knobs/Effect Parameters When an Effect is selected using the Encoder, the Effect’s parameter values are set by the current position of the ten control knobs. When a control knob is turned, the Billboard displays the parameter’s name and value. The controls are arranged in two rows and grouped according to their functions. The control knobs located along the top row are the primary level setting, delay times and feedback controls.
TimeFactor User Guide Control Knobs/Effect Parameters The following describes the control knob functions for the nine delay effects. The Looper requires special controls that are described in the Looper Section of this User Guide. Dly Mix Dly Mix (Delay Mix) controls the relative level of the twin delays, Delay A and Delay B. TimeFactor has circuitry that detects which input/output jacks are being used and adjusts the routing of signals through the Effects algorithm accordingly.
TimeFactor User Guide Control Knobs/Effect Parameters Dly Time A & Dly Time B With Tempo OFF, these controls set delay time for Delay A and Delay B from 0 to 3000 ms (milliseconds). With Tempo ON, delay time can be sync’d to the tempo and is displayed as a rhythmic sub-division of the tempo beat value - changing this from 0 delay to a whole note in common note increments.
TimeFactor User Guide Control Knobs/Effect Parameters ModDelay Xnob/Wave Shape: Selects the modulation wave shape as displayed by the Billboard display. There are two choices for each wave shape. The single waveforms modulate the two delays in phase and the double waveforms modulate the two delays out of phase. Depth: Selects the amount of delay modulation (0=OFF, 10=MAX). Speed: Sets the delay modulation rate (0-5Hz).
TimeFactor User Guide Catchup crossfades and a smoother reverse sound. Xnob sets the crossfade rate (XFADE) from 2 ms to 200 ms. Depth: Selects the amount of modulation (0=OFF, 10=MAX). Speed: Sets the delay modulation rate (0-5Hz). Filter: A low pass/high cut filter variable from 0 (no filtering) to 100 (extreme hi cut).
TimeFactor User Guide Catchup Looper The Looper provides 12 seconds of mono recording. Salient features are: loop recording in seconds or beats, variable speed scrubbing during playback and dubbing (including reverse playback and dubbing), seamless dubbing, and real-time adjustment of the loop starting point and loop length. If your TimeFactor is connected to a stereo source, the inputs are automatically summed and the sum is the Looper’s input. The Looper’s output drives both outputs identically.
TimeFactor User Guide Looper – Press to create Loop End and start Dubbing. The Dub Mode setting determines if the new audio is added to or replaces the previously recorded audio. – Press to create Loop End and start Playing from Loop Start. The Play Mode setting determines if the Loop is played once or continuously. If Play Mode is set to [AP:RVDIR], pressing Play ► will start Playing continuously in the playback direction at which the Speed knob is set.
TimeFactor User Guide Looper Looper Control Knobs In the Looper, the Control Knobs function as follows: Mix: Mix control between the Dry audio input and Looper playback. Dly Mix/Loop Record-Length: When the Loop is Empty, sets the Loop Length. Note that audio recording quality is degraded at slower recording speeds (1/2X and 1/4X).
TimeFactor User Guide Looper On the other hand, you may prefer to Dub only while you’re pressing and holding the Footswitch. To do this, choose one of the two Punch modes. The Dubbing Mode choices are: [D:LATCH] – toggles Dubbing ON/OFF. Dubbed audio is added to the looped audio. [D:PUNCH] – enables Dubbing while the footswitch is held. Dubbed audio is added to the looped audio. [D:REPL-L] – toggles Dubbing ON/OFF. Dubbed audio replaces looped audio.
TimeFactor User Guide Looper the middle (knob set to 12 o’clock). Play Speed resolution is dependent on the setting of the Depth control. Filter: Controls the tone of the looped audio. Tone control filters are placed at both the input and output of the Looper. This allows you to control the tone of the audio that you’re recording and then independently control the tone on playback. Turning to the left cuts low frequencies and turning to the right cuts high frequencies.
TimeFactor User Guide Recording Looper – Record to Dub transition quantizes to the next beat. ► – Record to Play transition quantizes to the next beat. – End recording and stop, quantized to the next beat Dubbing – Dubbing in/out doesn’t do any footswitch action quantization. ► – End Dubbing and Start Playing from Loop Start. This action quantizes to the next tick. – End Dubbing and Stop Playing. This action quantizes to the next beat. Playing – Start Dubbing, no footswitch quantization.
TimeFactor User Guide Catchup Catchup You would expect that when you turn a Parameter Control Knob, the parameter’s value would change instantly and, unless Catchup is enabled, it does. Instant changes, however, may not be desirable for all situations and users. Consider the following example: You have just loaded a Preset and the Preset’s value for Dly Time A is 10 mS. Now, let’s say that the Dly Time A Control Knob happens to be at the full clockwise position corresponding to a delay time of 3000 mS.
TimeFactor User Guide Expression Pedal Expression Pedal An external Expression Pedal can be connected to the rear panel ¼” phone jack. The Expression Pedal can be set up to control any combination of the eight parameters. For proper operation the Expression Pedal should be a simple resistive potentiometer with a maximum value of between 5k Ohms and 20k Ohms. Refer to www.eventide.com/AudioDivision.aspx for information on recommended expression pedals.
TimeFactor User Guide Expression Pedal Depth from 0 to 3 and Speed from 1.00 Hz to 2.00 Hz. Now, you’d like to un-assign Depth and have it fixed at 2 rather than have it change when the Pedal moves. Here’s what you do: 1) Press the Pedal to full heel and turn the Depth knob to 2. 2) Press the Pedal to full toe. Turn Depth away from 2 and back to 2. Remember, you must move the Parameter Control Knob to create the Pedal assignment.
TimeFactor User Guide The Footswitches The Footswitches - Play and Bank Mode TimeFactor’s footswitches are multi-purpose and operate in one of three modes, Play Mode, Bank Mode, and System Mode. In normal use, TimeFactor is in either Play Mode or Bank Mode. These two operating modes are discussed in this section. System Mode is used to set up MIDI, external controls and various system parameters. See the System Mode section of this User Guide for details.
TimeFactor User Guide The Footswitches Note: Tapping with Tempo OFF sets both Delays (A and B) to the same value. Bank Mode In Bank Mode, the Billboard displays the Bank and Preset Number of the currently running Preset. The Left and Middle Footswitches are used to instantly select or Bypass either Preset 1 or Preset 2. Presets are stored in pairs and each pair of Presets is called a Bank. There are a maximum of 50 Banks - a total of 100 Presets. The Billboard displays the current Bank and Preset number.
TimeFactor User Guide The Footswitches pair of Presets is cued but the new Preset is not yet loaded. The next time that either the Left or Middle Footswitch is pressed, the corresponding Preset will load from the cued Bank. Note: If the previous loaded Preset is in Bypass when the footswitch is pressed, the newly loaded Preset will be Active. Note: Edited Presets will be lost if they are not saved before loading another Preset.
TimeFactor User Guide The Footswitches Adjusting Tempo & Tweaking Delays The Encoder can be used to set or tweak the Tempo value in BPM if Tempo is ON. To use the Encoder, first press the Tap Footswitch (you must be in Play Mode) so that the Billboard displays the Tempo value in BPM. Whenever the Tap value is displayed, the Encoder can be turned to adjust the Tempo. While adjusting, the Billboard displays the updated Tempo and the parameter Control Knobs are disabled.
TimeFactor User Guide Saving Presets Saving Presets To save a Preset: 1) Press and hold the Encoder for a few seconds. The current Bank# and Preset# are displayed. Release the Encoder. 2) Turn the Encoder to select the desired Bank# and Preset#. Preset locations are displayed as “BANK#:#” where the first number is the Bank number from 1-50 and the second number is the Preset number (or slot) either 1-2. When saving, all Banks are available even if you’ve limited the number of active Banks.
TimeFactor User Guide Organizing Your Presets Organizing Your Presets in Banks When you save a Preset, you should consider if there is a companion preset with which it will be used. For example, if you have a pair of Presets that you plan to use together in the same song – one for the verse, one for the chorus – placing them in the same Bank will let you instantly switch from one to the other.
TimeFactor User Guide Auxiliary Switches Auxiliary Switches The rear panel Aux Switch stereo phone jack supports up to three independent momentary switches using Tip, Ring and Tip+Ring. Aux Switches do not disable TimeFactor’s Footswitches – the local Footswitches are always active. Aux Switches can be programmed to perform a number of functions and they make it easy to connect a dedicated Tap Tempo switch or Repeat switch or Preset Switch.
TimeFactor User Guide Routing Routing In most cases, the TimeFactor will be connected in one of the ways described earlier. For more advanced users, it offers a number of extra routing modes, which control the functions of the inputs and outputs. These are usually associated with dedicated wiring and amplifiers and can be selected from the UTILITY/ROUTING section of System Mode. These modes will usually be set to match your hardware configuration and will not normally be changed otherwise.
TimeFactor User Guide Routing Wet/Dry (WET.DRY,STEREO) In wet dry mode, either one or two inputs can be used. One output will be dry, meaning that the output is the same as the input (or mix if two inputs are used), whereas the other will be wet, using a mono output version of the effect. If only one input is used, this should be Input 1. The wet connection can be selected on a preset by preset basis. This means that either output 1 will be wet, or output 2. A normal stereo output can also be selected.
TimeFactor User Guide System Menu Tree System Mode System Mode is used for settings that cover the overall system such as the Bypass, Aux Switch, MIDI, Expression Pedal, etc. To Enter/Exit System Mode Press and hold the Encoder and Right Footswitch simultaneously for a few seconds to enter and exit the System Mode. Upon exit you’re returned to the previous mode, either Bank or Play. Upon entering System Mode, you’re at the top-level menu selection.
TimeFactor User Guide System Menu Tree System Menu Tree The system mode is divided into four categories [BYPASS], [AUX SW], [MIDI], and [UTILITY] which are the top-level menu items that appear when entering system mode. In the following, factory default settings are indicated in (bold) [BYPASS] – Select Bypass Mode After entering System Mode, turn the Encoder to select [BYPASS], then press the Encoder to enter Select Bypass Mode. Turn the Encoder to select either [BYP TYP] or [KILLDRY].
TimeFactor User Guide System Menu Tree To assign the switches, first select the TimeFactor parameter or function (the destination) that you want to externally control (Mix for example) and then select the Aux Switch that you want to control it with (the source). To Setup Parameter Destinations Turn the Encoder knob to select an external control destination. Destinations include the TimeFactor parameters and functions that can be controlled by one of the Aux Switches.
TimeFactor User Guide System Menu Tree Or consider Delay Time. You may want to be able to use a remote switch to instantly change from 100 ms of delay to 250 ms. After you’ve selected a Parameter Control Knob, you can set two values for the parameter; a minimum value [MIN VAL] and a maximum value [MAX VAL]. Each time the assigned switch is pressed, the parameter value instantly toggles between the minimum and maximum value.
TimeFactor User Guide System Menu Tree To use the Learn Mode to select the external control source, Press the Right Footswitch again. “LEARN” is displayed prompting you to press an Aux Switch for automatic assignment. Press the Right Footswitch again to exit LEARN mode and revert to manual source selection. Press the Left and Right Footswitches to toggle between Source and Destination to make as many assignments as you wish.
TimeFactor User Guide System Menu Tree [RCV CTL] - Receive Continuous Control Message RCV CTL allows external MIDI Continuous Control messages to be used as assignable controls for the Effects parameters and system control. The idea is to first select the TimeFactor parameter or function that you want to externally control (Mix for example) and then select either MIDI Bend or the MIDI CC with which you want to control it. Here’s how it works: Press the Encoder to select RCV CTL.
TimeFactor User Guide System Menu Tree maximum value. The Billboard displays the knob value while you’re turning the selected parameter knob and times out to display the selected [MAX VAL] when the knob is idle. MIDI CCs send values from 0 to 127. The minimum parameter value will be set when the MIDI CC sends a 0 and the maximum parameter value will be set when the MIDI CC sends 127. MIDI CC values between 0 and 127 are mapped to the selected parameter range.
TimeFactor User Guide System Menu Tree [XMT CC] – Control knobs transmit MIDI Continuous Control The default patch is as follows: PDL>C15, KB0>C22, KB1>C23, KB2>C24,…,KB9>C31 XMT CC makes it possible to use TimeFactor’s Expression Pedal and Control Knobs as MIDI controllers. Here’s how it works: Press the Encoder to select XMT CC. You will see two fields (split display) of the Billboard display showing Control source and Destination assignments.
TimeFactor User Guide System Menu Tree Press the Right Footswitch to select the Bank Preset field (indicated by a flashing right hand arrow) and turn the Encoder to select the Preset. To map another Prg No. to another Preset, simply press the Left Footswitch again to select the desired Prg No. and then the Right Footswitch to map it to the desired Preset. Default map: Prg No. 0-99 map to the 100 Presets starting with Bank 1:1. Press the Middle Footswitch once to back-up one level to MIDI menu.
TimeFactor User Guide System Menu Tree [PGM XMT] – MIDI Program Change Transmit Enable (ON, OFF) Press the Encoder to select. Turn Encoder to set MIDI Program Change transmit ON or OFF. If ON, a MIDI Program change message is transmitted whenever a Footswitch is pressed for Preset load. Press the Middle Footswitch once to back-up one level to MIDI menu. Press the Middle Footswitch twice to go to top level System menu. [SYS ID] – MIDI SysEx ID (1-16) Press the Encoder to select.
TimeFactor User Guide System Menu Tree [CLK OUT] – MIDI Output Clock Enable (ON, OFF) Press the Encoder to select. Turn Encoder to set MIDI Output Clock ON or OFF. If ON, TimeFactor can now be used as a MIDI Clock source. Press the Middle Footswitch once to back-up one level to MIDI menu. Press the Middle Footswitch twice to go to top level System menu. [CLK FLT] – MIDI Clock Filter Enable (ON, OFF) Press the Encoder to select. Turn Encoder to set MIDI Clock Filter ON or OFF.
TimeFactor User Guide [UTILITY] - Utility Functions After entering System mode, turn the Encoder to select [UTILITY], then press the Encoder to enter the Utility functions settings mode. Turn the Encoder to scroll through the following Utility functions. Press the Encoder to select and set: [ROUTE] – Set the Routing Mode (NORMAL, PRE.PST, WET.DRY) See p.44 for information on Routing Modes. Press the Middle Footswitch once to back-up one level to UTILITY menu.
TimeFactor User Guide System Menu Tree [PDLOCK] – Enable Expression Pedal Lock (ON, OFF) Press the Encoder to select. Turn the Encoder to set Pedal Lock ON or OFF. With Pedal Lock OFF, the Expression Pedal can be programmed live at any time. With Pedal Lock ON, Expression Pedal programming is disabled and all Expression Pedal settings are locked. The Pedal Lock feature is a good way to ensure that Expression Pedal settings do not change.
TimeFactor User Guide Restoring Factory Settings/Software Updates Restoring Factory Settings/Software Updates Restoring Factory System Settings To restore System settings, power up TimeFactor while simultaneously pressing the Right Footswitch and the Encoder until [CLEAR SETUP] is displayed. Restoring Factory Presets and System Settings CAUTION: This function will overwrite any Presets that you have saved.
TimeFactor User Guide MIDI Implementation Chart MIDI Implementation Chart Mode 1: Omni On, Poly Mode 3: Omni Off, Poly Basic Channel Mode Note Number After Touch Pitch Bender Control Change Program Change System Exclusive System Common System Real Time Aux Messages Mode 2: Omni On, Mono Mode 4: Omni Off, Mono Function Default Changed Default Messages Altered True Voice Key’s Channels O=Yes X=No 0 : 127 Transmitted 1-16 1-16 3 X X X X X O O Recognized 1-16 1-16 1 X X X X X O O True# O O O O So
TimeFactor User Guide Specifications Specifications Analog I/O Input Impedance 500K ohms Output Impedance 470 ohms Recommended Load Impedance 10K ohms or greater Connectors Input 1 (mono) - ¼ inch mono phone jack Input 2 - ¼ inch mono phone jack Output 1 (mono) – ¼ inch mono phone jack Output 2 – ¼ inch mono phone jack Expression Pedal – ¼ inch mono phone jack Aux Switch – ¼ inch stereo phone jack USB – Type B Socket. Use USB 2.0 cables only.
TimeFactor User Guide Limited Warranty LIMITED WARRANTY Eventide Stompboxes are built to exacting quality standards and should give years of trouble-free service. If you are experiencing problems which are not cleared up or explained as normal in the manual, your recourse is this warranty. What the warranty does and does not cover Eventide Inc.