
Instruction manual


Instruction Manual PCD 650
47
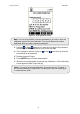
5. Dip the probe in calibration buffer. The tip of the probe must be completely
immersed into the solution. Stir the probe gently to create a homogeneous
solution.
6. The display shows the pH reading. The meter scans through all the
available (un-calibrated) points for the selected buffer group until it finds a
close match within its acceptable calibration window. (Refer Specification
section in page 99 for calibration window values). Once found a match, the
display shows ‘Stable’ indicator.
7. Press ENTER key to confirm the calibration.
8. Rinse the probe with clean water.
9. Place it in the next buffer and follow the steps 5 and 7 to calibrate other
points.
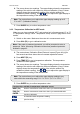
Function Keys available in pH Calibration mode:
TEMP (F1)
Goes to temperature calibration
CLR-C (F2)
Clears previous calibration (if any) after ENTER key is pressed in
confirmation screen
NEXT (F3)
Shows calibration report
ESC (F4)
Exits from calibration and goes back to pH measurement mode
ENTER
Confirms the calibration
(Not functional)
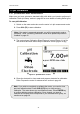
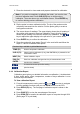
3.3.2 pH Calibration with a User-defined Buffer
If you selected ‘USER’ (Custom) buffer in the pH Setup, the following screen is
shown when you enter calibration mode. You need to prepare at least 2
custom buffers of known pH values.
Figure 42: Calibration screen for user-defined buffer
Note: Custom buffer solution values should be at least 1 pH unit apart
from each other. Otherwise, the meter will not accept the buffer values.