
Instruction manual


Instruction Manual PCD 650
37
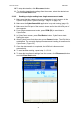
3. Press MEM (F2) key to view stored data. The last stored data entry is
shown in the display (Figure 36). The memory location of the currently
showing data entry is shown in the top-right corner of the screen. (Figure
36).
Figure 36 : Viewing stored data
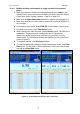
4. To navigate to a particular memory location, press up or down arrow
key to select memory location you intend to navigate to and then press
ENTER key. The meter shows the stored data in the memory location you
selected.
5. Press NEXT (F3) key to return to measurement mode from where you
entered to view memory.
6. Press ESC (F4) key to return to main screen of the measurement mode.
2.14.4 Transferring stored data to Computer (CyberComm) through IrDA
1. Make sure the CyberComm 600 application is up and running (page 12).
2. Make sure the IrDA port of the meter is closer and in-line with IrDA port of
the computer.
3. Go to ‘stored data viewing’ screen as described in above section (Figure
36).
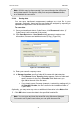
4. Press PRIN (F2). The screen appears for you to select printing options
(Figure 37).This allows you to choose either all memory locations or the
current memory location for transfer.
5. Press up or down arrow key to select your choice and then press
ENTER key.
6. If you have selected ‘All locations’, then you can specify the time interval in
between each transfer. Press up or down arrow key to select time
interval (1 to 50 seconds) and press ENTER key.
7. In CyberComm screen, press Find Device button.
8. Once CyberComm finds the meter, click Connect button to establish
connection.