Instruction Manual TN-100/ T-100 Portable Turbidimeter 68X357701 Technology Made Easy ... Rev. 0.
Preface This manual functions in two ways: first as a step by step guide to help you operate the waterproof TN-100/ T-100 turbidimeter; second, it serves as a handy reference guide. It contains basic instructions that you must follow during the operation, care and maintenance of the instrument. The safety protection provided by this equipment may be impaired if it is used in a manner not described in this manual.
TABLE OF CONTENTS 1 OVERVIEW........................................................................................ 1 1.1 1.2 1.3 1.4 2 3.3 5 Calibration Standards Indexing Calibration Procedure Restoring Factory Calibration 5 5 6 8 TURBIDITY MEASUREMENT......................................................... 10 3.1 3.2 4 1 2 3 4 TURBIDITY CALIBRATION .............................................................. 5 2.1 2.2 2.3 2.
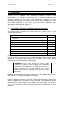
Instruction Manual TN-100/ T-100 1 OVERVIEW Thank you for selecting the waterproof portable TN-100/ T-100 turbidimeter. The TN-100/ T-100 allows you to measure turbidity of an aqueous sample in the field. This instrument operates on the nephelometric principle of turbidity measurement and is designed to meet the criteria specified in ISO 7027 and DIN 27027 standards (see Measurement Principle on page 19). 1.
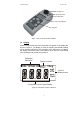
Instruction Manual TN-100/ T-100 Sample Vial Sample Well Index Mark Liquid Crystal Display Keypad Figure 1: Parts of TN-100/ T-100 Turbidimeter 1.2 Display All the LCD segments and annunciators that can appear on the display are shown in Figure 2. The display is used for reporting the turbidity reading and to provide guidance for the operation of the instrument. In addition, the display has several other annunciators that are used to communicate error messages and provide user guidance.
Instruction Manual 1.3 TN-100/ T-100 Keys and Functions The keypad has five keys: ON/OFF, CAL, ▲, ▼, and READ/ENTER. Keys Functions ON/OFF - Powers on and shuts off the meter. With the auto switch-off feature the meter automatically shuts off 20 minutes after last key press. CAL - Initiates the calibration mode of the meter. When pressed, the meter is set to accept the first calibration standard.
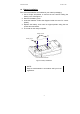
Instruction Manual 1.4 TN-100/ T-100 Battery Installation Four AAA-sized batteries are included in your meter’s packaging: 1. Use a Philips screwdriver to remove the two screws holding the battery cover. See Figure 3. 2. Remove the battery cover. 3. Insert the batteries. Follow the diagram inside the cover for correct polarity. 4. Replace the battery cover onto its original position using the two screws removed earlier. 5. The meter is now ready to operate.
Instruction Manual TN-100/ T-100 2 TURBIDITY CALIBRATION The TN-100/ T-100 turbidimeter was calibrated and tested prior to leaving the factory. Therefore, it is possible to use the instrument directly out of the box. However, re-calibration of the instrument is recommended to help you become familiar with the operation of the instrument and the calibration procedures. In addition, re-calibration is recommended at least once every month for optimum accuracy.
Instruction Manual 2.3 TN-100/ T-100 Calibration Procedure 1. Place TN-100/ T-100 turbidimeter on a flat and level surface. 2. Select the calibration function of the instrument by pressing the CAL button once. The [CAL] annunciator will blink momentarily and the meter will prompt for the first calibration standard CAL 1 standard (800 NTU). 3. Insert the CAL 1 standard (800 NTU) into the sample well, aligning the mark on the vial with the mark on the meter. See Figure 10 on page 12. 4.
Instruction Manual TN-100/ T-100 CAL CAL 3 NTU Place the next CAL 3 standard into the sample well Flashes about 5 times CAL 3 20.0 NTU CAL 1 READ ENTER NTU CAL 3 NTU CAL 1 800 NTU Flashes about 10 times or more Place the CAL 1 standard into the sample well READ ENTER CAL 4 NTU CAL 1 Place the next CAL 4 standard into the sample well NTU CAL 4 0.
Instruction Manual 2.4 TN-100/ T-100 Restoring Factory Calibration The TN-100/ T-100 turbidimeter allows you to reset the meter back to the factory default calibration values. This feature is extremely useful when there are errors in calibration or when you have new calibration standards. 1. With the meter switched off, press ▲ and ON/OFF keys simultaneously for about 2 seconds. 2. The display will flash [URST] (User-Reset) for 2 seconds and show [No], which is the default value. 3.
Instruction Manual TN-100/ T-100 METER OFF Press UP and ON/OFF keys simultaneously and hold for 2 seconds before releasing ON OFF Press UP or DOWN key to select YES or No To restore factory calibration READ ENTER READ ENTER [-Rd-] will flash 10 times The meter is now ready for measurement Figure 5: Restoring Factory Calibration 9 To retain last calibration values without retrieving factory calibration.
Instruction Manual TN-100/ T-100 3 TURBIDITY MEASUREMENT 3.1 General Information The waterproof TN-100/ T-100 turbidimeter allows you to measure the turbidity of a grab sample. The turbidity is reported in Nephelometric Turbidity Units (NTU). Readings above 1000 NTU are outside the range of this instrument. NOTE: Before switching on the TN-100/ T-100 turbidimeter, a sample vial MUST be placed in the sample well. You can use any of the calibration standards for this purpose.
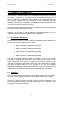
Instruction Manual TN-100/ T-100 3.2.1 Preparation of Sample Vial 1. 2. 3. 4. Grab liquid with the plastic bottle provided. Obtain a clean and dry sample vial (Figure 7). Take care to handle the sample vial by the top. Rinse the vial with approximately 10 ml of the sample water, capping the vial with the black screw cap and gently inverting it several times. Discard the used sample and repeat the rinsing procedure two more times. 5.
Instruction Manual TN-100/ T-100 3.2.2 Measurement Procedure 1. Place TN-100/ T-100 turbidimeter on a flat and level surface. 2. Place the sample vial inside the sample well and align the vial’s mark with the meter’s index mark. See below. Align index mark on the sample vial with the index mark on the TN-100/ T-100 turbidimeter IMPORTANT: Place meter on a flat and level surface. DO NOT hold it on hands while operating the meter.
Instruction Manual TN-100/ T-100 NOTE: 1. NEVER pour liquid directly into the sample well of the instrument. Always use a vial. The instrument will only accurately measure the turbidity of a sample when vials sealed with the black caps are used. The black cap serves as both seal and a light shield. 2. NEVER attempt to clean the sample well. The optics may be damaged. 3. The instrument will automatically power off 20 minutes after the last key press for battery conservation. 3.
Instruction Manual TN-100/ T-100 For continuous measurement: 1. Make sure the meter is sitting on a flat and level surface and is in measurement mode. The display shows the last measured value or [STbY]. 2. Place the sample vial in the sample well. 3. Press READ/ENTER key and hold. See Figure 13. 4. Wait for the reading to stabilize before rotating the sample vial. NOTE: During continuous measurement, the display is updated every 2 seconds. The displayed reading may not be the actual turbidity value.
Instruction Manual 4 TN-100/ T-100 TROUBLESHOOTING GUIDE The TN-100/ T-100 turbidimeter routinely performs self-diagnostics, and will automatically generate messages to provide you with specific diagnostic information. These messages are for your use and do not indicate a reduction in the performance of the instrument or a failure of any component in the instrument, unless otherwise stated in this list. LCD Message Description Correction Actions ERR 1 Calibration Error.
Instruction Manual TN-100/ T-100 5 ROUTINE MAINTENANCE The supplied carrying case is optimal for protecting the instrument. If you do not plan on leaving the instrument in the supplied carrying case, when not in use, ensure that the instrument has been turned off and that a clean sample vial fitted with a black cap has been placed in the sample well. This will ensure that a minimal amount of dust and/or debris will be able to settle on the optics of the instrument. 5.
Instruction Manual TN-100/ T-100 6 ACCESSORIES The items shown below are recommended accessories and replacement parts for the instrument. Item Description Eutech Instruments Oakton Instruments Order Code. Order Code. Waterproof TN-100/ T-100 portable turbidimeter with set of 4 calibration standards (800, 100, 20.0 & 0.02 NTU), set of 3 sample vials, lint-free cloth, silicone oil, batteries – all in a rugged carrying case.
Instruction Manual TN-100/ T-100 7 SPECIFICATIONS MODEL NO. TN-100/ T-100 Measurement Method ISO 7027 compliant nephelometric method (90°) Measurement Range 0 to 1000 NTU Automatic Range Selection 0.01 – 19.99 NTU 20.0 – 99.9 NTU 100 – 1000 NTU Resolution 0.01 NTU (0 – 19.99 NTU) 0.1 NTU (20 – 99.9 NTU) 1 NTU (100 – 1000 NU) Accuracy ±2% of reading for 0 to 500 NTU; ±3% of reading for 501 to 1000 NTU. Repeatability ± 0.
Instruction Manual TN-100/ T-100 8 ADDENDUM 1: TURBIDITY 8.1 Definition Turbidity is defined as an “expression of the optical property that causes light to be scattered and absorbed rather than transmitted in straight lines through the sample.”1 That is, turbidity is the measure of relative sample clarity, not colour. Water with cloudy or opaque appearance will have high turbidity, while water that is clear or translucent will have low turbidity.
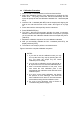
Instruction Manual TN-100/ T-100 Figure 14 shows the waterproof TN-100/ T-100 turbidimeter basic optical system. It includes a light source and a detector to monitor the light scattered at 90° with respect to the incident beam. Scattered Light 90° Transmitted Light Lamp Lens Glass Sample Vial Figure 14: Basic Nephelometric arrangement for turbidity measurements 8.
Instruction Manual TN-100/ T-100 9 ADDENDUM 2: GUIDE TO GOOD MEASUREMENT TECHNIQUE Turbidity is a very complex analytical measurement which can be affected by many factors. Some are inherent in the instrument’s design such as angle of detection, light beam aperture, incident beam wavelength and colour sensitivity of the photocell.
Instruction Manual TN-100/ T-100 Degassing is recommended even if no bubbles are visible. There are three methods commonly used for degassing: Addition of a surfactant: This involves adding a surfactant to the water samples to lower the surface tension of the water, thereby releasing trapped gasses. Application of a partial vacuum: Partial vacuum can be created by using simple syringe or vacuum pump. (This is only recommended for ultra-low turbidity measurement).
Instruction Manual 9.6 TN-100/ T-100 Calibration 1. Do not open the vials with calibration standards. 2. Check that the standards have not expired. 3. Make sure the calibration vials are free of dust, smudges and scratches before use. 4. Conduct the calibration in the same manner each time. Variations in how calibration is performed could yield inaccurate measurements. 5. It is very important that the user(s) who perform calibration have been trained to do so.
Instruction Manual TN-100/ T-100 10 WARRANTY The TN-100/ T-100 meter is supplied with a 2-year warranty from manufacturing defects and calibration standards for 6 months. If repair or adjustment is necessary and has not been the result of abuse or misuse within the designated period, please return – freight pre-paid – and correction will be made without charge. Eutech Instruments/ Oakton Instruments will determine if the product problem is due to deviations or customer misuse.
Instruction Manual TN-100/ T-100 CALIBRATION CHECKLIST Month ____________ Date Initials Year ___________ Value Standard 25 Comments
For more information on Eutech Instruments/ Oakton Instruments’ products, contact your nearest distributor or visit our website listed below: Oakton Instruments P.O Box 5136, Vernon Hills, IL60061, USA Tel: (1) 888-462-5866 Fax: (1) 847-247-2984 E-mail: info@4oakton.com Web-site: www.4oakton.com Eutech Instruments Pte Ltd Blk 55, Ayer Rajah Crescent, #04-16/24 Singapore 139949 Tel: (65) 6778 6876 Fax: (65) 6773 0836 E-mail: marketing@eutechinst.com Web-site: www.eutechinst.