
User Guide


Instruction Manual pH 510/ Ion 510
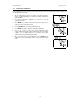
8
7.00
CAL
ERR
pH
pH
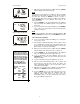
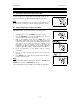
4.05
4.01
CAL
READY
pH
pH
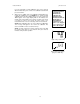
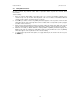
10.01
CAL
pH
pH
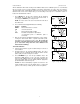
F
i
g
ure 2: Calibration erro
r
7. Wait for the measured pH value to stabilize (when the [READY]
indicator displays in the left-hand corner).
NOTE
If the upper measured display is not within the buffer acceptable
window (refer to Hint below) an error message and the electrode
icon flash upon pressing the ENTER key. Refer to Section 7,
Troubleshooting Guide. Check electrode condition and recalibrate.
Press CAL/MEAS key to exit calibration and resume to the
measurement mode.
8. Press the ENTER key. The upper display flashes the calibration
value momentarily. The calibration point is successfully stored
in the meter.
9. If you are performing a one-point calibration, press CAL/MEAS
key to return to the measurement mode and start taking pH
readings (see Figure 1).
NOTE
To exit from pH calibration mode without confirming calibration, DO
NOT press ENTER key in step 9. Press the CAL/MEAS key instead.
Two to Third Point Calibration
10. If you are performing a multi-point calibration (i.e. second-point
or more) go to step 11.
11. Rinse the probes with deionized water or rinse solution to avoid
cross contamination, and place them in the next pH buffer, say
pH 4.01 buffer. The meter automatically switches to the next pH
buffer solution selected in the lower display
12. Wait for the measured pH value to stabilize (when the [READY]
indicator displays in the left-hand corner). (see Figure 3).
13. Press the ENTER key. The upper display flashes the calibrated
value. The calibration point is now stored in the meter.
14. If you are performing a two-point calibration, then press the
CAL/MEAS key to return to the measurement mode and start
taking pH readings.
15. If you are performing a three-point calibration go to step 16.
16. Rinse the probes with deionized water or rinse solution, and
place them in the next pH buffer, say pH 10.01 buffer. The
meter automatically switches to the next pH buffer solution
selected in the lower display.
17. Wait for the measured pH value to stabilize. (For the third point
calibration, the [READY] indicator will not be displayed.
18. Press the ENTER key once the value has been noted to be
stable. The upper display flashes the calibration value. The
calibration point is now stored in the meter. The meter
automatically returns to the pH measurement mode after a
three
-
point calibration is perfo
rmed.
Figure 3: 2nd-point calibration
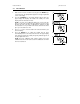
HINT: If the selected
buffer value is not within
the accepted window (see
below) from the measured
value: the electrode and
buffer icon blink and ERR
annunciator appears next
to the secondary display.
(See Figure 2 above)
Press CAL/MEAS key to
exit the ERR condition.
Window of Accepted
Values:-
USA 4.01 ±1.00
7.00 ±1.50
10.01 ±1.00
−−−−−−−−−−−−−−−−−−−−
NIST 4.01 ±1.00
6.86 ±1.25
9.18 ±1.00
Figure 4: 3rd-
point calibration