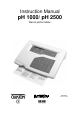
Instruction Manual pH 1000/ pH 2500 Bench pH/Ion Meter 68X090800 Rev. 5 07/03 Technology Made Easy ...
Instruction Manual pH 1000/ 2500
Instruction Manual pH 1000/ 2500 Preface Thank you for choosing the pH 1000/ 2500 bench meter series. This manual serves to explain the use of the pH 1000/ 2500 Bench meter. The manual functions in two ways, firstly as a step-by-step operational guide to help you familiarize with the meter’s features and functions. Secondly, it serves as a handy reference guide. This instruction manual is written to cover as many anticipated applications and uses of the pH 1000/ 2500 bench meter as possible.
Instruction Manual pH 1000/ 2500 TABLE OF CONTENTS 1 INTRODUCTION 1 2 METER INFORMATION 2.1 2.2 2.3 2.4 2.5 2.6 1 Meter Parts Customized LCD Slide Out Card Rear Instrument Panel AC/DC-Adapter Electrode 1 1 1 1 2 2 3 KEYPAD FUNCTIONS 3.1 3 Primary & Secondary Functions of Keypad 3 4 STARTING UP THE METER 4.1 4.2 4.3 4.4 4.
Instruction Manual 14 ELECTRODE CARE 14.1 14.2 14.
Instruction Manual 1 pH 1000/ 2500 INTRODUCTION Thank you for selecting pH1000/ 2500 bench meter. This step-by-step instruction manual gives you a detailed description on the use and operation of features on the meter. There are 2 models: pH1000 (pH/ mV/ Relative mV/ Temperature/ RS232C) and pH2500 (pH/ Ion/ mV/ Relative mV/ Temperature / RS232C). These meters are designed to be user-friendly while providing unprecedented levels of accuracy, repeatability and reliability.
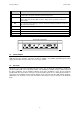
Instruction Manual pH 1000/ 2500 Connector ATC Function For phono jack connection from the temperature probe for Automatic Temperature Compensation. The probe should be a thermister type probe. INPUT For connecting sensors with a BNC connector to the meter. The meter accepts any pH, ORP or ISE electrode with a BNC connector. Always make sure that the connector is clean and dry. REF For connection to the pin tip type reference electrode normally used with half cell (mono) type pH or ISE electrodes.
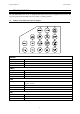
Instruction Manual 3 pH 1000/ 2500 KEYPAD FUNCTIONS The pH 1000/ 2500 bench meter is equipped with large tactile response keypad for ease of use. All keys have primary function with some keys having secondary functions. 3.1 Primary & Secondary Functions of Keypad ON/OFF Primary Function Turns meter on or off. Secondary Function None Numeric Value None SHIFT Primary Function Press to access the secondary functions of the meter.
Instruction Manual pH 1000/ 2500 CAL/MEAS Primary Function Press to toggle between measurement and calibration modes of the meter - pH, Temperature, mV, Relative mV and Ion. Also use as exit from SETUP mode, secondary functions and to abort operation while in calibration mode. Secondary Function None Numeric Value None 1 / MODE Primary Function Select one of four measurement modes: pH/mV/Relative mV/Ion.
Instruction Manual pH 1000/ 2500 7 / CAL EDIT / BEEP Primary Function Press to edit pH buffer value while you are in pH calibration mode. Secondary Function Turns on or off ‘beep’ sound whenever a key-press is depressed. Numeric Value 7 8 / ALARM / READY Primary Function Enter the high and/or low alarm values. Secondary Function Turns on or off the READY function. Numeric Value 8 9 / ACTIVATE / SET TIMER Primary Function Press to start timer countdown.
Instruction Manual 4 4.1 pH 1000/ 2500 STARTING UP THE METER Connecting the Sensor Electrode Slide the sensor electrode connector of the electrode over the INPUT BNC socket. Then push the connector into the socket and turn the connector clockwise to lock into position. Do not use excessive force. This applies to combination pH/ORP/ISE electrodes. For half-cell sensors where a reference electrode is used, connect the sensor connector to socket marked (REF).
Instruction Manual 5 pH 1000/ 2500 TURNING THE METER ON AND OFF Once the AC/DC adapter is connected and powered on, the meter beeps and the full LCD lights up for a few seconds to display all segments as a self-diagnostic test of the LCD. Then the meter will display the current time. To access the meter functions, press ON/OFF key. The meter beeps and performs a diagnostic test before going into the pH measurement [MEAS] mode. To turn the meter off, press ON/OFF key within the operation mode.
Instruction Manual HINT: For best results, perform at least a 2-Point Calibration using buffers that bracket the expected range of measurement. If a 1 Point Calibration is to be used, it is highly recommended that measurement be performed only at points close to the calibration value. pH 1000/ 2500 6 CALIBRATION 6.1 pH Calibration (With ATC) The pH 1000/ 2500 bench meter is capable of multi-point calibration up to 5 points for enhanced full range accuracy using standard pH buffer options at pH 1.
Instruction Manual 6.1.3 pH 1000/ 2500 Option 2 - Non-Standard Buffers 1. Press CAL EDIT key after entering into pH calibration mode. The buffer icon blinks at the bottom left hand corner of the LCD. Select the buffer value by entering the value directly via the keypad numeric keys. For example, 9.18. The value entered is displayed in the secondary display. Please ensure the correct pH buffer sample is available during calibration. 2.
Instruction Manual 6.3 pH 1000/ 2500 Special Topic: CAL EDIT (for Custom/NonStandard Buffers) The pH 1000/ 2500 bench meter allows non-standard or custom buffer solutions to be used for calibration. This is especially useful in applications where the use of special or non-standard pH buffer solution is required. To use, follow the steps as described. 1. When in the CAL (pH) mode, press CAL EDIT key. Refer to section 6.1.3 for further details. 2. The buffer icon at the bottom of the LCD blinks. 3.
Instruction Manual 6.5 pH 1000/ 2500 Relative mV Calibration Relative millivolt calibration is normally used for Redox sensors in which you set a base value. For the selection and preparation of appropriate calibration solutions, consult the instruction manuals for the Redox/ORP electrodes. 1. Make the appropriate electrode connections and switch on the meter. 2. Select [Rel] [mV] mode by pressing MODE key repeatedly until the Relative mV mode is accessed. 3.
Instruction Manual pH 1000/ 2500 6.6 Ion Calibration (for pH 2500 only) Ion calibration is used for ion selective electrodes (ISE). For the selection and preparation of appropriate calibration solutions, consult the instruction manuals for the list of ISE probes and calibration standards available. 1. Make the appropriate electrode connections and switch on the meter. 2. Select mode by pressing MODE key repeatedly until the Ion mode is accessed, as indicated in the LCD.
Instruction Manual 6.7 pH 1000/ 2500 Temperature Calibration In this calibration procedure, the ATC probe is attached to the meter and the ATC annunciator displays on the right hand side of the LCD. 1. Dip the temperature probe into a solution of known temperature, such as a temperature bath for a few minutes until the temperature probe stabilizes. Determine the temperature of the sample to be measured using an accurate thermometer. 2.
Instruction Manual pH 1000/ 2500 7 7.1 MEASUREMENT: READY, CONTINUOUS AND HOLD Measurement in the READY Mode The READY annunciator appears the readings are stable at the top left corner of the LCD. The reading is held as long as the variation of readings is within a range. (For pH, tolerance is +/- 0.02 pH. For mV, tolerance is +/- 0.3 mV < 400 mV and +/- 1.2 mV > 400 mV). 1. Rinse the pH electrode using de-ionized or distilled water prior to use.
Instruction Manual 7.4 pH 1000/ 2500 Measuring pH The meter automatically goes to the pH measurement mode when you power it on. 1. If you are not in the pH measuring mode, press MODE key until the mode annunciator at the bottom of the LCD shows that the meter is in the pH mode. 2. To measure in READY mode, follow steps (1) to (3) of the steps in “Measuring in the READY Mode”. 3. The primary display shows the pH reading and the secondary field shows the temperature. 7.5 Measuring mV 1.
Instruction Manual pH 1000/ 2500 7.6 MODE Measuring Relative mV 1. If you are not in Relative mV measuring mode, press MODE key until the mode annunciator at the bottom of the LCD shows that the meter is in the Relative mV mode. 2. To measure in READY mode, follow steps (2) to (3) of the steps in “Measuring in the READY Mode”. 3. The primary display shows the corrected Relative mV reading and the secondary field shows the temperature. The resolution will be 0.1 mV within the +/-399.
Instruction Manual 8 pH 1000/ 2500 SETUP FUNCTIONS AND KEYS The advanced SETUP mode allows user customization of the meter’s operation to individual’s preferences and defaults. To enter into the SETUP mode, press the SETUP key while in any measurement mode. Use S or T key to select options if changes are required. Press YES key to confirm selection in each program. The display will automatically scroll to the next program in sequence.
Instruction Manual 9 pH 1000/ 2500 PROGRAM 1: LAST CALIBRATION TIME, DATE AND TEMPERATURE This program allows you to view the last pH calibration performed time and date (month, day and year). Calibrated pH buffer and temperature values are also available for viewing. Program 1.0: Last Calibration Time Viewing only. No options. Press YES to go to next program. Program 1.1: Last Calibration Month Viewing only. No options. Press YES to go to next program. Program 1.2: Last Calibration Date Viewing only.
Instruction Manual pH 1000/ 2500 10 PROGRAM 2: MEMORY RESET AND AUTOOFF FUNCTION This program allows you to clear all the memory stored and to activate the Auto-Off function. Program 2.0: Memory Reset Selecting ON clears all data in memory including pH calibration data and also Relative mV calibration data. The meter automatically switches off and the clock appears. To proceed, switch the meter on again. If reset is required, press S or T to select the ON option and confirm by pressing YES. Program 2.
Instruction Manual pH 1000/ 2500 12 PROGRAM 4: COMMUNICATION SETUP Program 4 allows you to retrieve SETUP settings as well as to set up communication parameters for connection to external devices such as the printer or PC. Set the options to match with other optional devices. Program 4.0: Meter Setup Printing Select the ON option using S or T key if you want the settings as well as all calibration data to be printed out via the RS232C port. This is useful for you to see all setup functions at a glance.
Instruction Manual pH 1000/ 2500 SUMMARY OF SETUP OPTIONS Program Function Active Keys Options Factory Defaults Last pH Calibration Information P1.0 Last Calibration Time - - - P1.1 Last Calibration Month - - - P1.2 Last Calibration Date - - - P1.3 Last Calibration Year - - - P1.4 Last Calibration Temperature - - - P1.5 Display Calibrated Points S or T Only calibrated points will be displayed. “- - - - ” No Calibration. P2.
Instruction Manual pH 1000/ 2500 12.1 Switching pH Resolution Ensure that you are in the pH measurement mode. It does not matter which measurement mode you are in as the meter only toggles the pH resolution (as the resolution of mV and Relative mV settings is automatically set). Press SHIFT and then RESLN key. The LCD shows the resolution to be set. After two seconds the meter reverts to its normal operation.
Instruction Manual pH 1000/ 2500 12.4 Viewing pH Electrode Offset This function is diagnostic in nature and allows you to view the offset of the pH electrode in mV. The offset is based on the pH 7.00 buffer calibration. If the calibration has yet to be performed at this pH, the meter shows 00.0 mV (which is the ideal). The mV shows the efficiency of the electrode and how much the meter has to compensate for it. Generally a value of +/- 15 mV is acceptable with the ideal being 0.0 mV. 1.
Instruction Manual pH 1000/ 2500 12.7 Setting the High and Low Setpoint Alarm (pH/mV/Relative mV) An alarm can be set to give an audible warning to you whenever the set limits for pH, Relative mV or mV has been exceeded. Hint: You can set individual high and low setpoints for each of the measurement modes of pH, Relative mV and mV. The individual setpoint alarms will be automatically activated whenever the measurement mode of the set alarm is entered. 1. Press ALARM.
Instruction Manual pH 1000/ 2500 12.9 Setting the Timer From the MEAS mode, press the SHIFT followed by SET TIMER key. The meter shows that the secondary function is on. If no time has been set, the LCD displays “- - - -”. Use the numeric keys to enter the time required. Press YES to confirm or NO to re-enter value. Upon confirmation, the meter returns to the measurement mode. Note: The timer is NOT activated until you press the ACTIVATE key on the keypad. 12.10 Activating the Timer 1.
Instruction Manual pH 1000/ 2500 12.11 Memory Input Functions and Options The meters can store up to 16 sets of values (pH/mV/Relative mV together with temperature). The Last-In-First-Out (LIFO) method of the memory management is used. When the memory is full, the value stored in the first memory location will be erased to create space for the new input value. 1. During any measurement operation, press MI. 2. The MEM annunciator flashes to indicate that the data has already been stored into memory.
Instruction Manual pH 1000/ 2500 12.12 Print Functions and Options This function allows the printing of measurements directly to a peripheral device via the RS232C port of the meter. 1. Set the mode to the parameter that you wish to print, in the MEAS mode. 2. Press PRINT key to send the displayed reading. The printer indicator will flash to show that data is being sent. 3. ‘ERR“ symbol blinks if the cable is not connected properly or setup does not match PC requirements. 4.
Instruction Manual pH 1000/ 2500 13 TROUBLESHOOTING AND ERROR MESSAGES TROUBLESHOOTING PROBLEM CAUSE Power ON but no display. AC adapter not connected properly. Connect AC adapter properly. Unstable Reading. Electrode submersion in sample is insufficient. Place electrode deeper into sample. Broken electrode. Replace electrode. External noise causing instability in reading. Remove or switch off interfering motor. Dirty electrode. Clean Electrode. Reactivate if necessary. Dirty electrode.
Instruction Manual pH 1000/ 2500 14 ELECTRODE CARE 14.1 Electrode Activation DO NOT touch or rub the glass bulb. If you follow the strong and maintenance procedure, you can use your electrode immediately. If the electrode responds sluggishly or drifts, the bulb may be dehydrated. Immerse the electrode in an ideal storage solution such as electrode storage solution or pH 4 buffer solution for 1-2 hours to hydrate it. See Storing pH/ORP electrodes below.
Instruction Manual pH 1000/ 2500 15 METER SPECIFICATIONS Model pH 1000 pH Range -2.00 to 19.99 pH Resolution 0.01 / 0.1 pH (user-selectable) ± 0.01 / 0.1 pH Relative Accuracy ± 1999 mV mV Range Resolution Accuracy 0.1 mV within ± 399.9, 1 mV beyond ± 1000 mV ± 0.2 mV within ± 399.9, ± 2 mV beyond ± 1000 mV ± 1999 mV Relative mV Range Resolution Accuracy Ion Concentration Range pH 2500 0.1 mV within ± 399.9, 1 mV beyond ± 1000 mV ± 0.2 mV within ± 399.
Instruction Manual pH 1000/ 2500 16 ACCESSORIES Consult your Authorized Distributors for these items and other range of specialized pH electrodes or Ion Selective Electrodes.
Instruction Manual pH 1000/ 2500 Calibration Solutions Item Eutech Instruments Oakton Instruments Ordering Code Ordering Code pH 4.01 calibration buffer (480 mL) (1 pint) EC-BU-4BT 00654-00 pH 7.01 calibration buffer (480 mL) (1 pint) EC-BU-7BT 00654-04 pH 10.
Instruction Manual pH 1000/ 2500 17 WARRANTY The pH 1000/ 2500 bench meter is supplied with a 3-year warranty from manufacturing defects and electrodes for 6 months from the date of purchase. If repair or adjustment is necessary and has not been the result of abuse or misuse within the designated period, please return – freight pre-paid – and correction will be made without charge. Eutech Instruments/ Oakton Instruments will determine if the product problem is due to deviations or customer misuse.
NOTES
For more information on Eutech Instruments/ Oakton Instruments’ products, contact your nearest distributor or visit our website listed below: Oakton Instruments P.O Box 5136, Vernon Hills, IL60061, USA Tel: (1) 888-462-5866 Fax: (1) 847-247-2984 E-mail: info@4oakton.com Web-sites: www.4oakton.com Eutech Instruments Pte Ltd Blk 55, Ayer Rajah Crescent, #04-16/24 Singapore 139949 Tel: (65) 6778 6876 Fax: (65) 6773 0836 E-mail: marketing@eutechinst.com Web-site: www.eutechinst.