
User Guide


21
5.3 Taking Measurements
Be sure to remove the electrode soaker bottle or
protective rubber cap on the electrode before
measurement.
To take readings:
1. Rinse the probe with de-ionized or distilled water
before use to remove any impurities adhering to
the probe body. If the pH electrode has
dehydrated, soak it for 30 minutes in Eutech Instruments electrode storage solution or
2M – 4M KCl solution (sold separately).
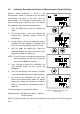
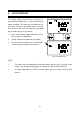
2. Press ON to switch on meter. The MEAS annunciator appears on the top center of the
LCD. The ATC indicator appears in the lower right-hand corner to indicator Automatic
Temperature Compensation (section 5.2 on Manual Temperature Compensation).
3. Dip the probe into the sample.
4. When dipping the probe into the sample, the sensor or the glass bulb of the electrode
must be completely immersed into the sample. Stir the probe gently in the sample to
create a homogeneous sample.
5. Allow time for the reading to stabilize. Note the reading on the display.
6. To toggle between pH and mV (or Rel mV) readings, press the MODE key.
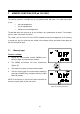
The READY mode informs you that the readings are stable within a range of ±0.01 pH. When
this occurs, the mode annunciator READY appears on the top left corner of the display. The
reading is held until the measured value exceeds the specified range when the READY
display is turned off.
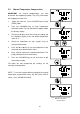
NOTE FOR pH 100 ONLY:
•
The READY mode is turned on by default i.e. when the SETUP (READY) mode is
not programmed. You can verify this by going through SETUP mode (See section
9.3.2). If READY mode is switched off, the annunciator will not be displayed.
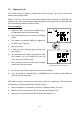
•
For ATC measurements, attach the probe to the CyberScan. The ATC mode
annunciator lights up. Insert the probe into the solution to be measured so that the
sample temperature can be recorded and compensated for.
Figure 23: Measurement mode